Grain Kalimba – Pure Data Patch

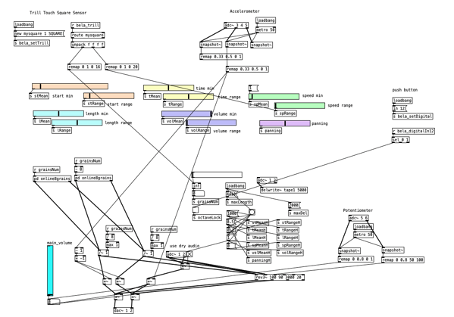
In the following image you can see the main pure data patch that is running on the bela board and over which most of the parameters you can interact with are modulated. The actual granular synthesis is taking place in different subpatches. Now let’s look at the different parameters you can interact with directly on the Kalimba with the sensors.
Pure Data Patch

On the top left corner Pure Data is receiving signals from the touch sensor, which are values between 0 and 1. These values are remapped to fit the needed parameters that we want to modulate. The x-axes of the square touch panel which is from left to right controls the grain number. If your finger touches the panel on the left side, no grain is produced, and you just hear the dry audio signal of the kalimba. The more you slide your finger to the right, the mor grains will appear. On the y-axes you control the speed range of each grain which also means the pitch of course. On the bottom of the panel the grains sound kind of similar and are in a closer pitch range. When you slide your finger upwards much higher and lower grains will appear.

The accelerometer controls the dry/wet signal of the grains and the dry audio signal. When the kalimba is held straight you can hear both the dry signal and the grains equally loud. If you tilt the kalimba to the right, the dry signal fades out and the grains get louder. The exact opposite happens, if the kalimba is tilted to the left side.

In the patch there is a function called Octave Lock which is activated by the small push button. It allows the grains to alter the pitch only in octaves. This is very helpful when you want to play exact harmonies, because otherwise the pitch of the grains is too random.

I also added a reverb object in pure data called the rev3~. The amount of this reverb is controlled via the potentiometer on the right side. The reverb is applied both to the dry signal and the grains. The second potentiometer is controlling the overall volume. It is placed on top because you don’t need the volume knob to be controlled while playing.

Further Steps

The next steps would be to figure out the exact position of the sensors. Some problems appear now for example when you play the kalimba with your thumbs you also strike the touch panel sometimes, which needs to be fixed. Of course, in the final product all the electronics including the bela board will be placed inside of the kalimba and will hopefully look not as chaotic as right now!
Film Sound Design – Seeing Through Sound

Sound is an integral part of movies. What’s interesting is that our vision and hearing kind of blend into one when it comes to film sounds. If the sound design is good enough, we can almost “see” through sound, because the auditory cues give us an idea of what might be hapening in the visual department.

Sound design components include sound effects or SFX sound design, mixing, Foley sound design, dialogue, and music. Sound design is the final and most important element needed to create an immersive experience for the audience.

Examples of Sound Design:

  • Lightsaber: combination of a film projector’s motor hum, TV interference, and waving a mic in front of the speaker to create “swooshing” sabers
  • Velociraptor: mixing a dolpin’s shriek with a walrus’ roar to create the raptor’s screech
  • Saving Private Ryan — recording period artillery to maximize the authenticity of battle scenes

Oftentimes, Sound Design is a bit overlooked within the film production timeline. Most people who are not in the sound industry would say that visuals are the main part of the movie, but the thing with sound design is that when it’s really good, it’s unnoticeable. But imagine watching a movie with no sound design? It would be quite weird. Only by removing sound completely can we see how much of an important role sound plays in movies.

Sound design can be used in guiding us to focus on the most relevant elements within a movie scene. For example, a movie can be done from a 1st or 3rd person perspective when it comes to sound design. Also tension doesn’t have to be built by growing crescendos- in fact, in “Munich”, Spielberg starts removing sound elements from a scene when building tension, making us focus only on the mail element in the scene, as well as a dynamic range difference once a particular scene reaches a climax. Here is a video explainig Spielberg’s practice in detail, as well as comparing the original sound design with a remake done by this channel:

Sources:

https://www.studiobinder.com/blog/what-is-sound-design-for-film/

https://www.researchgate.net/publication/342313340_Seeing_Film_Through_Sound_Sound_Design_Spatial_Audio_and_Accessibility_for_Visually_Impaired_Audiences

Soundeffekte als lückenlose Loops

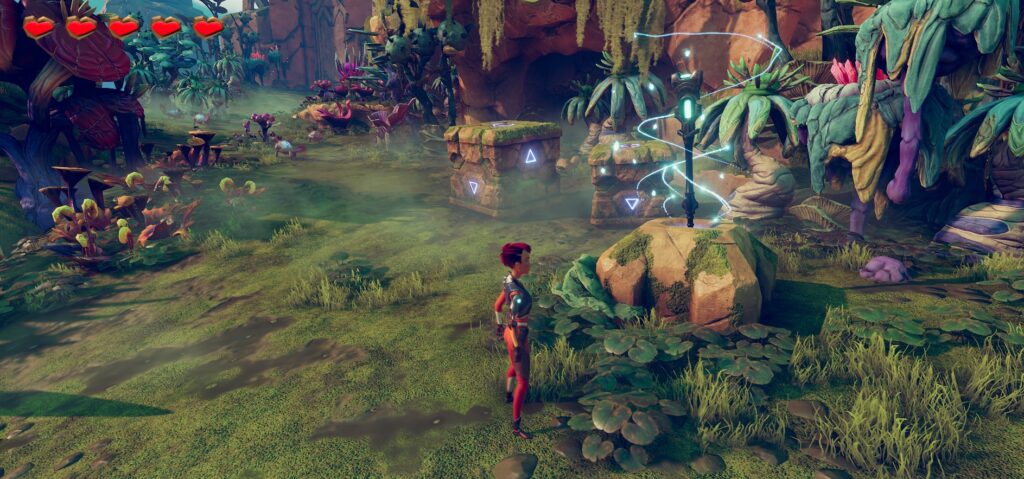
In meiner praktischen Studienarbeit arbeite ich aktuell an einem Sound Design für ein 3D Adventure Game. In diesem gibt es Elemente, die in einer Endlosschleife geloopt werden sollen. Klassisch zählen hierzu Atmosgeräusche, fließendes Wasser, Wind und auch der Soundtrack. In meinem Fallen handelt es sich um einen Zauber-/Lichteffekt, der um einen aufsammelbaren Stab herumschwirrt.

Zauberstab-Lichteffekte sollen in Dauerschleife klingen

Die meisten Game Engines bieten Funktionen, mit welchen Soundfiles geloopt werden können.

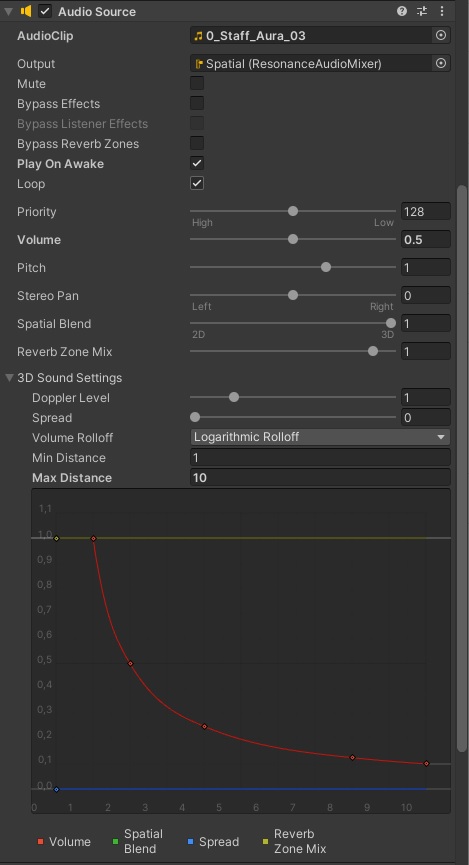
Loop-Funktion in Unity

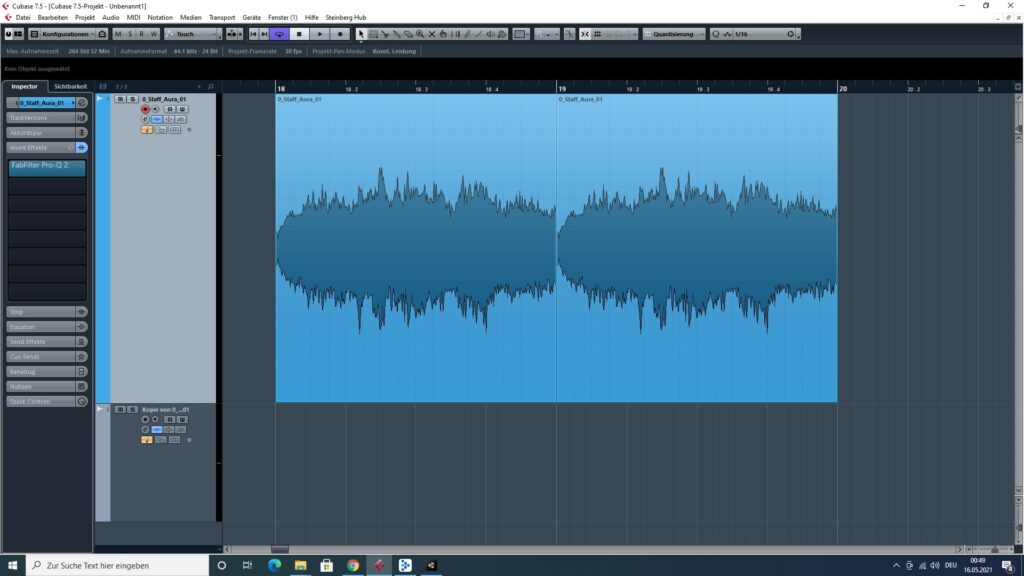
Wenn die Loop-Funktion nun bei einem gewöhnlichen Soundfile aktiviert wird, fällt jedoch auf, dass ein Knacksen zu hören ist, sobald die Datei wieder von vorne abgespielt wird. Das liegt daran, dass die Wellenform am Ende der Aufnahme sich von der Wellenform am Anfang unterscheidet.

Simulierter Loop ohne Übergang
Loop ohne Übergang

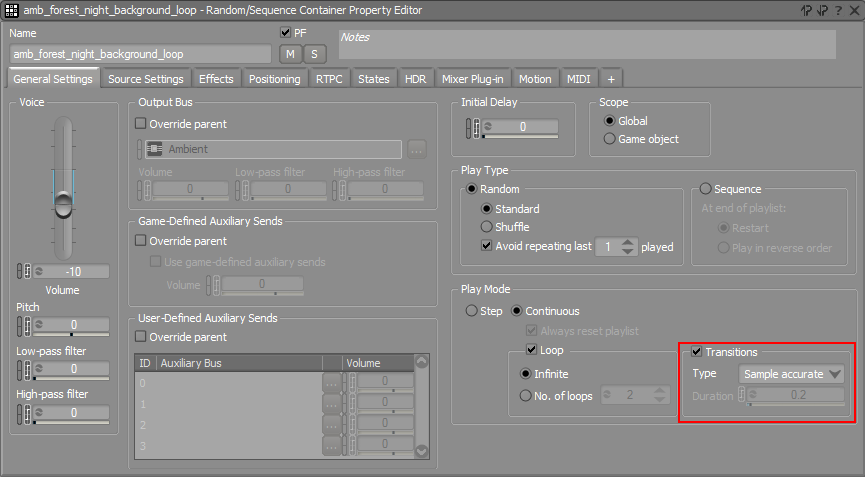
Audio-Middlewares, wie Wwise, ermöglichen die interne Umsetzung von Übergängen, womit artefaktfreies Looping möglich ist.

Transition-Optionen in Wwise

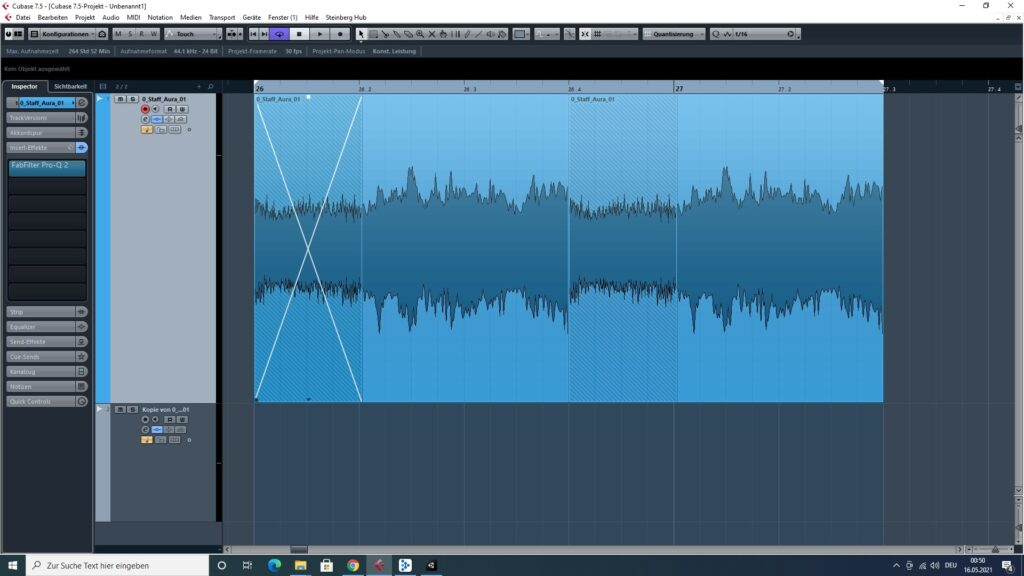
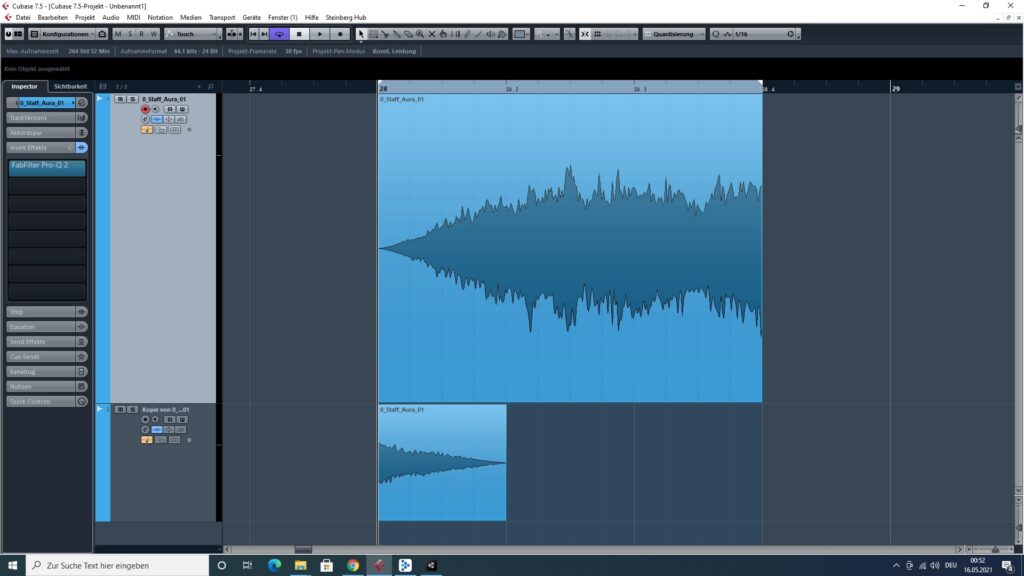
Man kann aber auch Soundfiles bereits in der DAW aufbereiten, damit diese auch ohne Middleware-Programmen und somit universell loop-tauglich sind. Man schneidet dafür das Ende des Soundfiles aus und fügt den ausgeschnittenen Teil der Aufnahme am Anfang des Soundfiles ein [1]. Anschließend wird ein Crossfade zwischen den beiden Audio-Events gesetzt. Damit erklingt nun kein Knacksen mehr, wenn die Datei beim Loop wieder von Anfang abgespielt wird und er Übergang verläuft flüssig.

Simulierter Loop mit Übergang

Loop mit Crossfade

Alternativ kann auch das Audio-Event, welches am Ende ausgeschnitten wird, auf eine zweite Spur gelegt werden, womit man den Fade-In und Fade-Out unabhängig voneinander bestimmen kann. Die Länge der Fades kann je nach Bedarf angepasst werden und ist vom Material abhängig.

Crossfade auf zwei Spuren

Quellen:
[1] https://www.frontiersoundfx.com/how-to-seamlessly-loop-any-ambience-audio-file/

Wie man mit der Stimme einen “Impact”-Sound erstellt

Vor kurzem bekam ich eine eine Hausaufgabe, bei welcher ich eine Actionfilmszene aus “Mission Impossible 2” vertonen musste. Dabei durften Sounds nur mithilfe des Mundes und der Stimme erzeugt und nur mit klassischen Sound-Design-Tools, wie Time-Stretching, Pitch-Shifting, Layering, Cutting und Equalizing bearbeitet werden. In dem Ausschnitt, die ich zu vertonen hatte, kam eine Szene vor, bei welcher ein Auto explodiert. Für Explosionen werden im Sound Design häufig sogenannte Impact Sounds verwendet, die einen stark perkussiven Klangcharakter haben und sich durch ausgeprägte Transienten und lange Release-Zeiten definieren. Mit der Stimme oder dem Mund ist es allerdings schwierig einen Sound zu generieren, der vor allem im Tieftonbereich explosiv wirkt und die Kinowände zum Schwingen bringt.

Für einen tiefen Impact-Sound, wie ich ihn gerne für die Explosion hätte, würde ich generell eine Kickdrum verwenden und sie mit einem langen Hall-Reverb versehen. Zur Erstellung der Kickdrum aus meiner Stimme orientiere ich mich an der Klangsynthese einer elektronischen Kick. Diese basiert auf einem schnellen Sinussweep vom hohen Spektrumsbereich in den tiefen.


Als Ausgangssignal muss es sich nicht zwangsweise um einen perfekten Sinuston handeln. Mit der Stimme ist das auch nicht möglich, deshalb singe ich zunächst einen “U”-Vokal ins Mikrofon.

Die rohe Aufnahme des U-Vokals

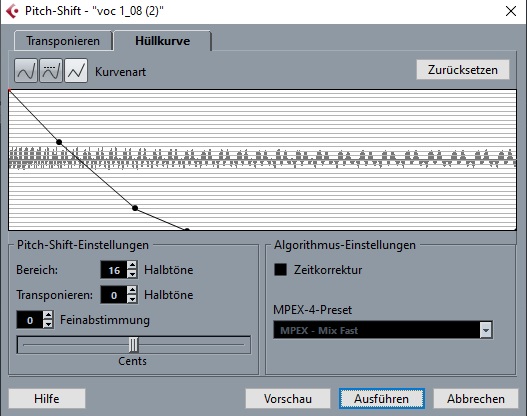
Nun beschneide ich die Aufnahme so, dass sie mitten im U-Vokal anfängt und auch endet und wende anschließend einen Pitch-Shifting-Effekt an, der mithilfe eines Envelopes von einem hohen zu einem tiefen Ton moduliert wird.

Cubase’ eigener Pitch-Shifting-Effekt

U-Vokal nach dem ersten Pitch-Shifting-Durchlauf

Da Cubase’ eigener Pitch-Shifter nur im Bereich von 16 Halbtönen modulieren kann, wende ich den Pitch-Shifter noch ein zweites Mal an.

U-Vokal nach dem zweiten Pitch-Shifting-Durchlauf

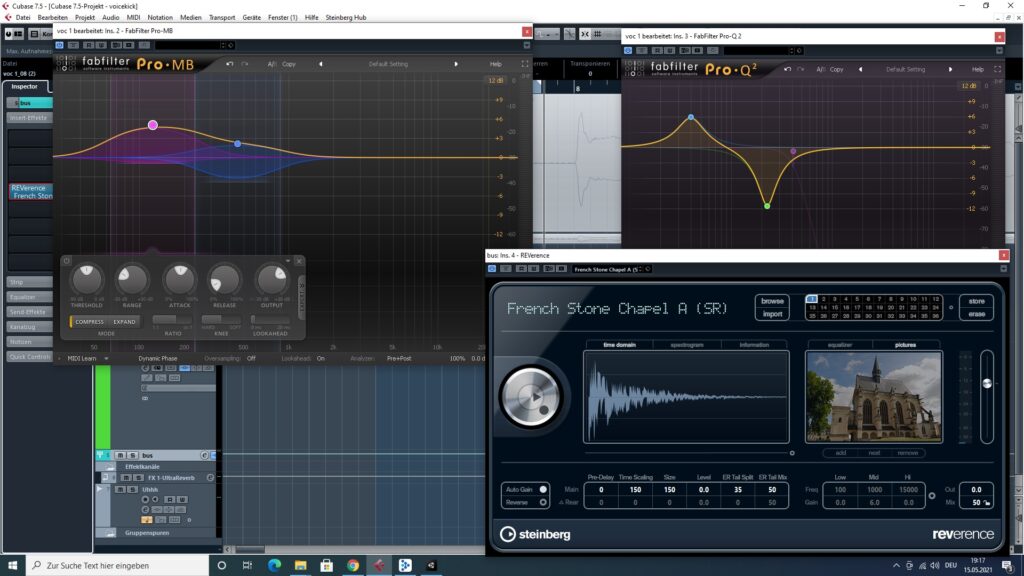
Nun habe ich einen Klang, der die wichtigsten Frequenzbereiche abdeckt und auch die perkussive Charakteristik einer Kickdrum abbildet. Um daraus nun einen Impact-Sound zu generieren, verfeinere ich den Sound noch mithilfe eines Equalizers und Multibandkompressors und lege einen Reverb darauf. Dabei muss der Reverb einen langen Decay haben und besonders im Tieftonbereich lange nachklingen. Ich habe hierfür gute Erfahrungen mit Convolution-Reverbs, also Impulsantworten tatsächlicher Räume, machen können.

Finale Effekte für den Impact-Sound

Impact-Sound

Als Alternative dazu kann man auch die hohen Frequenzen mittels Tiefpass-Filter entfernen und erhält damit einen tiefen Impact-Sound, den man beispielsweise oft in Trailern hört.

Tiefer Impact-Sound


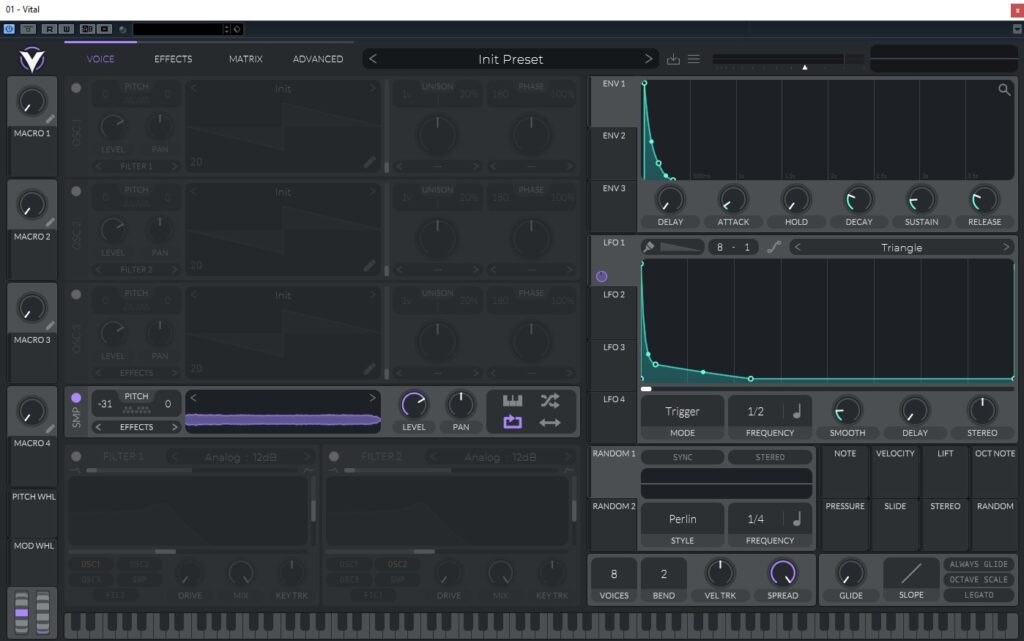
Ich habe noch eine zweite Fassung erstellt, bei welcher ich statt des Cubase Pitch-Shifters einen Sampler verwende, mit welchem der Pitch-Shift nicht auf 16 Halbtöne limitiert ist. Dazu verwende ich den frei-erhältlichen Synthesizer Vital, der auch Samples abspielen kann [1]. Ich senke den Pitch generell um 31 Halbtöne ab und moduliere zusätzlich mithilfe eines LFO’s die Tonhöhe von oben nach unten. Den Volume-Envelope stelle ich so ein, dass das die Transiente besonders ausgeprägt ist und schnell leiser wird, allerdings genug Bass-Anteil vorhanden bleibt. Nun habe ich einen Kick-Sound, der glaubwürdiger klingt als nach Cubase’ eigenen Pitch-Shifting. Tatsächlich macht das aber für den Impact-Sound nur einen kleinen Unterschied.

Kick-Sound mit Vitals Sampler

U-Vokal nach Vitals Pitch-Shifting

Nun lege ich noch einen Reverb-Effekt darauf und erhalte einen Impact-Sound.

Tiefer Impact-Sound mit Vital


Zusätzliche Links:
[1] https://vital.audio/

Scapes

Scapes is a project by sound designer Francis Preve, who dives into the belief that synthesizers can literally sound like anything.

This statement describes the project exactly:

“If we tend to recreate what we have heard, it is partly because we are synthesizing something we have listened to with some care. So why not go back to the richness and complexity of sound as we hear it in everyday life? Why not combine actively listening to a sound walk or a field recording with the art of producing something using synthesis, instead of a recording? “

Preve’s work goes in this direction, it does not have a single sample, the whole ambiental environment, such as the rainy day in the city, summer midnight, the birds, are synthetic.

Those sounds are also synthesized using just several instances of Ableton’s stock-synth operator and some internal effects.

It might not sound 100% realistic, but the resemblance with the natural world is stunning.

https://www.francispreve.com/scapes

Resources

Francis Preve – Scapes

CMD – What if you used synthesizers to emulate nature and reality?

Recreate the natural world with electronic music

There have been various attempts to achieve this, and here I would like to share with you this fascinating project from music producer Darren Cunningham.

What I personally find interesting is his approach to electronic music. He not only tries to emulate the sounds of nature, trying to have the same sound with some synthesizers, but he wants to give us the same sensations from electronic sources. Not the sounds of nature from electronic sources, but the feelings of nature.

The way he also uses field recording is quite inspiring, because he uses it exactly like electronic sounds / synthesizers by taking them away from the natural context, but letting them hold their feel and translate it into another electronic world.

Here is the full article with related video:

https://www.npr.org/sections/therecord/2012/08/13/158695578/an-electronic-composer-reconstructs-the-natural-world?t=1620803583190

Getting Creative – Music on a Low Budget

As the music industry is getting more and more saturated, artists are trying to outperform each other in sound quality. It’s become more often to invest in a lot of advanced equipment, and many artists (mostly bigger) are splurging on mixing and mastering engineers with expensive studio set-ups. But this shouldn’t discourage everyone else! At the core of everything, music is about creativity, expression and unique sounds. As bigger artists are focusing on sound quality, smaller artist can still find their way by putting out something that doesn’t have an immaculate mix, as long as they have a signature sound and can take us on for a ride. The biggest example of this is TikTok. I have noticed that a lot of the artists getting famous on the app are bedroom producers with noticeably imperfect mixes. But they obviously have something that is appealing enough for a larger audience to give them a platform.

How to record from home? Instead of trying to perfectly isolate your space and spend your hard-earned money on specialised microphones, try using your phone! Phones released in the last few years have good audio quality, they can record WAV and some better phones can even do stereo (mine is stereo and goes up to 24bit 48kHz). Recording with a phone leaves more room for spontaneity, because you can just press record while something cool randomly starts happening. For example, 2 of my friends were playing guitar in the lobby and I just quietly put my phone down on the table between them, with each microphone pointing at 1 of them. I then signalled them that I am recording and that they shouldn’t stop playing. The wooden walls/floor actually gave it a very nice slap-back/ short reverb effect, which fit perfectly into the recording. I then used this recording to create a lo-fi track. Every microphone has its own specific coloration and EQing- so do phones. You can use this in your advantage to give your track unique colouring, instead of using the same industry-standard microphones/plug-in that give you a sound similar to 80% of other music in your genre. Lo-fi effects are actually a great way to go when recording on phone microphones. They will mask the quality imperfection and at the same time give a cool flavour to your tracks.

Also remember- you can use just one sound to create literally anything you want, thanks to all the different effects and sampler we have available nowadays- a lot of them for free! I have done this “challenge” multiple times in order to force myself to get creative and make a whole track using just one sound as the basis.

Here is a video from a Sound Designer using objects he has around the house on order to create a cool beat:

Sound Designer Makes a track using random sounds around the house

Sources

https://ask.audio/articles/5-unusual-things-every-sound-designer-should-try

Grain Kalimba Prototype

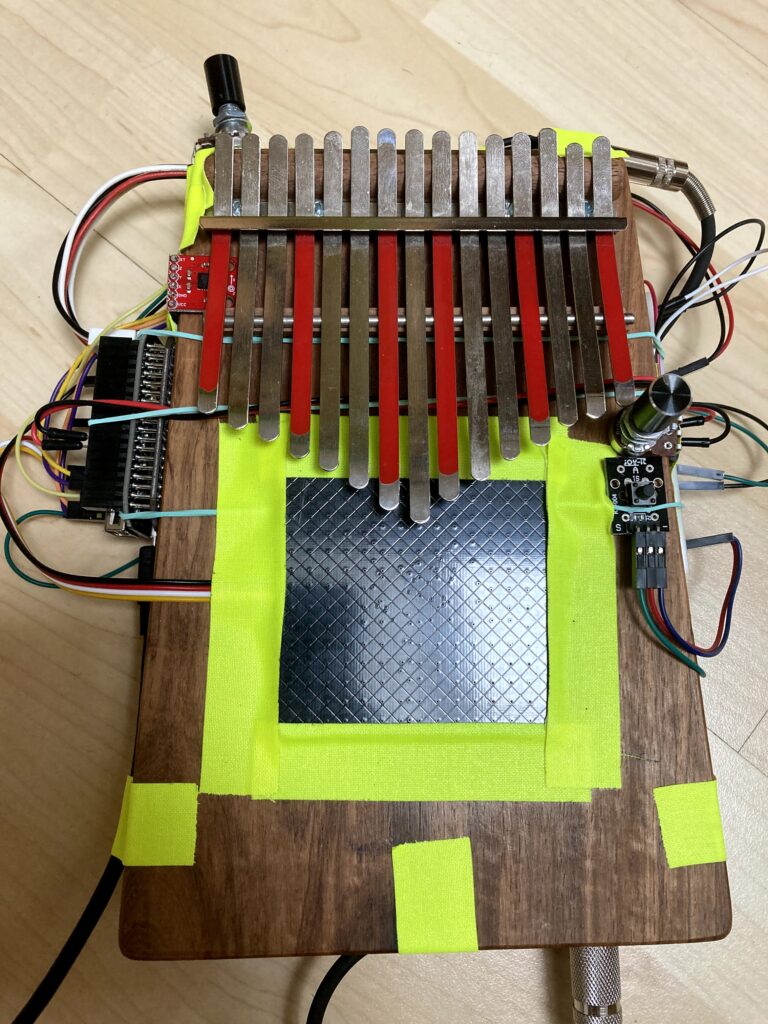
This is how my prototype looks like right now. The Kalimba has a built in Piezo Pick-Up from which the signal goes directly into the Bela board. The board itself is attached on the left side of the Kalimba. On top of it the touch panel is mounted right in the middle to be interacted with your thumbs. To the right there is a Push-Button and a potentiometer. In the top left corner, you can spot the red accelerometer and another potentiometer.

Grain Kalimba_Prototype

Is Virtual Reality the Future of Documentary Films?

Virtual reality documentaries are on the rise, illuminating issues of social injustice through immersive experiences.

Is virtual reality a tool for social change?

In the world of film, VR has become a powerful tool for tackling pressing social issues. It’s capable of presenting hard truths in ways that the average person can easily comprehend and connect with. However, its greatest power is its ability to inspire action.

Why Virtual Reality?

The fully immersive experience that VR provides makes it an excellent medium for storytelling.

It cuts off viewers from the outside world. Unlike traditional films, which set a safe distance between you and the story, VR puts viewers right in the middle of it. It creates visceral experiences that enable you to connect with characters in a much deeper way. Moreover, it eliminates the typical distractions that you encounter in the cinema, allowing you to focus on the story.See Also:  Virtual Reality Documentary Tells the Story of the Band That Changed History in Eastern Europe

Depending on the point of view, you can watch the story unfold from the perspective of a character. You can walk in someone else’s shoes. You’ll feel empathy—not just sorrow—for the real lives represented in the film.

How Virtual Reality Documentaries Are Highlighting Social Issues

One of the latest VR documentaries you can check out right now is called Reeducated, which debuted at SXSW back in March. Through this film, The New Yorker exposes the harsh truths inside the Xinjiang prison camps. It accompanies their investigative piece called “Inside Xinjiang’s Prison State,” a multimedia report detailing ethnic and religious persecution in China.

The internment camps in China have been a well-kept secret for quite some time now. Apart from survivor accounts and satellite imagery, the world knows so little about the reality inside these camps. That is, until now, with the debut of Reeducated.

Just before the COVID-19 lockdown, reporter Ben Mauk, director Sam Wolson, and illustrator Matt Huynh traveled to Central Asia. There, they spoke with dozens of survivors of the mass internment campaign.

The documentary, however, only uses the testimonies of three Kazakh men who survived the internment camps.

Huynh captured their stories in pen-and-brush drawings. Animator Nicholas Rubin—with the help of Jon Bernson, who composed the spatial audio—reconstructed the illustrations in a three-dimensional space.

Using a VR headset such as Oculus Rift, you can step into the prison yards, cells, and classrooms in the camps. Since there are no photos or video footage of the camps, VR makes a great alternative. It brings viewers directly into the story, allowing them to connect with these people. Moreover, it conveys the stories with clear and powerful emotions.

Virtual Reality and the Power of Experience

VR documentaries are nothing new. In 2014, Zero Point was released as the first 360-degree movie made for the Oculus Rift. It’s about immersive filmmaking and follows the researchers, developers, and pioneers of virtual reality.

Over the years, there has been an increasing number of VR documentaries, which focus on a myriad of subjects and stories. Some of them are like Reeducated in that they tackle pressing issues.See Also:  Shaun MacGillivray Chats About IMAX and VR Movies

Traveling While Black is one such example. It illustrates the US’ long history of restrictions for Black Americans. At the same time, it shows viewers how they can make a difference in their communities.

Other VR films illustrate human experiences that might be foreign to the average person. Notes on Blindness, The Protectors: Walk in the Ranger’s Shoes, and Zero Days are a few examples. As VR becomes widely available, filmmakers might use it more not just to highlight pressing issues but also to encourage action.

Real-Time Granular Synthesis in PD – Part II

Apply volume Envelope

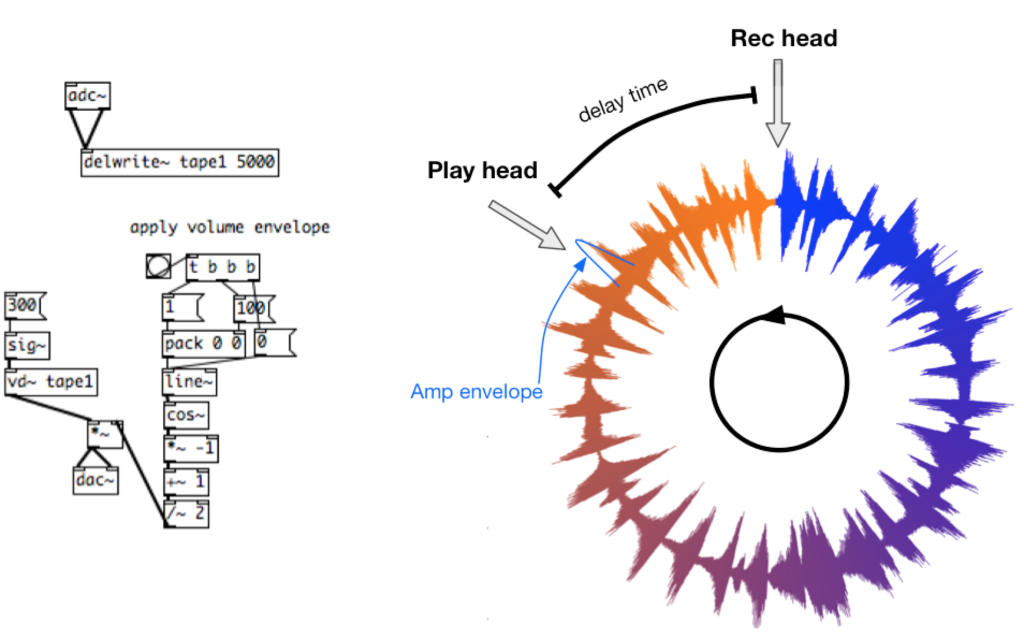
Now that we have set the starting point of the grain, we need to also apply a volume envelope. This envelope will also define how long the short audio segment will play. In the following example the small chunk of audio has a length of 100ms.

Volume Envelope; Source: Kaliakatsos-Papakostas, 2016

Pitch up / Pitch down

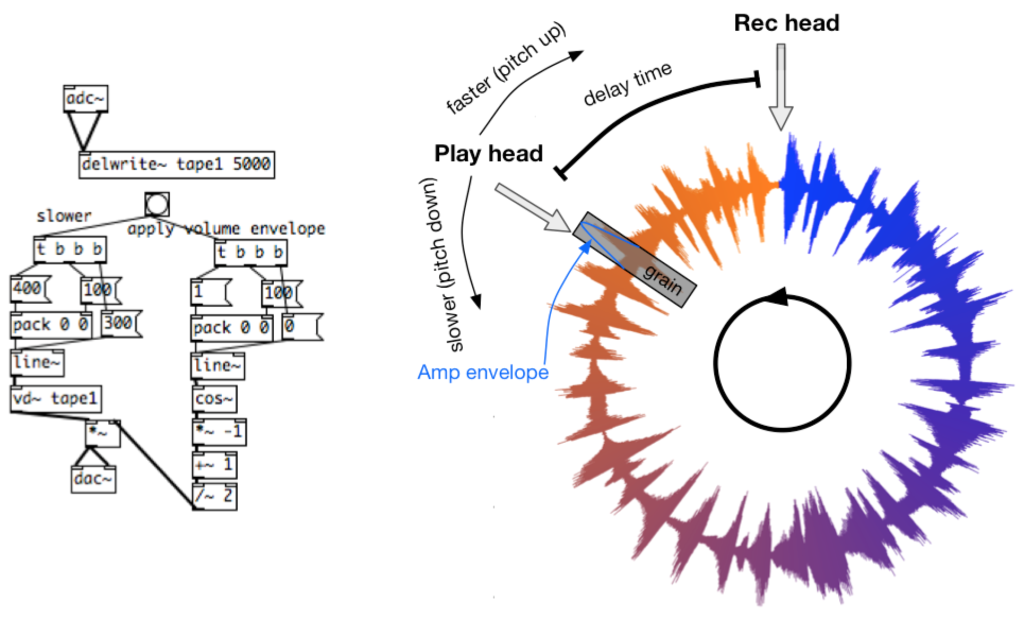
When the playhead is moved towards the recording head, the audio gets pitched up or down, because it is played back faster or slower. To make it slower we need to increase the delay time in de vd~ object. Its done by the line~ object on top of the vd~ object. In the following example the playhead moves from 300ms to 400ms.

Controlling a Grain; Source: Kaliakatsos-Papakostas, 2016

We can now control the starting time of a grain, the length and the pitch!