Diese Icons durfte ich gemeinsam mit Christof Geramb gestalten. Ziel dieser Übung war, dass ich zuerst die Sounds aufgenommen habe und Christof im Nachhinein die Icons kreierte. Bei meinen Klängen habe ich mich hauptsächlich auf akustische Instrumente beschränkt. Zum Einsatz kommen zum Beispiel auch Handpans, Kalimba und Vibraphon.
Author: Johannes Koelbl
Sound Vision
Im Entstehungsprozess für den Sound haben wir uns vorgenommen ausschließlich akustische Instrumente zu verwenden. Da wir eine sphärische Aufnahme geplant hatten eigneten sich Instrumente mit viel Decay, mit denen man große Flächen erzeugen konnte. Zum Einsatz kamen exotische Instrumente wie Handpans, eine Kalimba, ein Vibraphon und kleinere Perkussionsinstrumente wie Chimes, Fingercymbals, ein Rain Maker und ein Crash Cymbal.
Die Handpan spielt eine getragene Fläche, die wie beim Atmen mit der Dynamik auf und nieder geht. Das Kalimba wird durch einen Grain Delay geschickt, der ohne bestimmten zeitlichen Verlauf, also eherer random, kleine Tonschnipsel in unterschiedlichen Oktaven wiederholt, was teilweise wie ein Shimmer klingt. Die Chimes werden reversed abgespielt, was auch innerlich die Erscheinung bringt, dass etwas zurückgespult wird. Das tiefe Grollen bzw der Bass kommt von einem recht großen 22“ Cymbals, das nur sehr leicht angeschlagen ist, aber extrem dicht ans Mikrofon gehalten wurde. Somit wurde die Bassabnahme sehr verstärkt und es klingt schon fast bedrohlich.
Das Vibraphon wird nicht wie üblich mit Mallets gespielt, sondern mit einem Geigenbogen gestrichen. Somit fällt die Attack des Anschlags weg. Dazu habe ich zwei unterschiedliche Takes gemacht und hard L R gestellt. So werden die unterschiedlichen Töne immer aus einer anderen Richtung aus und eingefadet.
Dieses Projekt durfte ich gemeinsam mit Christof Geramb gestalten, der den visuellen Part umgesetzt hat.
Jazz Popcorn Robot Drum Solo
Dieses Video stammt von Moritz Simon Geist, einem Sound Designer, der mit verschiedensten selbst gebauten Robotern Musik macht. In seinen Projekten kommen sehr oft Motoren oder Solenoids zum Einsatz, die durch ein bestimmtes Ereignis getriggert werden und einen mechanischen oder perkussiven Klang von sich geben. Eines seiner Projekte hat mich besonders beeintruckt, da ich selbst Schlagzeuger bin. Es handelt sich um ein DrumSet, das durch PopCorns getriggert wird.
Im Vergleich zu klassischer Musik ist im Jazz die Improvisation das um und auf. Dieses Experiment vertont die Zufälligkeit, in der die Popcorns poppen, die dann zur gleichen Zeit eine zufällige Trommel bzw. Becken triggern. Zwischenzeitlich hat man wirklich das Gefühl, dass das Drumset Solo tatsächlich von einer Person gespielt wird. Auch wenn die Schläge natürlich sehr random auftreten wirkt es auf mich musikalisch und unterhaltsam.
Grain Kalimba – Pure Data Patch
In the following image you can see the main pure data patch that is running on the bela board and over which most of the parameters you can interact with are modulated. The actual granular synthesis is taking place in different subpatches. Now let’s look at the different parameters you can interact with directly on the Kalimba with the sensors.
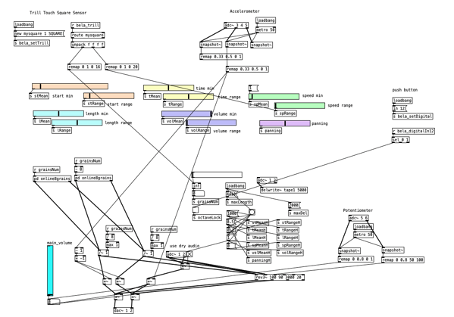
On the top left corner Pure Data is receiving signals from the touch sensor, which are values between 0 and 1. These values are remapped to fit the needed parameters that we want to modulate. The x-axes of the square touch panel which is from left to right controls the grain number. If your finger touches the panel on the left side, no grain is produced, and you just hear the dry audio signal of the kalimba. The more you slide your finger to the right, the mor grains will appear. On the y-axes you control the speed range of each grain which also means the pitch of course. On the bottom of the panel the grains sound kind of similar and are in a closer pitch range. When you slide your finger upwards much higher and lower grains will appear.
The accelerometer controls the dry/wet signal of the grains and the dry audio signal. When the kalimba is held straight you can hear both the dry signal and the grains equally loud. If you tilt the kalimba to the right, the dry signal fades out and the grains get louder. The exact opposite happens, if the kalimba is tilted to the left side.
In the patch there is a function called Octave Lock which is activated by the small push button. It allows the grains to alter the pitch only in octaves. This is very helpful when you want to play exact harmonies, because otherwise the pitch of the grains is too random.
I also added a reverb object in pure data called the rev3~. The amount of this reverb is controlled via the potentiometer on the right side. The reverb is applied both to the dry signal and the grains. The second potentiometer is controlling the overall volume. It is placed on top because you don’t need the volume knob to be controlled while playing.
Further Steps
The next steps would be to figure out the exact position of the sensors. Some problems appear now for example when you play the kalimba with your thumbs you also strike the touch panel sometimes, which needs to be fixed. Of course, in the final product all the electronics including the bela board will be placed inside of the kalimba and will hopefully look not as chaotic as right now!
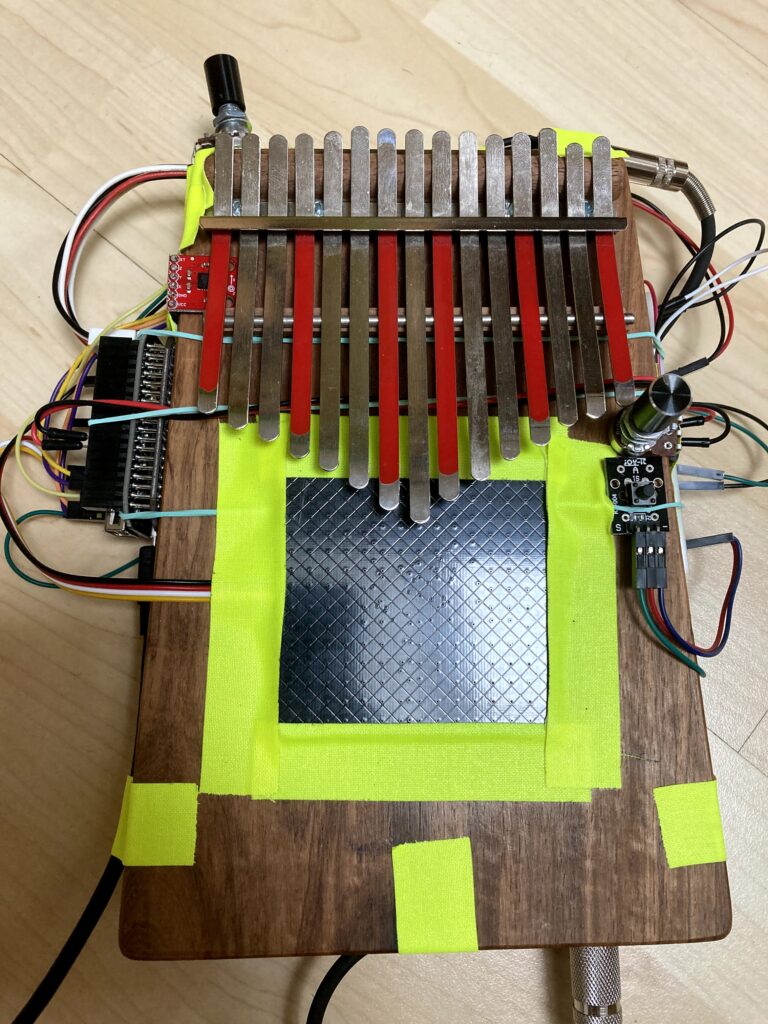
Grain Kalimba Prototype
This is how my prototype looks like right now. The Kalimba has a built in Piezo Pick-Up from which the signal goes directly into the Bela board. The board itself is attached on the left side of the Kalimba. On top of it the touch panel is mounted right in the middle to be interacted with your thumbs. To the right there is a Push-Button and a potentiometer. In the top left corner, you can spot the red accelerometer and another potentiometer.
Real-Time Granular Synthesis in PD – Part II
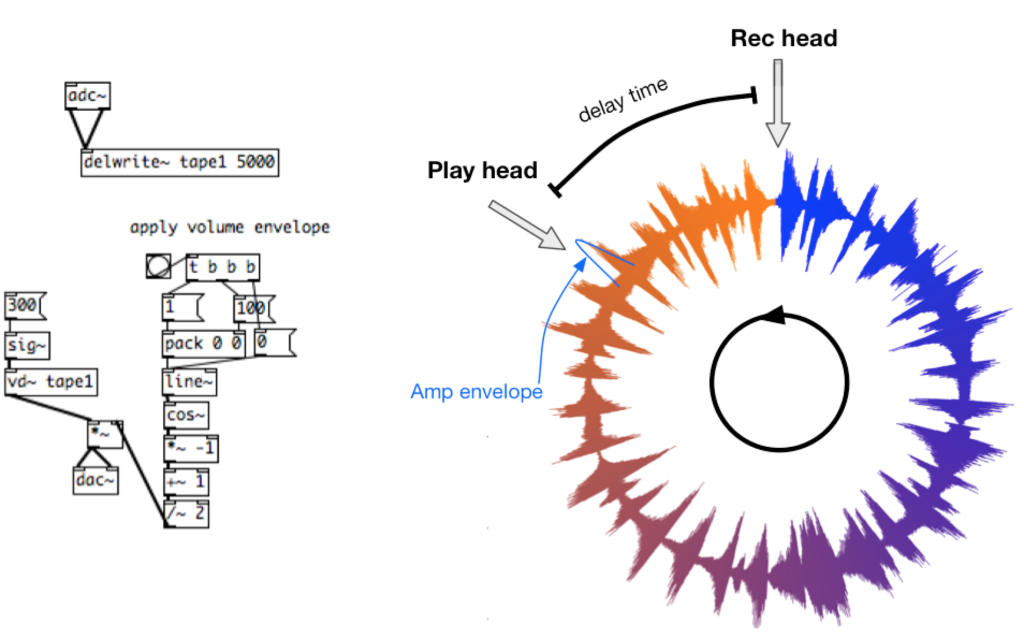
Apply volume Envelope
Now that we have set the starting point of the grain, we need to also apply a volume envelope. This envelope will also define how long the short audio segment will play. In the following example the small chunk of audio has a length of 100ms.
Pitch up / Pitch down
When the playhead is moved towards the recording head, the audio gets pitched up or down, because it is played back faster or slower. To make it slower we need to increase the delay time in de vd~ object. Its done by the line~ object on top of the vd~ object. In the following example the playhead moves from 300ms to 400ms.
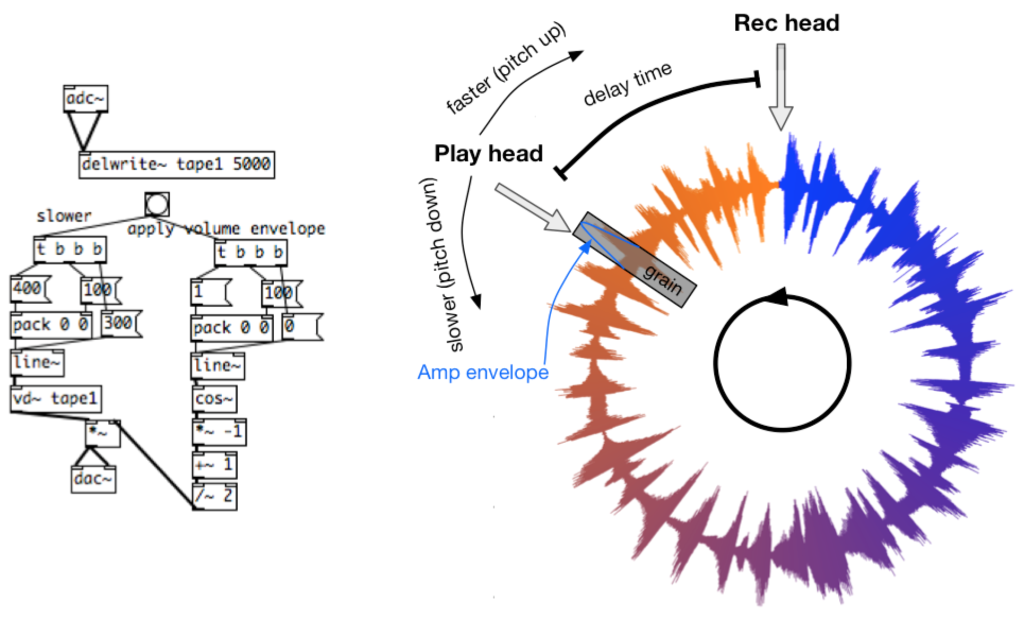
We can now control the starting time of a grain, the length and the pitch!
Real Time Granular Synthesis in PD
A basic granular synthesis patch that uses a real-time mic-in signal with tools that pure data is offering. It should contain parameters like Grain starting time, grain length and playback speed which also affects the pitch of the grain.
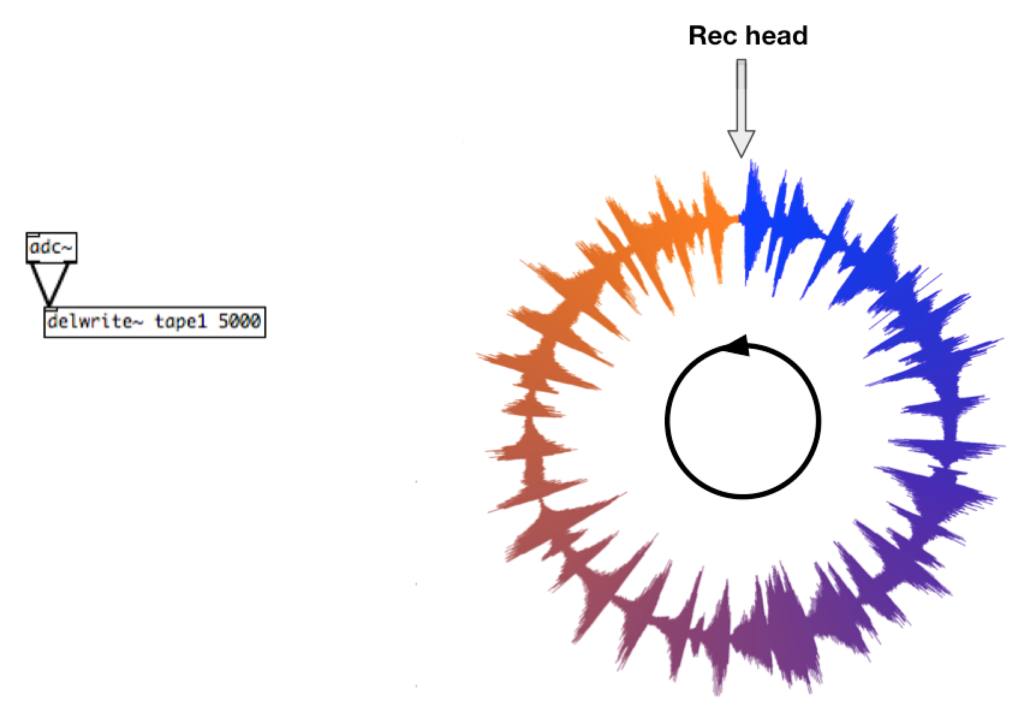
Circular Buffer
Pure data has a built-in object called delwrite~. This object collects the incoming audio and stores it for a given time in this so-called circular buffer. You can imagine it as a round tape where the new audio from the mic-input is recorded over old audio. In the following example the tape has a length of 5 seconds.
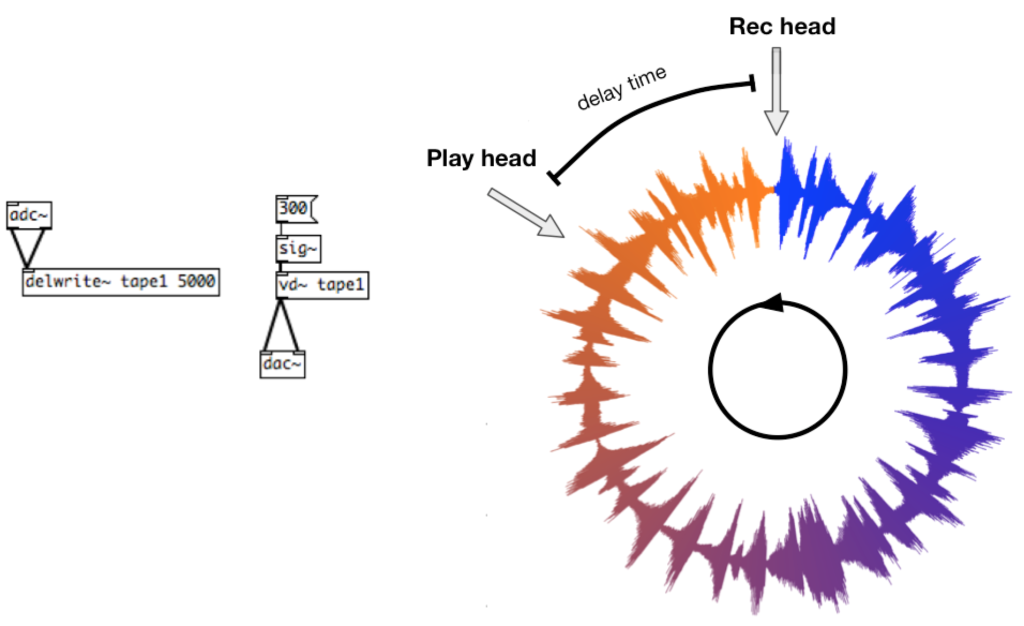
Play Sound from the Buffer
To make use of this circular buffer and play sound that has been stored a play head is needed which is implemented with the vd~ object in PD. This play head needs a given delay time that will later be the starting point of a single grain.
Granular Synthesis in PD Part II
Load an Audio File
Now let’s load an actual audio wave file. It’s important that pure data knows the size of the file and the maximum length a grain should have. The horizontal slider has values between 0 and 1 and making all the values relative to the selected file size and maximum grain length.
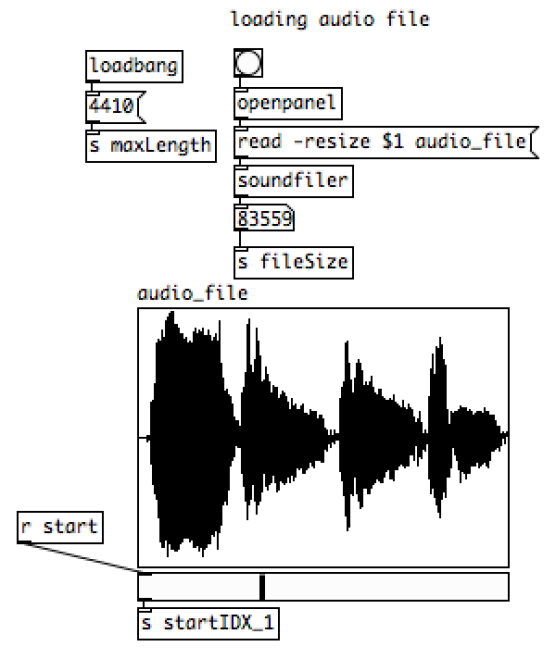
Select starting and ending point on the file / Modifying the envelope
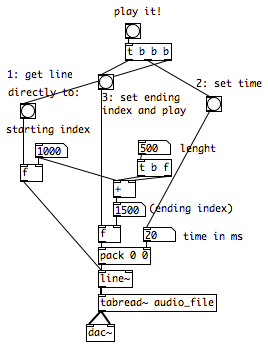
To select a starting and ending point of the grain a good way is to use the line~ object that allow to read from any index to any index of the audio file. In the following figure the starting index is selected on the left side, the length in the middle and the playback time on the right side of the patch. By hitting bang on top you can play it. The f object is suppressing the bang because the order of bangs is very important for the line~ object. First comes the starting index directly, second the duration and third to play the file.
On the right part of the following patch the envelope is integrated. It receives the time length from the number box that sets the grain duration time.
Granular Synthesis in Pure Data
Granular Synthesis on Audio Files
The goal is to create a patch that loads an audio file from which are taken tiny grains from random positions. The controllable parameters should be:
- Grain density: how many grains per second we expect to listen.
- Grain starting time: position of the loaded file that the grain starts.
- Grain length: how long the grains will be.
- Playback speed: how quickly will the grain be played, affecting the pitch of the grain as well.
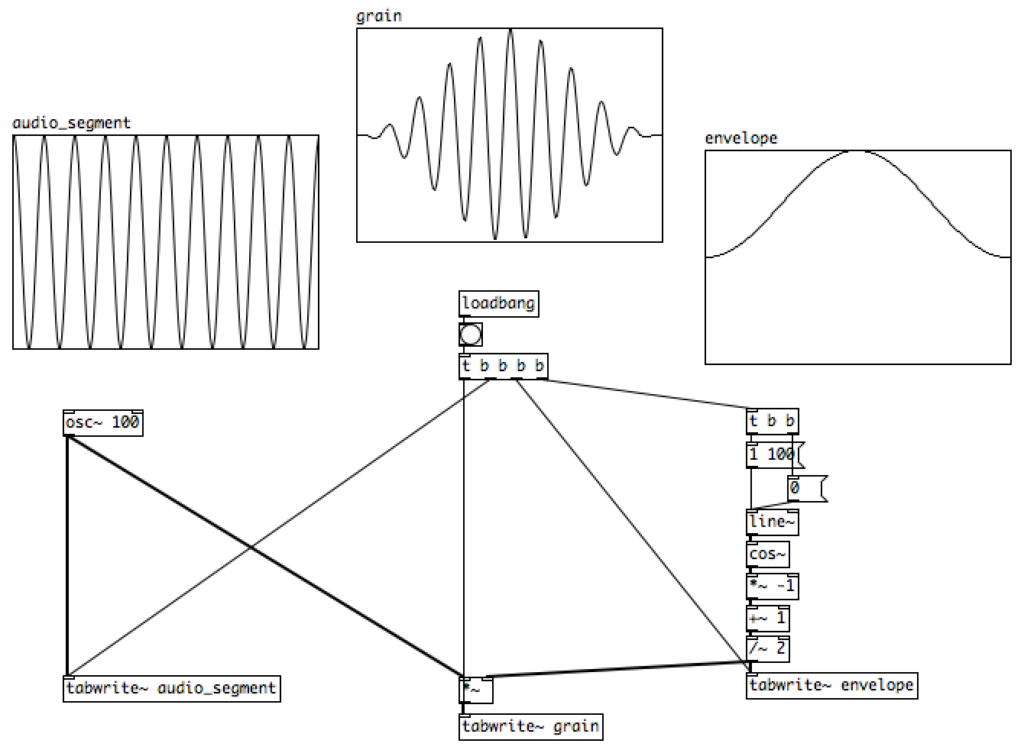
Simple grain Generator
In the following example you can see a grain being generated in its simplest form. The source audio isn’t coming yet from an audio file, but from an oscillator that generates a sine wave at 100 Hz. The audio segment on the left side is then modulated by the envelope and generates a single grain that has a duration of 100 ms. (Kaliakatsos-Papakostas, 2016)
Sensors Part II: Touch Sensor
Trill-Touch Sensoren
The Trill Sensors are made to interact with the world by using your hands. It tracks the finger movement very precisely by using capacitive touch sensors. Different types of these sensors are available for example a Bar, Ring or a Square which I am using on my Kalimba. The sensors are compatible with a wide range of different microcontrollers that support the so called I2C communication protocol.
I2C Communication
This protocol provides a convenient method of passing messages to, and getting data from, a network of sensors and devices. It allows you to not only connect one sensor per input, but instead you can connect multiple devices to one controller and requires only two wires for the communication.
Every device must have a unique I2C address, especially when more devices are connected to the same bus. To initialize a trill sensor in Pure data there has to be given a sensor ID, the i2c bus that the sensor is connected, which device, the mode and the address of the sensor. (Bela, 2021)

After successful initializing the sensor we can read from it through r bela_trill object. By using the square sensor the incoming data is formatted as a list with the following items: number of touches, x axes, y axes, size.
