Sounds of ist ein Format in dem verschiedenste Künstler*innen, Foley Sounds an besonderen Plätzen sammeln und danach ins Studio gehen und daraus einen neuen Song machen.
Sounds of Trailer
Über Sounds of:
Ursprünglich ist das Format von Fynn Kliemann und dem Kliemannsland initiiert und auch moderiert worden. Die ersten Videos wurden noch im alten Studio des Kliemannsland aufgenommen. Mittlerweile wird das Format von Nisse Ingwersen moderiert und gehört zu Funk dem Content-Netzwerk der öffentlich rechtlichen Sender ARD und ZDF, wird jedoch immer noch vom Kliemannsland produziert.
Die Folgen laufen immer so ab, dass die Künstler*innen an einen von ihnen ausgewählten, besonderen Ort gehen und dort die Atmosphäre mittels Recorder als Foley Sounds aufnehmen. Danach bekommt man einen Einblick in die Produktion der neuen Songs und kann auch persönlichen Geschichten lauschen. Die Zuschauer bekommen auch immer wieder Tipps für eigene Produktionen.
Community:
Das tolle an dem Format ist, dass man sich auch als Zuschauer alle Sounds downloaden kann. So bekommt man zum Beispiel aus der Folge mit Severin Kantereit einzigartige Aufnahmen aus Äthiopien.
Die Zuschauer werden selbst dazu aufgefordert, nur mit den Sounds aus den Folgen neue Tracks zu produzieren. Diese können an das Kliemannsland geschickt werden und werden dann auf der SoundCloud Playlist veröffentlicht.
Sounds of Äthiopien
In einer Folge, war Nisse mit Deichkind sogar in der Hamburger Elbphilharmonie:
The semester is nearing its end and after a long journey with our personal projects, we have to conclude our research and present the results. The time really flew by and I feel a bit sad that we are finishing this portion of our studies. In this article, I wanted to give some updates on the current state of my research and product progress.
Recap
My project is exploring the possibility of training non-synaesthetic people to experience synaesthesia (weaker form). I wanted to do it with an ep titled CMYK, where each song has a dominant colour based on my own synaesthetic perception.
Product Pt. 1 – Songs
I am in the process of polishing out the final details of all the 4 songs in my project collection. 2 of the songs on the EP have a similar mood/style, while the other 2 are slightly different in genres, with one being significantly darker than the rest.
Product Pt. 2 – Training videos
As part of the research and testing, I came up with a short training video that I will use in order to have a benchmark between different test groups and evaluate the validity of my hypothesis. I kept the video as short as possible because I knew I couldn’t expect unpaid subjects to focus on something for more than 3-4 minutes. Here is the video itself:
Test Groups
My project requires working with 2 different test groups with the goal of comparing results and determining whether there is a positive difference present with long-term training. The first portion of the test has started- the training video is being watched daily for 20 days by 15 participants so far. The goal is to get 15 more. The second test group will be a short-term group that will be exposed to the video only once.
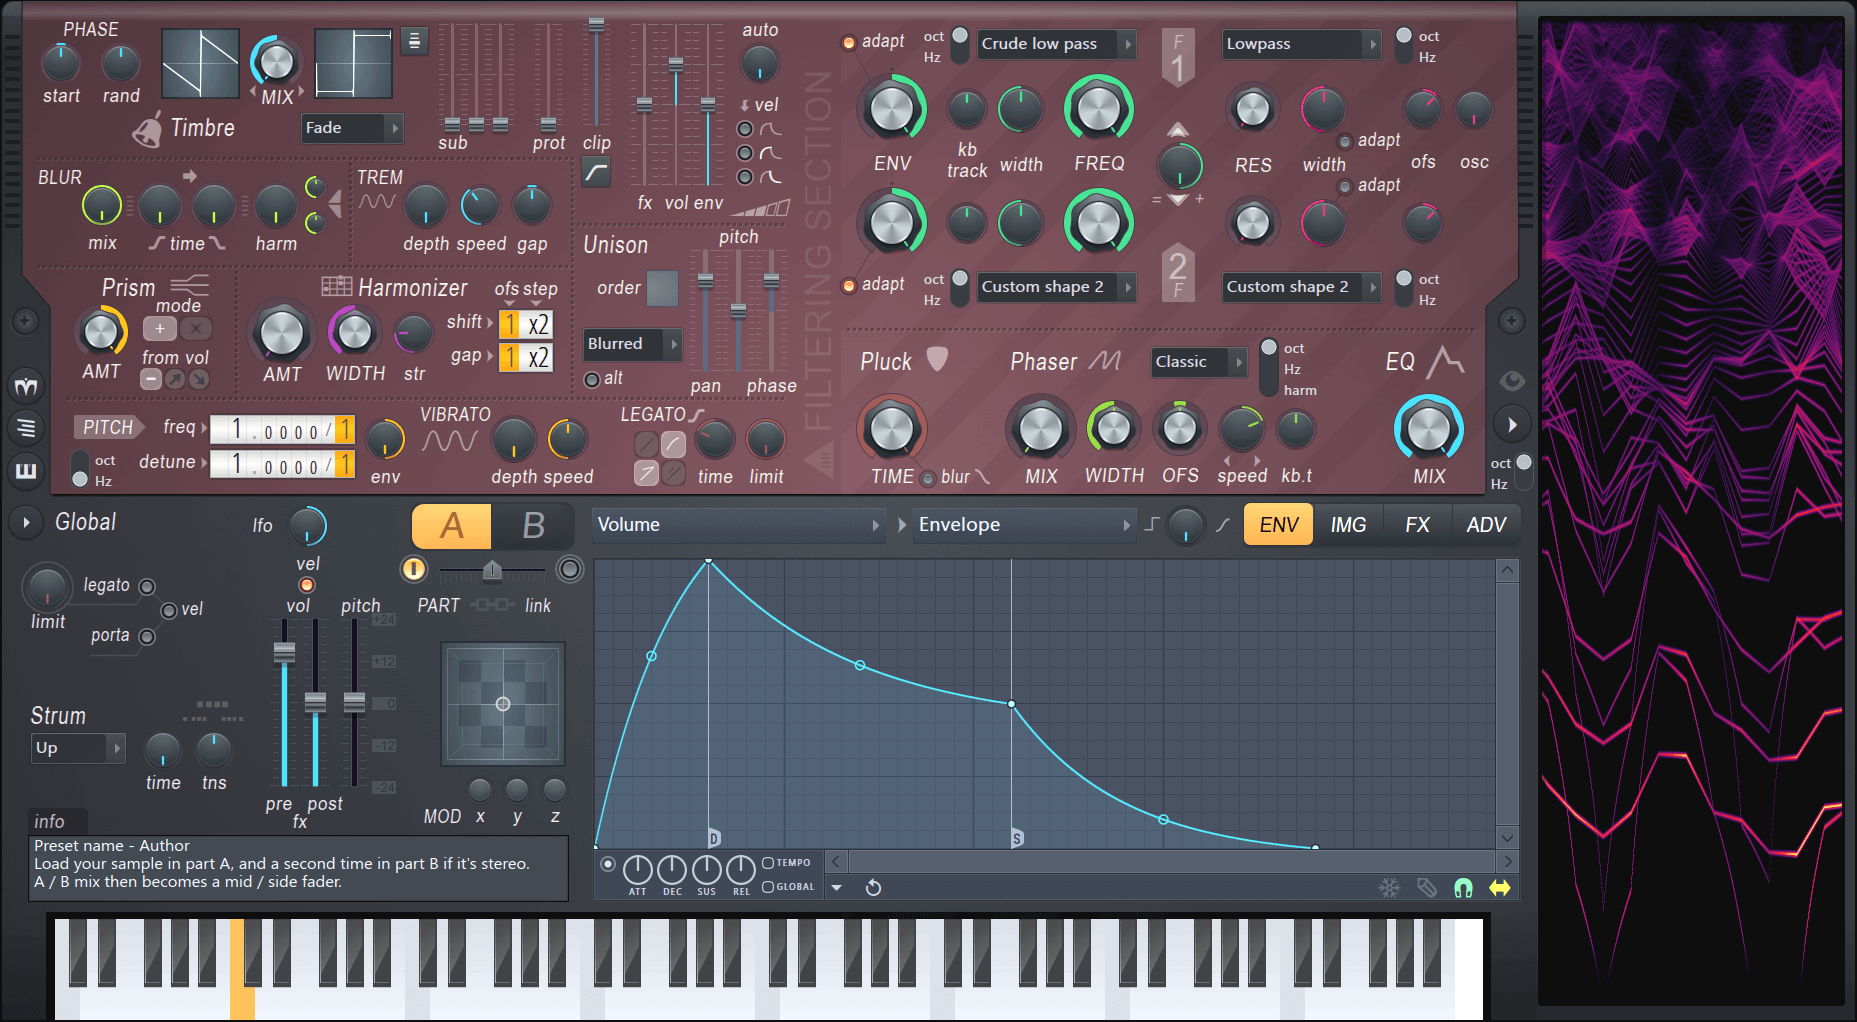
The picture above shows Harmor’s interface. We can group the Interface into three sections: The red part, the gray part and the window to the right. Firstly, the easiest section to understand is the window to the right. Harmor is an additive synthesizer, which means the sounds it generates are made up of sine waves added on top of each other. The window on the right displays the frequencies of the individual sine waves, played over the last few seconds. Secondly, the red window is where most of the sound is generated. There are different sections and color-coded knobs to be able to identify what works together. Left of the center you can see an A/B switch. The red section exists twice: once for state A and once for state B. These states can be mixed together via the fader below. Lastly the gray area is for global controls. The only exception is the IMG tab, which we will cover a little later. As you can see there are many knob, tabs and dropdowns. But in addition to that most most of the processing can be altered with envelopes. These allow the user to draw a graph with infinitely many points to either use it as an ADSR curve, an LFO, or map it to keyboard, velocity, X, Y & Z quick modulation and more. At this point it already might become clear that Harmor is a hugely versatile synth. It’s marketed as an additive / subtractive synthesizer and features an immense amount of features which we will take a closer look at now.
Additive or Subtractive?
As mentioned above Harmor is marketed as an additive / subtractive synthesizer. But what does that mean? While Harmor is built using additive synthesis as its foundation, the available features closely resemble a typical subtractive synth. But because Harmor is additive, there are no audio streams being processed. Instead a table of frequency and amplitude data is manipulated resulting in an efficient, accurate and partly very unfamiliar and creative way to generate audio streams. Harmor features four of these additive / subtractive oscillators. Two can be seen on the image above in the top left corner. These can be mixed in different modes and then again mixed with the other two via the A/B switch. In addition to the four oscillators, Harmor is also able to synthesize sound from the IMG section. The user can drag-and-drop audio or image files in and Harmor can act like a sampler, re-synthesizing audio or even generating audio from images drawn in Photoshop.
The Generator Section
As you can see in addition to the different subsections being walled in by dotted lines, this section is color coded as well. The Timbre section allows you to select any waveform by again drawing and then morphing between two of them with different mixing modes. Harmor allows you to import a single cycle waveform to generate the envelope. But you can import any sample and generate a waveform from it. Here is an example where I dragged a full song into it and processed it with the internal compressor module only:
The blur module allows you to generate reverb-like effects and also preverb. Tremolo generates the effect of a stereo vibrato, think about jazz organs. Harmonizer clones existing harmonics by the offset/octaves defined. And prism shifts partials away from their original relationship with the fundamental frequency. A little prism usually generates a detune-like effect, more usually metallic sounds. And here is the interesting part: As with many other parameters as well, you can edit the harmonic prism mapping via the envelopes section. This allows you to create an offset to the amount knob on a per frequency basis. Here is an example of a usage of prism:
As you can see in the analyzer on the right: There is movement over time. In the Harmonic prism envelope I painted a graph so that the knob does not modify lower frequencies but only starts at +3 octaves. The other options from this section, unison, pitch, vibrato and legato should be clear from other synthesizers.
The Filter Section
As seen above, Harmor features two filters per state. Each filter can have a curve selected from the presets menu. The presets include low pass, band pass, high pass and comb filtering. Additionally you can draw your own curve as explained in the Basics section above. The filters can additionally be control the mix for the envelope, keyboard tracking, width, actual frequency and resonance. But the cool thing is how these filters are combined: The knob in the middle lets you fade between only filter 2, parallel processing, only filter 1, filter 1 + serial processing and serial processing only. In the bottom half there is a one-knob pluck knob as well as a phaser module with, again, custom shaped filters.
The Bottom Section
As you can see above the bottom section features some general global functions. On the left side most should be clear. The XYZ coordinate grid offers a fast way to automate many parameters by mapping them to either X Y or Z and then just editing events in the DAW. On the top right however there are four tabs that open new views. Above we have seen the ENV section where you can modulate about anything. The green tab is the image tab. We already know that Harmor can generate sound from images and sound (not that this is a different way of using existing sound, before I loaded it into an oscillator, now we are talking about the IMG tab). On the right you can see a whole lot of knobs, some of them can be modified by clicking in the image. C and F are course and fine playback speed adjustments, time is the time offset. The other controls are used to change how the image is interpreted and partially could be outsourced to image editors. I’m going to skip this part, as this post would get a whole lot more complicated if not. It would probably be best to just try it out yourself.
The third tab contains some standard effects. These are quite good but especially the compressor stands out as it rivals the easy-but-usefullness of OTT.
And finally, the last section: Advanced (did you really think this was advanced until now? :P) Literally the whole plugin can be restructured here. I usually only go in here to enable perfect precision mode, threaded mode (enables multi core processing) and high precision image resynthesis. Most of these features are usually not needed and seem more like debugging features so I will not go into detail about them, but like before I encourage you to try it out. Harmor can be very overwhelming and as many people mention in reviews: “Harmor’s biggest strength is also it’s greatest weakness, and probably why there are so few reviews for such an amazing synth. You can use Harmor for years, and still feel like a noob only scratching the surface. That makes writing a review difficult. How can you give an in-depth review, when you feel so green behind the ears? You only need to watch a few YT videos (e.g. Seamless) or chat with another user to discover yet another side to this truly versatile beast.”
The paper “Vodhrán: collaborative design for evolving a physical model and interface into a proto-instrument” was a short but interesting read into what could be explored more in the marriage of music making and interaction design.
The design itself is a box that consists of a touch sensitive plate for interaction, a micro computer for processing, and an AMP for sound production. It was effectively designed to create a new form of interaction for musicians and a new way of making music. It also can work connected to a computer with a special software. The authors write on their experience and the tools/methods they used throughout the building of this device and how it would function.
This type of a new interaction for music making is highly interesting in the field of interaction design in my opinion. Since making music generally has predefined methods and pretty commonplace conceptions it is both really interesting and difficult to experiment with a new form of interaction. This is the reason why I was interested in this paper. Also since this semester I had the chance to experiment with a new type of interaction with my project for this course, I could relate more with the process and findings of this paper. With the increasing amount of music production on computers it is hard to dismiss this topic. Human-computer interaction in this area is already highly saturated, with interaction methods that popped up in the last 2 decades but also with digitalisation of already existing centuries old musical instruments. This progress will only expand with increasing usage of digital devices in this area, hence the need and search for new and different interactions will always persist. I think this paper was the start of this kind of an approach where the authors wanted more out of the interaction and ability to create through creation. As an interaction designer it is crucial to understand and reflect on areas that can feel settled and unchangeable. This paper for me does exactly that and I highly appreciate it for it.
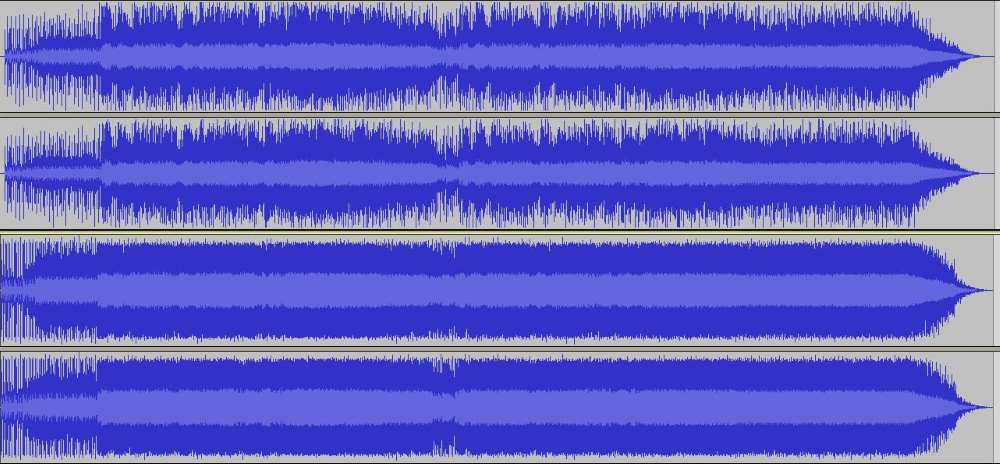
Before starting, look at the top image. These 2 sets of sound files, mastered/limited at different levels. The first one is from the 90s and the second one is what is being done post 2010. Just by looking at the graphic representations, you can tell that the first song has a lot of breathing space and room for expression, while the second one looks a bit like the life has been squeezed out of it. This is the loudness war in a nutshell- people competing to squeeze in as much volume as possible within the range that we can digitally produce.
So why is the loudness war happening? Usually, we perceive louder as better, even if a song might not be better mixed. Basically, music is getting progressively louder as time passes, thus becoming less dynamic and lively.
What are the basics of loudness? There are a few units used in measurement- LUFS (loudness units relative to scale and DBTP (decibels true peak). Our DAWs by default show a different unit- DBFS (decibels relative to full scale), which is does not show us the overall average loudness, just the momentary peaks. LUFS are actually closer to how our ear perceives loudness. It is similar to RMS (root mean square) but still closer to our own loudness perception. When mastering audio/music, it is highly recommended to get a measurement tool that includes at least these measures (but ideally give you access to more insights into your track’s dynamics, spectrum and similar):
Short-Term LUFS – Short-term peak at the current listening point
Integrated LUFS – overall loudness of the whole track
Dynamic Range – the difference between the quietest and the loudest part of the track
Momentary Max LUFS – the highest peak measured in LUFS within the audio/music that is being analysed
True Peak – The maximum peak level of the audio measured real-time, measured in DBTP. Different from the regular peak (which relates to individual tracks inside the mix)
Loudness range LUFS- measures the perceived loudness of audio material. Similarly to dynamic range, it tracks the difference in loudness between different parts of the audio
It is a big challenge to determine which loudness you should use, taking into consideration loudness perception, as well as different loudness standards presents on each streaming/music platform. Platforms apply loudness normalisation, which sets every audio file to the same integrated loudness. From my own experience, one loudness setting will never be perfect for every use case, but the most important thing is to find a compromise and choose a loudness/true peak level that sound solid on every service. Sometimes, the audio will be turned up, and sometimes turned down by certain services, depending on their own normalisation standards. Each platform will normalize the audio according to their own standards, so it is just important to make sure your source material dynamic range is good enough to not get completely squished by a music platform. The good news is that each platform recommends a dynamic range that is 9 DR or less (meaning 9 dbs difference between the loudest and quietest part).
Here are some of the standards used by the most popular platforms:
Spotify – -14 LUFS/ -1 DBTP (-11/-2 is also fine)
Deezer – -14 to -16 LUFS /-1 DBTP
Beatport – -6 to -9 LUFS /-1 DBTP
Apple Music – -16 LUFD/-1 DBTP
Bandcamp – No loudness normalisation, but -2DBTP is recommended for the peaks due to low playback quality they offer
Using our voice or even any other random sound as an instrument is not really a new thing. Music producers often make synths by sampling their own voice, which is a fun approach to sound design. Moreover, beatboxers are capable of creating quite realistic drum sounds with their voice. But, have you ever wondered if it is possible to turn any sound into an actual instrument- like a trumpet, violin or such? Well, now you can!
Two teams within Google Research- Magenta and AIUX collaborated on creating Tone Transfer, which took over a year to develop. This little software allows you to transform everyday sounds into instruments, like the trumpet, violin or flute. The way the algorithm works is by transferring the formants of the selected instrument onto the sound recording that is fed into the software. The results vary, but are sometimes very accurate. However, even if they give a weird result, most of the time the newly synthesised sounds are quite cool for integration into electronic music.
The project is based on Magenta’s Differentiable Digital Signal Processing (DDSP) technology. AIUX helped make it user-friendly, so that it can be used by a wider audience, not just experienced developers. Their current online web app has a limited array of 4 instruments, with the possibility to upload your own and train the algorithm yourself. The algorithm was trained with 10-minute long samples for each of the instruments that are currently available.
There is still a long way to go and the research teams state that this is just the beginning of their plans. Tone transfer is not perfect yet, as it struggles with volume/dynamics of samples it is fed with. It also cannot superimpose attenuations of each specific instrument on the input sound, so it may not always sound realistic. The trumpet sounds the best with vocals. I presume it is because pushing out air into trumpets and while signing produce similar dynamics and volume changes.
This project is a great example of how useful machine learning can be in a multitude of situations. Software like the Tone Transfer could open up possibilities of unique live performances with generated instrument sounds that cannot be achieved with traditional instruments. Below you can watch a demonstration of how this software looks and works: