The genius of Trent Reznor

One of the most influential bands of our time are certainly the Americans Nine Inch Nails (NIN), founded by singer / composer / programmer / multi-instrumentalist / visionary / genius Trent Reznor in 1988.

Nine Inch Nails have sold over 20 million records and were nominated for 13 Grammys and won 2. Time magazine named Reznor one of its most influential people in 1997, while Spin magazine once described him as “The most vital artist in music”.

Their concerts are characterized by their extensive use of thematic visuals, complex special effects and elaborate lighting; songs are often rearranged to fit a given performance, and melodies or lyrics of songs that are not scheduled to play are sometimes assimilated into other songs.

Trent is also famous for soundtracks of him along with his bandmate Atticus Ross.

They (he) deconstructed the traditional rock song, a bit like Sonic Youth did, but they went in a more electronic and aggressive direction. Their music is characterized by their massive use of Industrial sounds (although, not as massive as for the berliners Einstürzende Neubaten) in early works and lately is focused on analog and modular synths.

The sound design work is a really important part in their composition, as important as the harmony and the melody. They probably used every electronic instruments (and software) they could find, turning them all into their signature, creating that industrial NIN sound. Reznor’s sound is always clearly identifiable. While some of that is due to his sound design, which includes digital distortion and processing noise from a wide variety of sound sources,

What I find really impressive, besides the sound design and beautiful dark lyrics, is the unique choice of harmony and melody progression.

Nothing is predictable and even in the simplest progression there is that note that takes you deep into Reznor’s mind, away from any other musical word.

Reznor’s music has a decidedly shy tone that sets the stage for his often obscure lyrics.

His use of harmony, chords and melody also has a huge impact on his sound. In the movie Sound City, Reznor explains that he has a foundation in music theory, especially in regard to the keyboard, and this subconsciously influences his writing of him:

“My grandma pushed me into piano.  I remember when I was 5, I started taking classical lessons.  I liked it, and I felt like I was good at it, and I knew in life that I was supposed to make music. I practiced long and hard and studied and learned how to play an instrument that provided me a foundation where I can base everything I think of in terms of where it sits on the piano… I like having that foundation in there.  That’s a very un-punk rock thing to say. Understanding an instrument, and thinking about it, and learning that skill has been invaluable to me.”

Here are some example of his writing process:

  • Right where it belongs

Here’s is a continuous shifting between D major e D minor, that marks also an emotional shift of feeling, going constantly from sad to happy and viceversa. This helps give the song its emotional vibe.

  • Closer

Here the melodic line ascends the notes E, F,  G, and Ab.  The last note is intentionally ‘out of key’ to give an unique sound sound.

  • March of the Pigs

The harmonic and melodic choices of this song are simply impressive. They are exactly what an experienced musician would NEVER do, yet they work great.

The progression is unusual because the second chord is a Triton away from the first chord (this means, something really dissonant, that sound you would always try to avoid). The melody is brilliant. The song is (mostly) in the key of D minor (these are the notes of the D minor chord, D – F – A), but in the vocal line it sings an F #. Also, sing the major in a minor key, the worst thing to do, and yet it sounds great.

I must say that falling in love with their music helped to “color outside the borders”. It is a wonderful feeling to know how things should be and to consciously destroy those rules to follow the pure essence of your art.

For anyone interested in learning more about chord theory, here is the full article I was inspired by:
https://reverbmachine.com/blog/trent-reznor-chord-theory/

Wwise Implementierung in Unity (Teil 5: AkListener, AkGameObj & AkEnvironment)

In meinem letzten Blogeintrag habe ich das grundlegende Prinzip der Soundengine von Unity, die auf der Verwendung von Audio Listenern und Audio Sources basiert, vorgestellt. Die Wwise-Soundengine arbeitet auf dem selben Prinzip und hat standardmäßig bereits vorhandene Skripte mit welchen die selben System realsiert werden können. Diese Skripte heißen AkAudioListener und AkGameObj. AkAudioListener ist der Wwise-Ersatz für den Audio Listener von Unity.

Ist die Position und Blickrichtung eines GameObjects notwendig, was bei den meisten diegetischen Klänge einer dreidimensionalen Spielwelt der Fall ist, muss dieses GameObject auch als ein solches in Wwise registriert werden. Dafür gibt es das AkGameObj-Skript, das auf alle GameObjects gelegt wird.

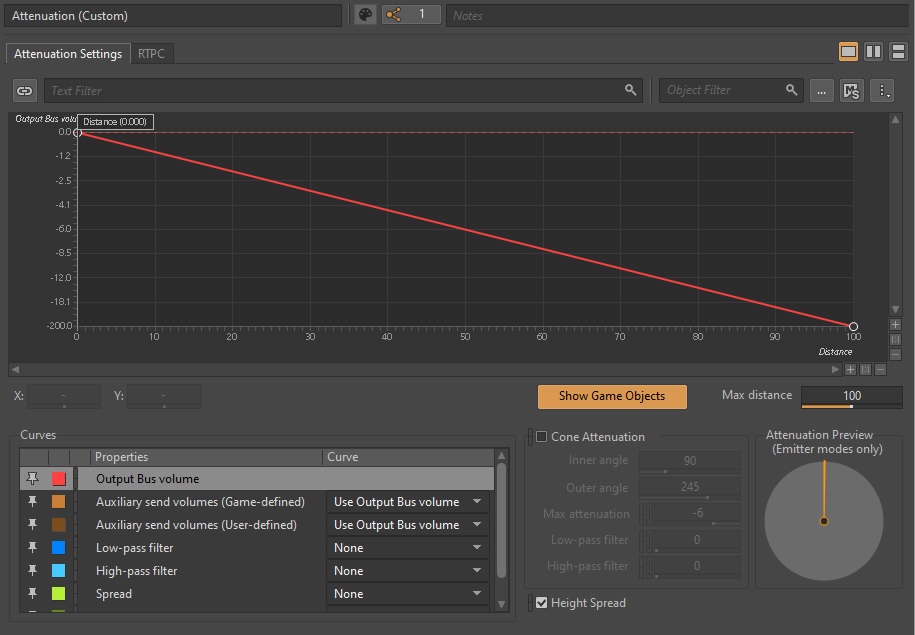
Das GameObject, das als Main Camera dient und auf welchem das AkAudioListener-Skript liegt, muss ebenfalls mit einem AkGameObj-Skript versehen werden, weil auch dessen Position und Blickrichtung notwendig ist, um den Abstand und die Richtung zu anderen GameObjects berechnen zu können. In Wwise kann das Verhalten des Richtungshörens und auch des Pegelabfalls bei steigernder Distanz von Audio Listener zu klangerzeugenden GameObject (wie der Rolloff in Unity) konfiguriert werden.

Konfiguration des Klangverhaltens von Objekten in einer dreidimensionalen Spielwelt
Pegelabfallverhalten abhängig von der Distanz des Audio Listeners zum GameObject

Das AkGameObj-Skript kann zusätzlich auch noch andere Parameter aus dem Spiel übermitteln, wie Switches, RTPCs oder Umgebungsinformationen.

Reverb Zones werden Wwise mithilfe von Aux-Bussen realisiert, mit welchen innerhalb von Wwise ein Hall-Effekt zum Direktsignal hinzugemischt wird. Tatsächlich können auch andere Effekte statt Hall-Effekte verwendet werden. Das hierfür benötigte Skript ist das AkEnvironment-Skript, welches auf einen Collider gelegt wird. Im Inspector des Collider-GameObjects kann ausgewählt werden, welcher Aux-Bus aktiviert werden soll, sobald der Collider betreten wird.

AkEnvironment Skript, welches den “Testreverb” aktiviert

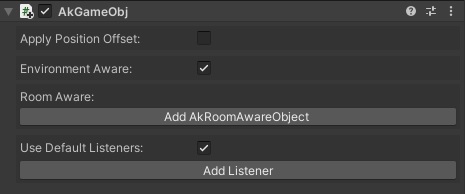
Dabei ist wichtig, dass das GameObject, wie z.B. der Audio Listener (also die Main Camera) im AkGameObj so konfiguriert wird, dass diese auf AkEnvironment-Skripte reagieren und damit ein Signal an den jeweiligen Aux-Bus senden.

Dieses GameObj ist Hall-fähig konfiguriert


Quellen:

[1] https://www.audiokinetic.com/courses/wwise301/?source=wwise301&id=Audio_Listener

[2] https://www.audiokinetic.com/library/edge/?source=Unity&id=class_ak_audio_listener.html

[3] https://www.audiokinetic.com/library/edge/?source=Unity&id=pg__wwise_components.html

[4] https://www.audiokinetic.com/library/edge/?source=Unity&id=class_ak_game_obj.html

[5] https://www.audiokinetic.com/library/edge/?source=Unity&id=unity_use__ak_environment__ak_environment_portal.html

Audio Listener und Audio Sources in Unity

Eines der grundlegenden Prinzipien der Soundwiedergabe in der Gameengine Unity ist das Zusammenspiel aus sogenannten Audio Listenern und Audio Sources. Auf diesem Prinzip basieren alle mit Unity entwickelten Spiele und Klangrealisierungen. Man muss sich ein Spiel ein wenig, wie einen Film vorstellen, bei welchem der Regisseur (oder aber der Spieleentwickler) genau festlegt, was der Spieler sehen kann und was nicht. Zwar hat der Spieler viel mehr Freiheiten als im Film, aber im Grunde ist es ein ähnliches Prinzip. Auf visueller Ebene wird eine Kamera genutzt, die der Spieler lenken kann. Diese wird oft Main Camera genannt und ist oft an die eigene Spielfigur in der ersten oder dritten Person gebunden. Gesehen werden können alle GameObjects die im Blickwinkel der Kamera sind und mit sichtbaren Texturen belegt sind.

Ähnlich verhält es sich auch auf klanglicher Ebene. Analog zum Visuellen kann man Audio Listener als die Main Camera sehen und Audio Sources wie visuelle GameObjects. Tatsächlich ist der Audio Listener in den meisten Fällen mit der Main Camera verknüpft und Audio Sources mit den GameObjects, die Sound erzeugen. Der Audio Listener ist quasi ein Mikrofon, der Signale von Audio Sources erhält und weiter an die Audioausgänge schickt. In Unity kann es standardmäßig nur einen Audio Listener geben.

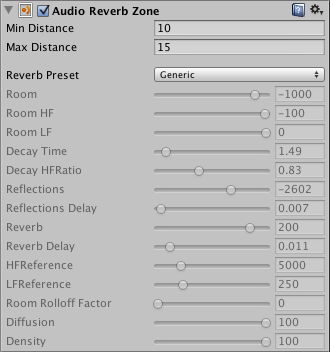
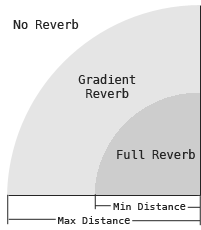
Audio Listener empfangen also Signale von Audio Sources, welche aber noch durch Effekte, wie z.B. einen Hall, geschickt werden können, wenn der Audio Listener sich in einer sogenannten Reverb Zone befindet. Reverb Zones sind kugelförmige GameObjects, die ein bestimmtes Gebiet umfassen und nach Eintreten des Audio Listeners den Anteil des Halls hinzumischen, je nachdem, wie nah sich der Audio Listener am Zentrum der Reverb Zone befindet.

Audio Reverb Zone im Unity Inspector mit verschiedenen Konfigurationsmöglichkeiten
Visualisierung des Hall-Verhaltens. Innerhalb des “Full Reverb”-Bereichs ist der Anteil des Diffussignals bei 100%. Im “Gradient Reverb”-Bereich sinkt der Anteil des Diffussignals zugunsten des Direktsignals, je weiter außen der Audio Listener sich befindet

Audio Sources können auf zwei Arten implementiert sein: 2D und 3D, diese können mit dem Spatial Blend-Regler reguliert werden.

2D bedeutet, dass sowohl Abstand als auch Richtung zum Audio Listener nicht relevant sind und der Sound unabhängig davon abgespielt wird. Der Sound, außer er wird im Unity-Mixer oder im Inspector des selben GameObjects noch weiter bearbeitet, wird so wie er ist abgespielt. Das wird vor allem für Soundtracks oder klangliche Hintergrundkulissen, wie Atmo-Aufnahmen, verwendet.

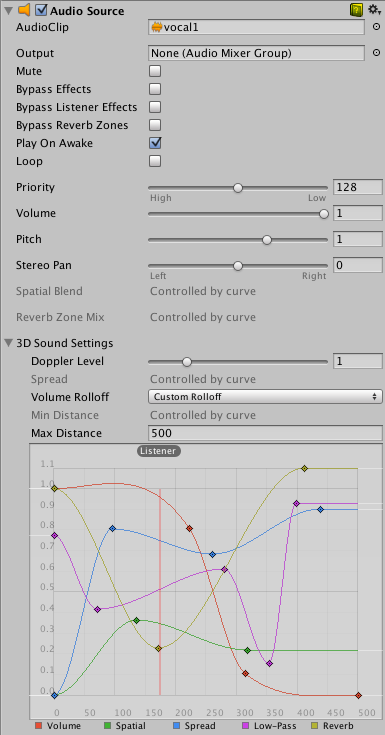
Audio Source mit verschiedenen Konfigurationsmöglichkeiten

3D hingegen setzt einen Sound Source in die dreidimensionale Spielwelt und erlaubt Richtungshören und zugleich variable Pegel, je nach Abstand des Audio Sources zum Audio Listener. Das Richtungshören wird ermöglicht, indem das ausgehende Audiosignal in ein Monosignal gewandelt wird und durch Pegelunterschiede ein Panning erhält. Es gibt zwar auch Lösungen für komplexere Surround-Sound-Verfahren, aber standardmäßig arbeitet Unity nur mit dieser vereinfachten Form, welches das Richtungshören ermöglicht. Von den verschiedenen 3D-Konfigurationsmöglichkeiten ist vor allem der Rolloff von großer Bedeutung. Damit lässt sich bestimmen, wie der Pegel, je nach Abstand zum Audio Listener, abfällt. Standardmäßig verwendet man entweder einen logarithmischen oder einen linearen Rolloff. Alternativ kann auch ein eigener, händisch eingezeichneter, Rolloff erstellt werden. Zusätzlich bestimmt man noch die Parameter Min Distance und Max Distance. Diese markieren einen Bereichen, in dem der Audio Listener sich befinden muss, um den Audio Source hören zu können und in welchem der Rolloff sich abspielt. Ist der Audio Listener außerhalb dieses Bereichs, wird das Signal nicht an diesen weitergegeben und folglich wird das Signal auch nicht abgespielt.

Die unterschiedlichen Rolloff-Verhalten

Quellen:

[1] https://docs.unity3d.com/Manual/class-AudioListener.html

[2] https://docs.unity3d.com/Manual/class-AudioReverbZone.html

[3] https://docs.unity3d.com/Manual/class-AudioSource.html

[4] https://docs.unity3d.com/Manual/AudioSpatializerSDK.html

[5] https://docs.unity3d.com/Manual/AmbisonicAudio.html

Wwise Implementierung in Unity (Teil 4: Scripting)

Neben der Nutzung vorgefertigter Skripte, die für die Implementierung von Wwise in Unity mitliefert sind, gibt es auch die Möglichkeit eigene Skripte bzw. eigenen Code zu schreiben, um Befehle an Wwise zu senden. Der Vorteil davon ist, dass man ganz genau bestimmen kann, an welcher Stelle Befehle an Wwise übermittelt werden sollen. Viele Funktionen werden außerdem von den mitgelieferten Skripten nicht abgedeckt und müssen deshalb selbst erstellt werden. Häufig muss z.B. ein Sound abgespielt werden, wenn ein Spieler eine Taste betätigt oder etwas im Spiel geschieht, was nicht mit Triggercollidern zu tun hat.

Für das Implementieren von Wwise in Unity mittels Skripte gibt es grundsätzlich zwei Möglichkeiten: Die direkte Hardkodierung eines Befehls oder die Kodierung mithilfe von Wwise-Types, die im Unity-Inspector einen Property Drawer anzeigen, mit welchem man Wwise-Objekte (Event, State, Switch usw.) auswählen kann.

Jeder hardkodierte Befehl beginnt mit dem Begriff AkSoundEngine, der quasi eine Information für Unity darstellt, dass ein Wwise-Objekt aufgerufen werden soll. Daraufhin wird bestimmt, welche Wwise-Funktion ausgeführt werden soll. Eine der grundlegendsten Funktionen ist “PostEvent” für das Aufrufen eines Wwise-Events. Desweiteren gibt es noch die Funktionen “setState” bzw. “setSwitch” zum Bestimmen eines States bzw. Switches, “setPosition“, damit Wwise die Position eines GameObjects bekommt, was für die korrekte dreidimensionale Wiedergabe von diegetischen Sounds benötigt wird, “setRTPC“, mit welchem Parameter aus dem Spiel an Wwise übermittelt werden und viele weitere Funktionen, die in der Wwise-Dokumentation nachgeschlagen werden können.
In den runden Klammern wird immer der Name des Wwise-Objekts als String mit angegeben. Manchmal werden noch andere Argumente benötigt, wie das GameObject, von dem der Befehl ausgeht.

Das Aufrufen eines hartkodierten Trigger-Events, das Sounds für Fußschritte abspielt

Alternativ dazu kann man auch mithilfe von Wwise-Types Implementierungen realisieren. Dazu wird zunächst eine Variable mit einer Wwise-Type-Klasse initialisiert. Wwise-Type-Klassen sind die verschiedenen Arten von Wwise-Objekten. Das ist z.B. AK.Wwise.Event für Wwise-Events, AK.Wwise.State für Wwise-States und viele andere. Auch alle Wwise-Type-Klassen können in der Wwise-Dokumentation nachgeschlagen werden.

Daraufhin kann im Unity-Inspector im Property Drawer des Skripts das jeweilige Wwise-Objekt, welches im Wwise-Editor angelegt ist, ausgewählt werden.

Variable “Play_SFX_Ellen_Run” mit dem gleichnamigen Wwise-Objekt im Property Drawer belegt


Nach der Initialisierung wird die Variable in einer Funktion im Skript aufgerufen. Dabei wird die Variable mit der jeweiligen Wwise-Funktion aufgerufen, wie z.B. “Post()” bei Wwise-Events oder “SetValue()” bei RTPCs, States oder Switches.

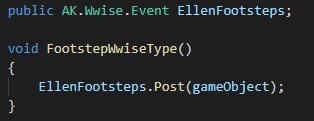
Variable “EllenFootsteps” wird mit Wwise-Type “AK.Wwise.Event” initialisiert und in der darauffolgenden Funktion “FootstepWwiseType()” mit der “Post()”-Funktion aufgerufen

Quellen:

[1] https://www.audiokinetic.com/courses/wwise301/?source=wwise301&id=Posting_Events_using_WwiseTypes#read

[2] https://www.audiokinetic.com/courses/wwise301/?source=wwise301&id=Creating_a_WwiseType_Event_property#read

[3] https://www.audiokinetic.com/library/edge/?source=SDK&id=waapi_functions_index.html

[4] https://www.audiokinetic.com/library/edge/?source=Unity&id=annotated.html

Wwise Implementierung in Unity (Teil 3: AkState, AkSwitch)

Bei meinem letzten Blogeintrag habe ich die Wwise-Implementierungsskripte AkInitializer und AkBank, die eine grundlegende Voraussetzung für die Nutzung der Wwise Audio-Engine bilden und das Laden von Soundbanks ermöglichen, beschrieben.

Ein Grundbaustein eines adaptiven Sounddesigns ist das adaptive Verhalten von Sounds, das auf unterschiedliche Gegebenheiten im Spiel reagiert. Dafür gibt es Switches und States, die quasi Zustände repräsentieren und wie Schalter aktiviert werden können. Der Hauptunterschied zwischen Switches und States ist, dass ein Switch jeweils einem einzigen GameObject zugeordnet wird, während States von unterschiedlichen GameObjects aktiviert werden können. Die Nutzung und Konfiguration beider Parameter ist hingegen identisch.

Für das Verändern eines Switches oder eines States gibt es extra dafür vorgefertigte Skripte namens AkSwitch und AkState. In Wwise müssen dafür bereits die unterschiedlichen States bzw. Switches und die State bzw. Switch-Container mit den Audiofiles vorhanden sein, damit man sie in Unity implementieren kann. Ist das gegeben legt man ein AkSwitch- bzw. AkState-Skript auf ein GameObject. In diesen kann man nun über den Unity-Inspector den Switch bzw. State wählen, der aktiviert werden soll.

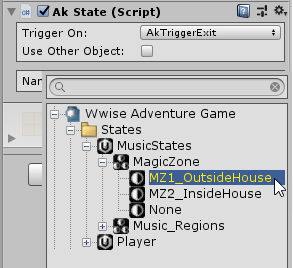
Auswahl des States im Unity Inspector

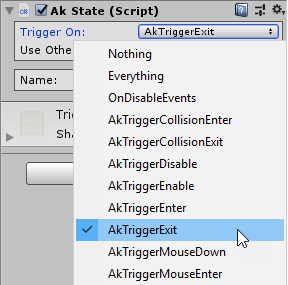
Des Weiteren muss noch bestimmt werden, was den Switch bzw. State triggert. Klassischerweise ist es das Betreten oder Verlassen eines Colliders.

Der State wird hier beim Verlassen des Triggers verändert

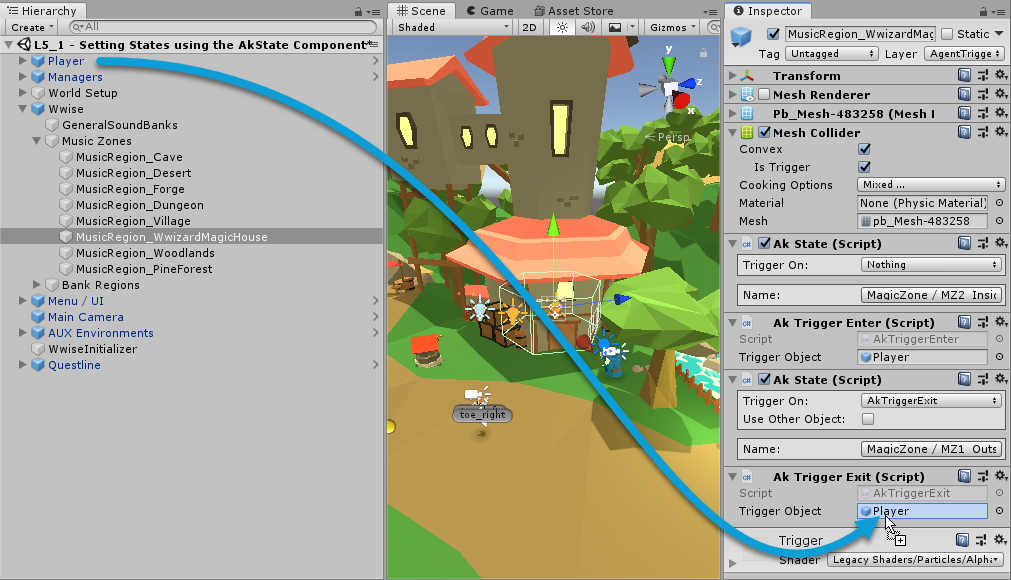
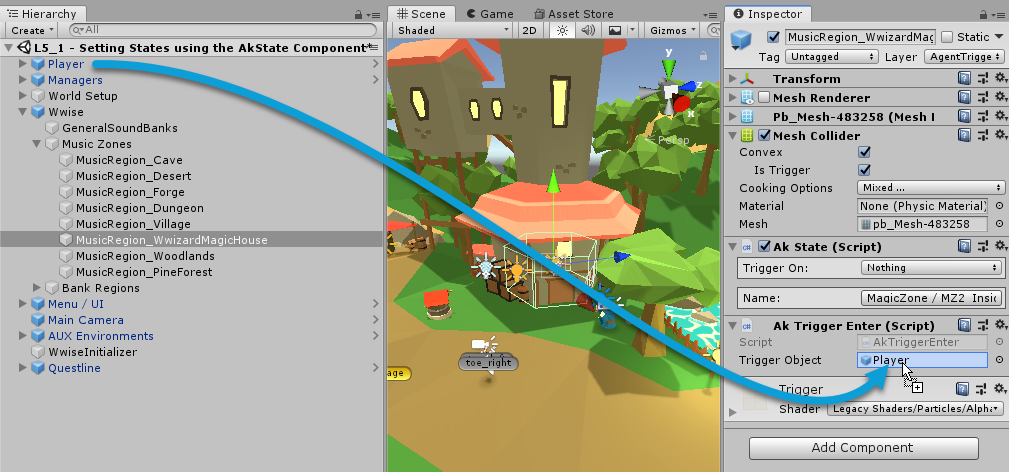
Hierbei sollte noch ein AkTriggerEnter– bzw. AkTriggerExit-Skript hinzugefügt werden, der spezifiziert, welches GameObject den Trigger auslöst, ansonsten löst jede Kollision mit irgendeinem anderen GameObject den Trigger aus, was in den meisten Fällen nicht gewünscht ist.

AkTriggerExit-Skript mit dem Player als auslösendes GameObject

Quellen:

[1] https://www.audiokinetic.com/library/edge/?source=SDK&id=soundengine_switch.html

[2] https://www.audiokinetic.com/courses/wwise301/?source=wwise301&id=Setting_States_using_the_AkState_Component

Wwise Implementierung in Unity (Teil 2: AkInitializer & AkBank)

Im letzten Blogpost habe ich die für Unity vorgefertigten Skripte AkEvent und AkTriggerEnter beschrieben, die in Kombination für das Auslösen von Wwise-Events genutzt werden. Dieses Mal möchte ich einige grundlegende Skripte zur Nutzung von Wwise vorstellen.

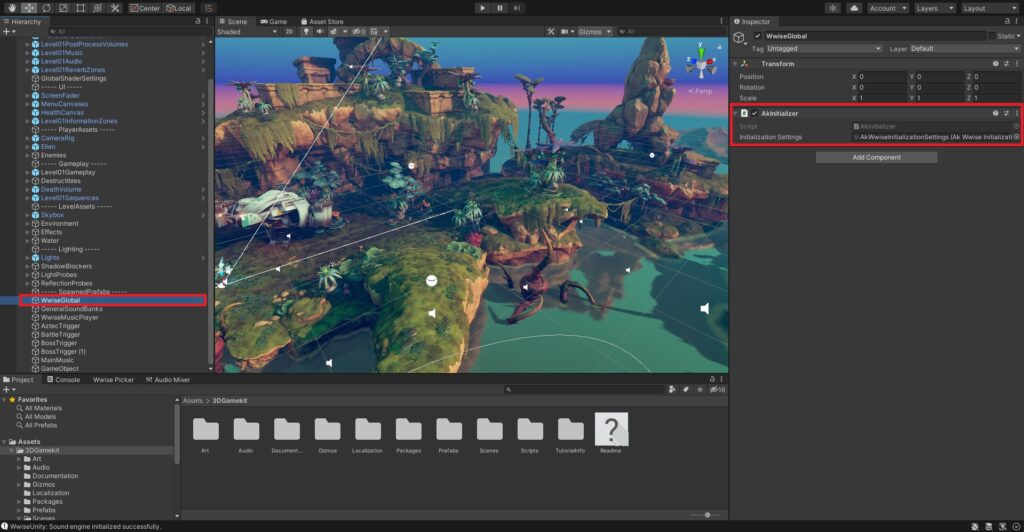
Damit die Unity-Engine allerdings überhaupt erkennt, dass es Wwise als Audio-Engine nutzen soll, muss zunächst Wwise beim Spielstart initialisiert werden. Das wird mit dem Skript AkInitializer realisiert. Hierfür wird ein leeres GameObject benötigt, das beim Starten des Spiels bereits vorhanden ist. Das GameObject wird im Inspector von Unity mit dem AkInitializer-Skript versehen, das automatisch beim Starten des Spiels geladen wird. Während des Spiels sorgt das Skript zusätzlich dafür, dass Frame für Frame Daten an die Wwise-Engine übetragen werden und somit die Kommunikation unter den beiden Engines gewährleistet wird. Das ist eine der Grundvoraussetzungen für die Nutzung von Wwise.

Leeres GameObject (links) mit AkInitializer-Skript (rechts)

Eine mit AkInitializer nah verwandte Funktion von Wwise ist das Laden von sogenannten Soundbanks. Soundbanks sind Audiodaten und Befehle, die während des Spiels in den Arbeitsspeicher geladen werden und somit unmittelbar ohne längeren Wartezeiten abgerufen werden können. Große Spiele arbeiten mit vielen Soundbanks, die abhängig von der Position des Spielers oder anderen Bedingungen einzeln geladen und wieder entladen werden. Das ermöglicht die Realisierung von großen und komplexen Spielwelten auf einem PC oder einer Konsole. Häufig wird vom Entwicklerteam ein Datenmengenlimit vorgegeben, welches das Audio-Team nicht überschreiten darf.

Das Skript für das Laden von Soundbanks heißt AkBank und kann an unterschiedlichen Stellen ausgeführt werden. In der Regel hat man immer eine Soundbank, die beim Starten des Spiels geladen wird. Weitere Soundbanks werden unter anderem geladen, wenn ein neues Gebiet betreten wird. Das Laden einer Soundbank dauert eine Weile, weshalb einige Spiele währenddessen eine Ladesequenz anzeigen. Bei der praktischen Anwendung erfordert das Skript im Unity-Inspector eine Information, wann die Soundbank geladen, wann sie entladen werden soll. Dabei muss auch bestimmt werden, welche Soundbank geladen werden soll. Es gibt noch weitere Optionen, mit welchen sich einstellen lassen, wie dekodiert und wie genau mit den Daten verfahren werden soll. Das hilft beim Datenmanagement und ist vor allem für umfangreiche Spiele mit großen Datenmengen praktisch.

Die Soundbank “Footsteps” wird beim Starten des Spiels geladen und beim Zerstören des GameObjects entladen

Quellen:

[1] https://www.audiokinetic.com/library/edge/?source=Unity&id=class_ak_initializer.html

[2] https://www.audiokinetic.com/library/edge/?source=WwiseFundamentalApproach&id=understanding_soundbanks_understanding_soundbanks

Wwise Implementierung in Unity (Teil 1: AkEvent & AkTriggerEnter)

Es gibt verschiedene Methoden Wwise-Elemente in der Gameengine Unity zu implementieren. Zum einen gibt es es die klassische manuelle Implementierung mithilfe von Skriptbefehlen in den Programmiersprachen C# (am populärsten), UnityScript und Boo zum anderen gibt es auch vorgefertigte Skripte (in C#) und Funktionen, die ein schnelles Implementieren innerhalb des Unity-Editors ermöglicht.

Vorgefertigte Skripte

Diese Skripte werden bei der Installation von Wwise in einem Unity-Projekt mitgeliefert und decken eine allgemeine Bandbreite von unterschiedlichen Implementierungsmöglichkeiten ab.

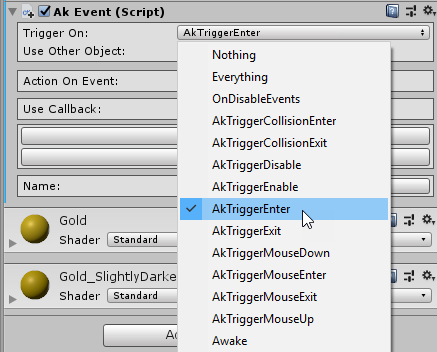
Eine der am häufigsten benötigten Funktionen bei der Nutzung von Wwise-Elementen ist das Abrufen von Wwise-Events. Diese übermitteln Informationen an Wwise, die Anweisungen, wie die Audio-Engine handeln soll, beinhalten. In den meisten Fällen ist es das Abspielen oder Unterbrechen von Sounds. Das für Unity vorgefertigte Skript heißt AkEvent. Dieses ist an Bedingungen geknüpft. Häufig ist es das Betreten oder Verlassen eines GameObjects, wie z.b. eines Colliders. Ein Collider ist eine geometrische Form (häufig unsichtbar für den Spieler) im Spiel, die für das Triggern verschiedener Funktionen genutzt werden kann.

AkEvent, das auf das Betreten des Triggers ausgeführt wird


Zusätzlich muss dabei erwähnt werden, dass Collider nur auf GameObjects reagieren. In der Regel möchte man allerdings spezifizieren, welche GameObjects genau diese Trigger auslösen können, sonst reagieren die Trigger auf jedes Eintreten irgendeines GameObjects, also auch auf Elemente, wie überlappende Bausteine aus der Spielwelt. Mit dem Skript AkTriggerEnter kann man festlegen welches GameObject diesen Trigger auslösen kann. Häufig soll nur die eigene Spielfigur, die der Spieler steuert, triggerfähig sein.

AkTriggerEnter mit dem “Player” als einziges GameObject, das diesen Trigger auslösen kann

Quellen:

[1] https://www.audiokinetic.com/courses/wwise301/?source=wwise301&id=Adding_a_Trigger_Condition#read

[2] https://www.audiokinetic.com/courses/wwise301/?source=wwise301&id=Restricting_the_Trigger_Condition#read

The Loudness War

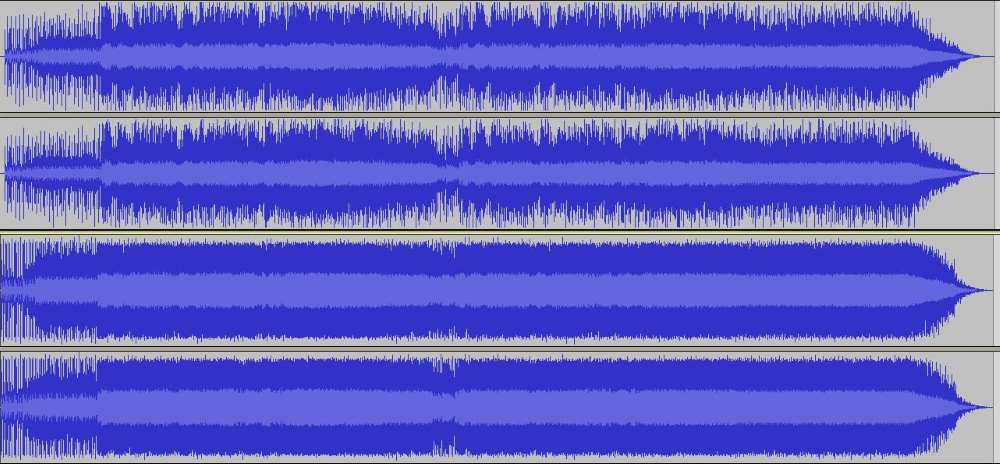
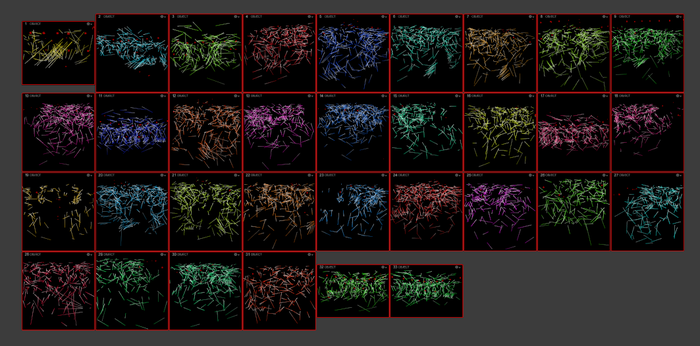
Before starting, look at the top image. These 2 sets of sound files, mastered/limited at different levels. The first one is from the 90s and the second one is what is being done post 2010. Just by looking at the graphic representations, you can tell that the first song has a lot of breathing space and room for expression, while the second one looks a bit like the life has been squeezed out of it. This is the loudness war in a nutshell- people competing to squeeze in as much volume as possible within the range that we can digitally produce.

So why is the loudness war happening? Usually, we perceive louder as better, even if a song might not be better mixed. Basically, music is getting progressively louder as time passes, thus becoming less dynamic and lively.

What are the basics of loudness? There are a few units used in measurement- LUFS (loudness units relative to scale and DBTP (decibels true peak). Our DAWs by default show a different unit- DBFS (decibels relative to full scale), which is does not show us the overall average loudness, just the momentary peaks. LUFS are actually closer to how our ear perceives loudness. It is similar to RMS (root mean square) but still closer to our own loudness perception. When mastering audio/music, it is highly recommended to get a measurement tool that includes at least these measures (but ideally give you access to more insights into your track’s dynamics, spectrum and similar):

  • Short-Term LUFS – Short-term peak at the current listening point
  • Integrated LUFS – overall loudness of the whole track
  • Dynamic Range – the difference between the quietest and the loudest part of the track
  • Momentary Max LUFS – the highest peak measured in LUFS within the audio/music that is being analysed
  • True Peak – The maximum peak level of the audio measured real-time, measured in DBTP. Different from the regular peak (which relates to individual tracks inside the mix)
  • Loudness range LUFS- measures the perceived loudness of audio material. Similarly to dynamic range, it tracks the difference in loudness between different parts of the audio

It is a big challenge to determine which loudness you should use, taking into consideration loudness perception, as well as different loudness standards presents on each streaming/music platform. Platforms apply loudness normalisation, which sets every audio file to the same integrated loudness. From my own experience, one loudness setting will never be perfect for every use case, but the most important thing is to find a compromise and choose a loudness/true peak level that sound solid on every service. Sometimes, the audio will be turned up, and sometimes turned down by certain services, depending on their own normalisation standards. Each platform will normalize the audio according to their own standards, so it is just important to make sure your source material dynamic range is good enough to not get completely squished by a music platform. The good news is that each platform recommends a dynamic range that is 9 DR or less (meaning 9 dbs difference between the loudest and quietest part).

Here are some of the standards used by the most popular platforms:

  • Spotify – -14 LUFS/ -1 DBTP (-11/-2 is also fine)
  • Deezer – -14 to -16 LUFS /-1 DBTP
  • Beatport – -6 to -9 LUFS /-1 DBTP
  • Apple Music – -16 LUFD/-1 DBTP
  • Bandcamp – No loudness normalisation, but -2DBTP is recommended for the peaks due to low playback quality they offer
  • Tidal – -14 LUFS/-1 DBTP
  • YouTube – -13 to -15 LUFS /-1 DBTP
  • SoundCloud – -8 to -13 LUFS /-1 DBTP

Sources:

https://www.masteringthemix.com/pages/mixing-with-levels#LoudnessRange

www.audiodraft.com/blog/audio-levels-101-all-you-need-is-lufs

https://artists.spotify.com/help/article/loudness-normalization

https://www.edmprod.com/lufs/

https://www.sageaudio.com/blog/mastering/mastering-for-streaming-platform-loudness-and-normalization-explained.php

https://www.masteringthemix.com/blogs/learn/76296773-mastering-audio-for-soundcloud-itunes-spotify-and-youtube

Wanding

Wanding is a very important process for the OptiTrack system calibration.

A calibration wall is used, which is repeatedly shaken in front of the cameras so that all cameras can see the markers.

The CalibrationWand must be brought into the capture volume and carefully shaken through the entire aspiration volume. To collect samples with different orientations, it is best to draw figures of eight.

For adequate sampling, we need to cover as much space as possible and cover both low and high heights.

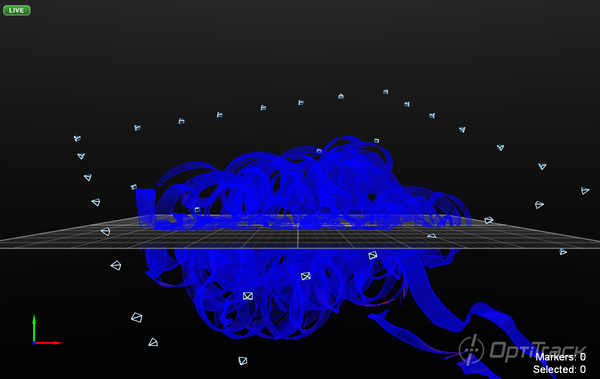
The wanding trails are shown in color in the 2D view. A table with the status of the measurement process is displayed in the calibration area to monitor the progress.

After enough samples have been collected, the software can calculate. Generally 2,000 to 5,000 samples are sufficient.

When done, the cameras are displayed in Motive’s 3D viewer. However, the recording volume built into the software still has to be aligned with the coordinate plane. This is because the ground plane is not fixed.

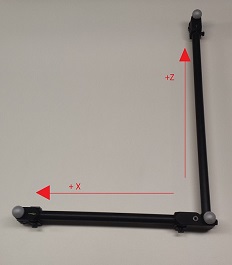
The final step necessary to complete the calibration is to set the ground plane and origin by placing the calibration square in the volume and indicating on the subject where the calibration square is located. This needs to be positioned within the volume where we want to place the origin and level the ground floor.

To set the coordinate system, reference is made to the position and orientation of the calibration square, so it must be aligned in such a way that it relates to the desired axis orientation.

Surroundscapes

The next generation of audio

Surroundscapes: the power of immersive sound

Geoff Taylor, CEO, the BPI: “Cutting-edge new tech, such as immersive audio used in VR and other applications, give us a glimpse of how this exciting new world of consumption and entertainment will take shape.”

In the early days of silent film, music was performed live. There was a band or pianist that would play in front of the screen, serving as commentary for the narrative’s action and flow. In 1927, music and sound were recorded and printed onto film for the first time. Slowly, as film technology became more sophisticated, it encompassed multiple channels of sound, with a number of speakers placed around the theatre. Eventually, surround sound was developed, and became a critical factor in the success of the overall cinematic experience.

Immersive content is no different. If one thinks of virtual reality as an attempt to create an alternative reality, the brain needs audio cues to match the visuals to be able to buy into the illusion. The user has to feel present in the experience, and can only feel present if all the cues received are completely natural. If the sound is flat and coming from just one place, the spell will be broken.

When delivered successfully, immersive audio creates the sensation of height around the user, transporting into a more thrilling experience. Because the power of sound can alert users to something behind or above, it’s important users realise that they are able to move around within the immersive experiences. When creating virtual reality (VR) and augmented reality (AR) experiences, for a long time, the industry has been focusing on the visuals, but that is only part of the environment.

This year, at SXSW, Tribeca and the Venice Film Festival there was a noticeable rise in sound-led immersive experiences: sound has become a powerful storytelling tool.  

Last year, Bose launched BoseAR  and with it three products to transform AR audio. Launched alongside  
these products, the software to  create AR content is now available, with the world’s first audio AR platform: Traverse.

At SXSW, Traverse’s “From Elvis in Memphis”, an AR-based piece of content allowed users to experience the music of Elvis Presley by walking through a physical space. The experience is created in such a way that it’s like being in the studio with Elvis; it’s possible to walk right up to him and his band members.

In the UK, Abbey Road Studios is one of the most famous recording studios in the world. It has been in use since 1931, and has famously provided recording facilities for talents such as The Beatles, Pink Floyd and Aretha Franklin. Abbey Road is the only facility in the UK to offer both scoring and film sound post-production, while the focus on immersive technology grows year on year.

Our research has identified a number of companies in the UK which are creating sound-based tools and solutions. There are even more creating sound-led immersive experiences. Two companies from our CreativeXR programme this year are doing just that: Darkfield and Abandon Normal Devices. On last year’s programme, Roomsize developed Open Space: a platform that enables the rapid construction of interactive audio experiences that occupy physical spaces. All this activity suggests that we are on the brink of a new generation of infrastructure 
to amplify sound in VR, AR and MR. Sound-led content will simultaneously open up new streams of possibilities for entertainment and media.

In partnership with the British Phonographic Industry (BPI) and its Innovation Hub, we are delighted to introduce Surroundscapes: The power of immersive sound. This is the latest Digital Catapult immersive showcase which runs from July to October 2019. We will be shining a light on UK-based startups and scaleups that are either creating the latest solutions to amplify VR, AR and MR experiences with sound, or content creators who are  specifically sound-led. 

Surroundscapes: showcase

After a competitive selection process, Digital Catapult and the BPI welcome six of the most innovative immersive sound companies in the UK: 

1.618 Digital: is an award-winning creative sound design studio that provides audio production and post-production services; immersive and spatial audio solutions for 360 video content; and games and interactive VR/AR media. 

As part of this showcase, 1.618 Digital is proud to present three projects that are on the cutting edge of digital technology for modern education and storytelling and illustrate the innovative applications of immersive audio. Immersive environments allow interactions and user manipulation of objects and sounds, which has been proven to provide 40% more brain activity relating to storage and recall of information. The use of high spatial resolution audio and interactivity along with volumetric audio and 6DOF enables users to engage with stories and other content on a deeper level.

Darkfield: specialises in creating communal location-based immersive experiences inside shipping containers. These experiences place the audience in complete darkness and then deliver binaural 3D audio and other sensory elements, using the darkness to create a canvas for the imagination.

The company has a unique offer grown from over twenty years working in the immersive theatre industry, and over six years creating shows and experiences in complete darkness that use binaural audio, multi-sensory effects and content to place the audience in the centre of evolving narratives. The experiences’ greatest asset is the invitation to walk the line between what seems to be happening and what imaginations can conjure up.

MagicBeans: is a spatial audio company creating a new kind of AR audio. The company maps highly realistic audio ‘holograms’ to real-world locations, visual displays and moving objects, creating a new and emotive presence for experiential businesses and visitor attractions.

The experiences demonstrate how sound can be mapped to visual displays, to individual objects that can be picked up and interacted with, and to a full room-scale audio experience. Experience MagicBeans technology embedded in a next-generation silent disco, an immersive theatre production and a new kind of audio-visual display

PlayLines: is an immersive AR studio that specialises in creating narrative-led immersive AR experiences in iconic venues. Its productions combine cutting-edge location-based AR technology with game design and immersive theatre techniques. The team’s work has been described as “Punchdrunk Theatre meets Pokemon Go”.

CONSEQUENCES is a groundbreaking immersive interactive audio-AR grime rap opera, created in collaboration with multi-award-winning MC Harry Shotta. Explore the AR Grime Club, follow the rhymes, and choose the ending. CONSEQUENCES gives audiences a brand new kind of night out that combines Secret Cinema, silent disco and ‘Sleep No More’. 

Volta: is a new way to produce music and audio, using space and movement as both a medium and an output. It is a VR application that makes spatial audio production not just easy but expressive, like a musical instrument, and easily integrates with audio production software.

Volta achieves integration by retaining the visual and interactive elements of producing spatial audio within the platform, while keeping all audio signal processing in the producer’s or engineer’s audio production application of choice. It uses a robust communication channel that allows the user to physically grab objects, move them in space, and record and automate that motion.

ZoneMe: ZONEME’s TRUE2LIFE™ object-based sound system provides a new way to control how audiences hear things by placing the sound at the point of origination. For example, words can appear to come from an actor’s mouth, not the speakers, or a gunshot can be made to sound as if it takes place outside the room. 

ZONEME aims to put the ‘reality’ into VR/AR/MR experiences by providing TRUE2LIFE™ sound. These experiences can be up to seven times more stimulating than visuals. Yet visuals have seen huge technological advances over the last 30 years that have not been matched by similar developments in audio. 

Naima Camara Thursday 04 July 2019