An accelerometer measures the acceleration of an object, or in other words the rate of change of an objects velocity. It also uses earth`s gravity on a static object and measures its movement or vibrations. The most typical sensors have 3 axes, oriented on the x, y and z planes. One of the most common usages of accelerometer would be the orientation sensor in smart phones.
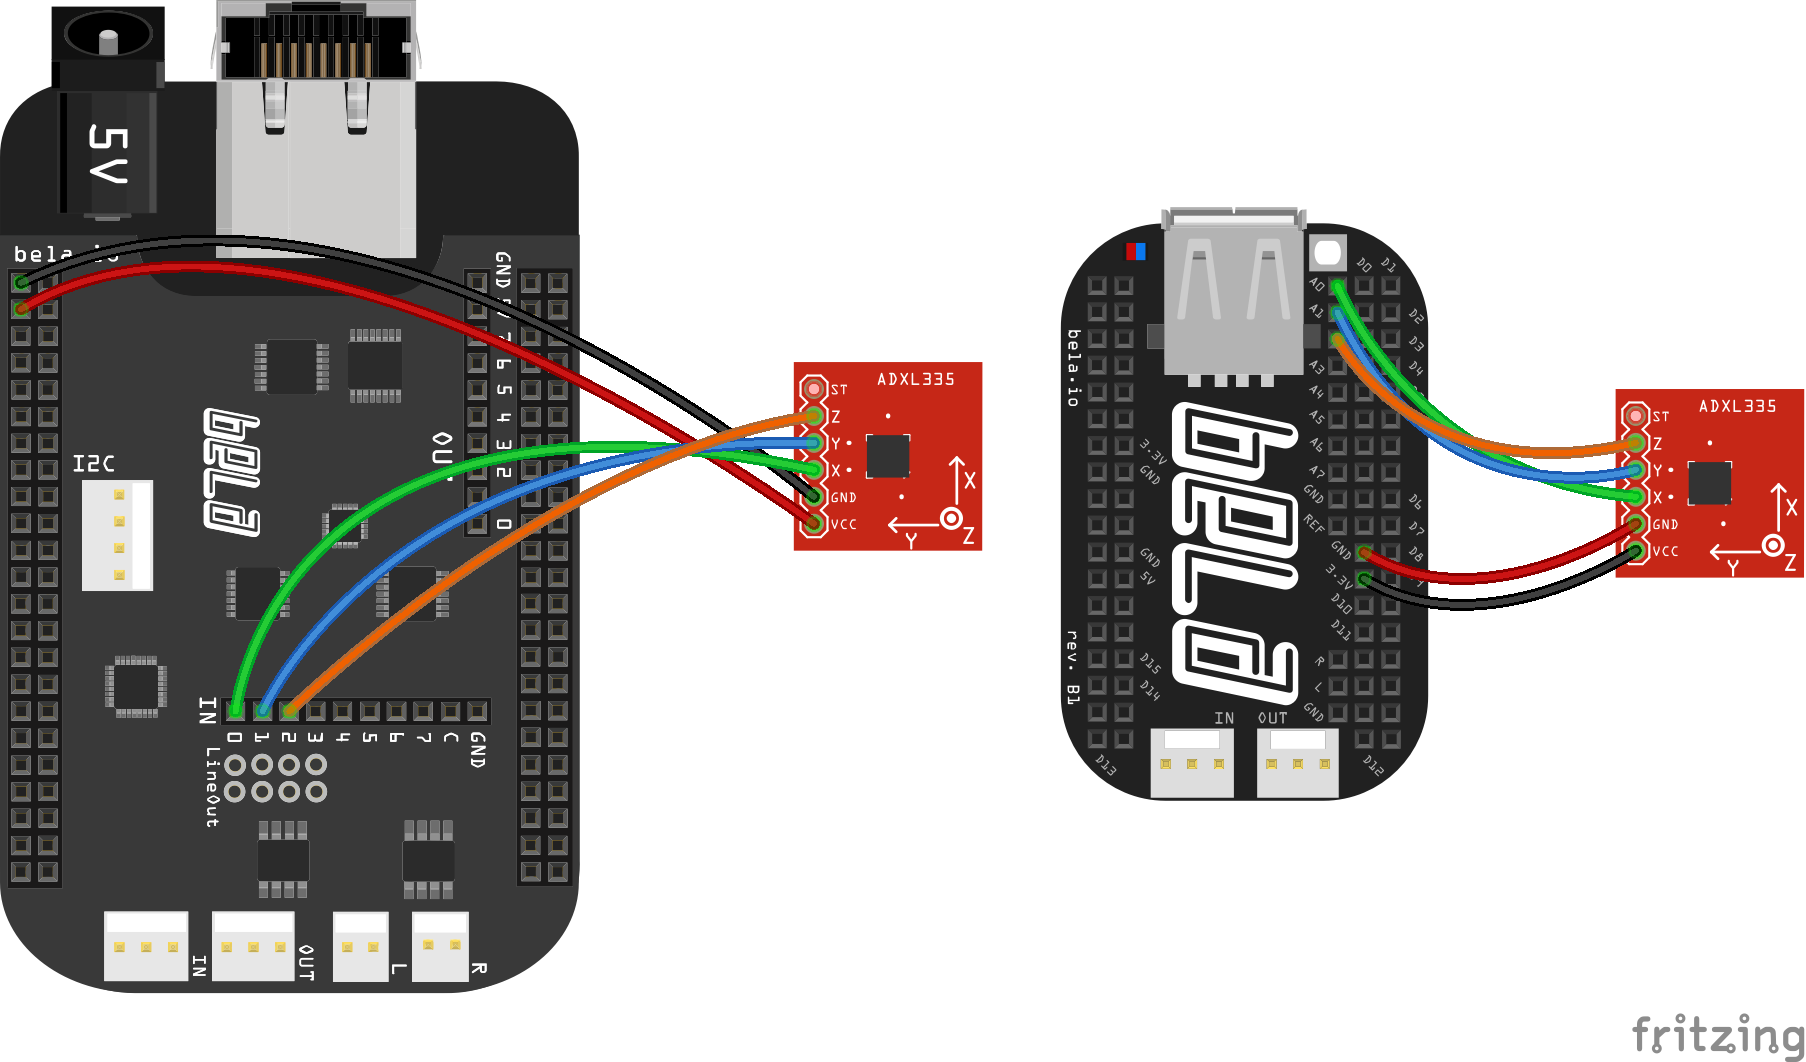
As we already know, accelerometers are analog sensors that provide a different amount of voltage for each axes. To connect it to the bela we need 5 wires, 3 for the axes, one for the power and the last one for the Ground.
Connecting Accelerometer to Bela Board; Source: bela.io
Analog signals can vary anywhere between 0 and 1, whereas digital signals on the Bela have only two states (0, 1). In my project I am using two different types of analog sensors, which are an accelerometer and two potentiometers. I will explain them in more detail afterwards. With these analog inputs you can have a variable control over some parameters and tune them exactly like you want them to be. (Bela, 2021)
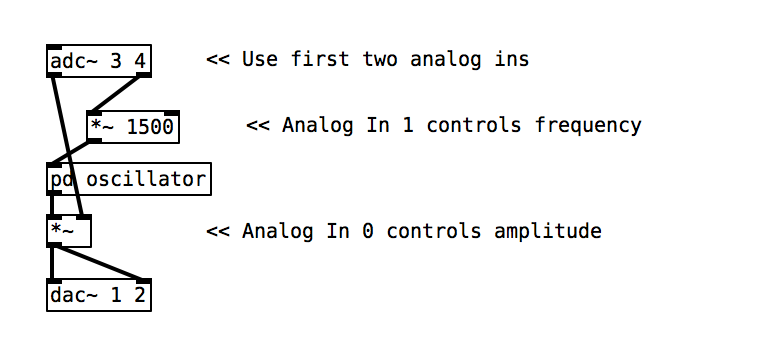
To read from the analog inputs in Pure Data an adc~ object is needed. The incoming signals are sampled at audio sampling rate, so that you can handle them in the same way as audio signals.
Analog Input in PD; Source: bela.io
Digital Input
As mentioned above, the digital inputs have only two states and are perfect suitable for push buttons. The digital port has to be configured as an input or output. To use a push button it has to be an input of course. If the button is pressed, the input receives the incoming 3.3 volts, and 0 V when its off. In the following example in Pure Data, digital pin 18 is set as an input and pin 17 as an output. (Bela, 2021)
The Bela Board lets you create different interactions with sensors and sounds. It is built to interact with various inputs for example touch sensors or an accelerometer. The Bela Mini which I am using in my project features 16 digital I/O channels, 8 analog inputs and 2 audio input and output channels. The Bela board is accessed via the Bela software that you can use via the browser and communicate with the board while connected via USB. With this method it is very easy to load the Pure Data patches onto the Bela board. To point out one disadvantage is, that you can’t edit the patch directly on the board, you have to upload it every time if you change something. (Bela, 2021)
Granular Synthesis is often referred and used for pad sounds, but it actually has a ridiculous number of applications and sound design possibilities. Granular Synthesis appears in a lot of tools in your DAW where you wouldn’t expect it, for example pitch shifting. With this method you are able to pitch shift audio without affecting the timing. The audio is getting sliced into a lot of tiny chunks called grains. It is basically the same method when you slice a drum groove, but at a much smaller scale. These tiny grains can have a duration about 1 ms – 100 ms. Grains can be compared with for example a video played back, because in a video you have all the different frames which you can play back at normal speed, but also speed it up or slow it down. In Granular Synthesis it gets interesting when you don’t play back the grains in the correct order but make it kind of random. You can also detune each grain, pan it in different positions or alter its volume. The possibilities are endless for lots of weird and abstract clouds of sounds.
But: Why aren’t there any clicks and pops?
That’s because each grain gets its own crossfade curve that could be just a linear triangle or some kind of bell like shape. This could really affect the sound that comes out. (Theory, 2019)
This process of a waveform modulated by a short envelope is also called a Grain Generator. The short packets of sounds could not only be played back after each other, but also layered on top to create more complex sounds. (Farnell, 2010)
Das Axoloti Board eignet sich hervorragend, um Prototypen von anzufertigen. Es ist ein Board mit vielen I/O Pins, stereo Audio in- und Output, A/D und D/A Wandlern. Das Board ist mit dem Axoloti Patcher programmierbar. Eine Software, mit der man komplexe Sound Algorithmen und Interaktionen auf einfache Art und Weise generieren kann, die man nach dem Erstellen einfach auf den Axoloty lädt und danach im Standalone Betrieb verwenden kann. Ein Nachteil ist, dass die Software seit Mac OS Catalina nicht mehr unterstützt wird, ansonsten hätte ich damit gerne einen ersten Prototypen programmiert.
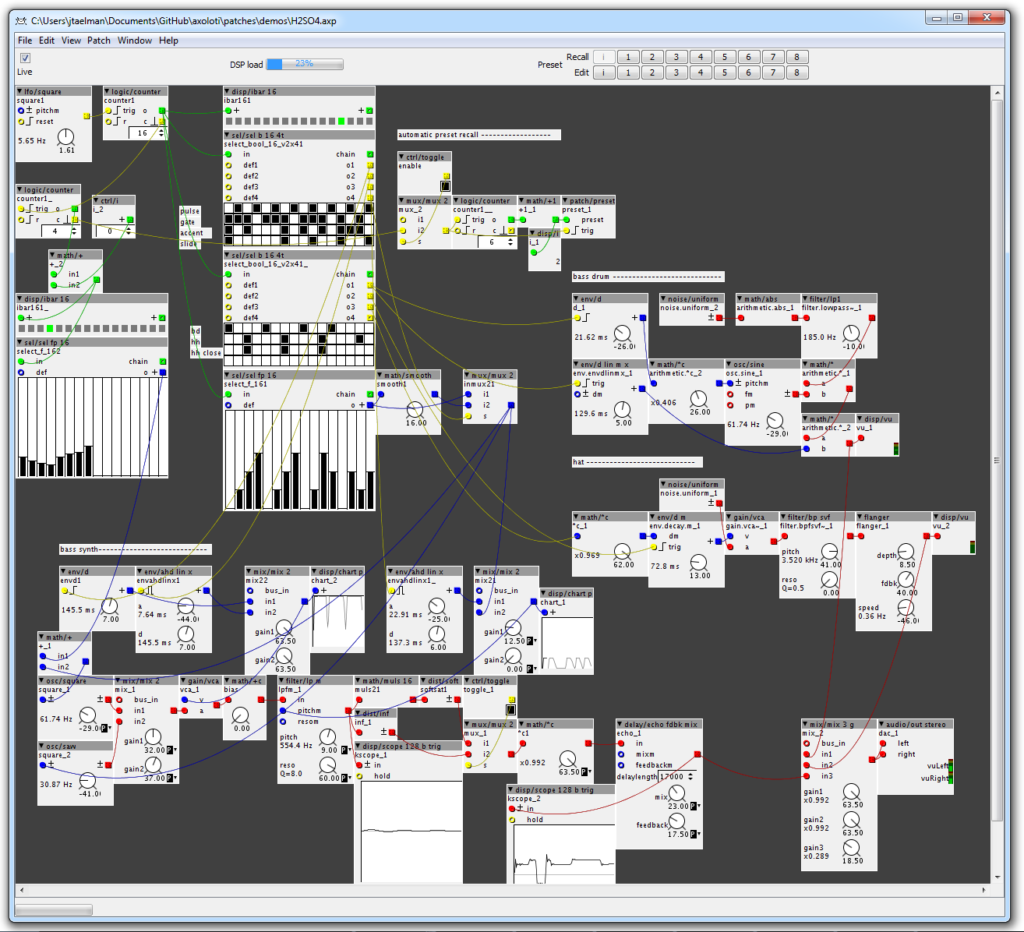
Axoloti Patcher
Der Axoloti Patcher funktioniert ähnlich wie MaxMSP oder Pure Data. Man hat verschiedene Objekte zur Verfügung, wie beispielsweise Input/output, LFO´s, Oscillators etc. Mit diesen Objekten kann man auf einer grafischen Oberfläche seine Signalkette programmieren.
Leider gibt es unter Mac OS Catalina und Big Sur Kompatibilitätsprobleme mit der Software.
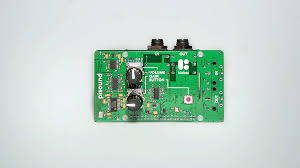
Der Pisound verwandelt den Raspberry Pi in ein Musikinstrument, einen Effekt, einen Audiophilen Netzwerk Player, ein portables Recording Studio oder gar eine Internet Radio Sation. Es ist eine ultra-low latency Sound Card und Midi Interface, ausgestattet mit 192kHz 24-bit Stereo Input and Output.
Den Pisound kann man beispielsweise im Patchob OS verwenden. Eine Software, die quasi ein Pedal-Board simuliert. Die Software, die man über einen Browser öffnen kann, lässt verschiedenste Effekte und Signalwege Programmieren. Nicht nur für Audio, sondern auch für Midi. Die Einstellungen werden über eine Netzwerkverbindung synchronisiert. Die Sound Card eignet sich auch hervorragend dafür seine eigenen Pure Data oder Super Collider Patches laufen zu lassen.
Den Raspberry Pi und den Pisound werde ich schlussendlich nicht für mein Projekt verwenden, da er in einigen Bereichen schon fast zu komplex ist und viele Features hat, die ich gar nicht benötigen würde. Weiters habe ich die Erfahrung gemacht, dass man sich nicht immer 100 Prozent auf das Betriebssystem verlassen kann, sprich dass es richtig bootet usw. Auch der Kostenpunkt ist ein Ausschlussgrund, da ein solches Produkt nicht finanzierbar wäre, wenn man eine Sound Karte um 100 Euro + den eigentlichen Raspberry Pi verbaut.
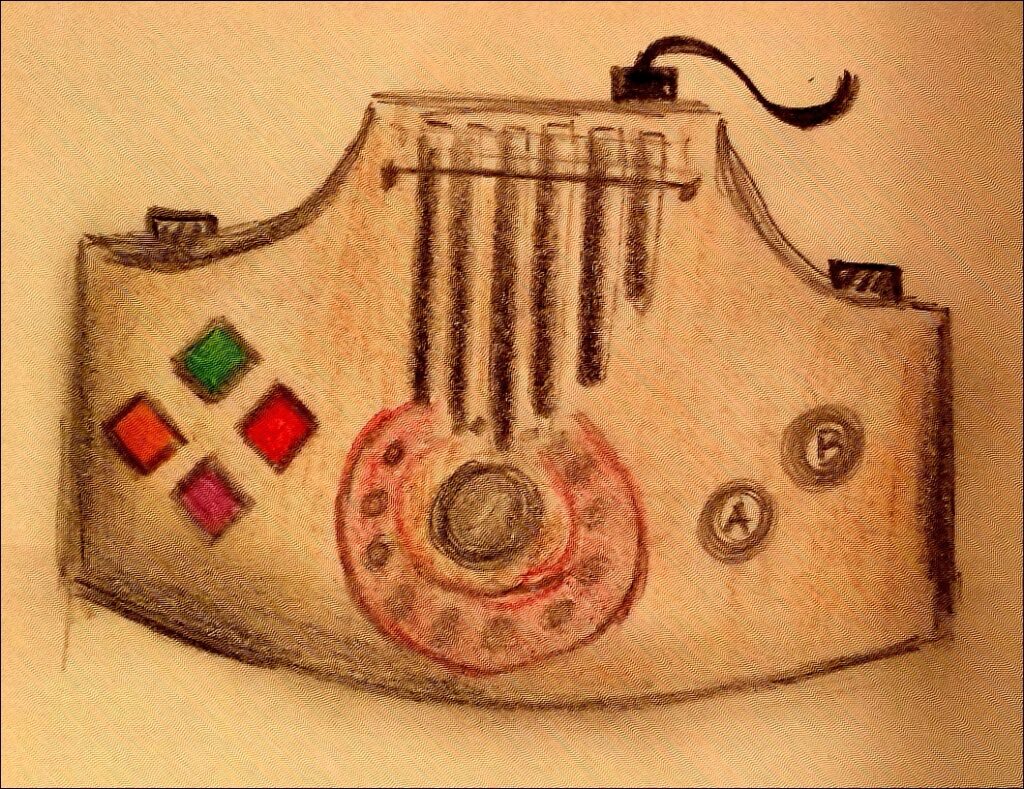
Mein Ziel ist es, ein spielbares akustisches Instrument zu bauen, das wie ein Game Boy in der Hand liegt und in dem man den Klang interaktiv verändern kann. Effekte wie ein kurzer Loop, ein Pitch Control Knob und ein simpler Delay sollen vorhanden sein und mit den Knöpfen, die wie bei einem kleinen Game Controller angeordnet sind, bedienbar sein. Nach ausgiebiger Recherche bin ich auf den Schluss gekommen als Instrument eine Kalimba zu verwenden, da es vergleichbar einfach selbst zu bauen ist und es sich mit den beiden Daumen, (aus diesem Grund auch Daumenklavier genannt) ohne viele Vorkenntnisse von jedermann bedienen lässt. Der Korpus der Kalimba soll aus Holz gebaut sein, in dem auch die Elektronik Platz finden wird.
Nun zu dem Thema, mit dem ich mich in diesem Semester am meisten beschäftigt habe: Die Wahl des Micro Controller Boards, auf dem die Effekte und die Signalkette programmiert werden sollen. Ich werde auf die einzeln getesteten Boards später eingehen. Ich habe mich schlau gemacht vom Raspberry Pi über das Axoloti Board bis hin zum Arduino. Schlussendlich viel meine Wahl aber auf ein Teensy Board mit dessen kompatiblen Audio Adapter.
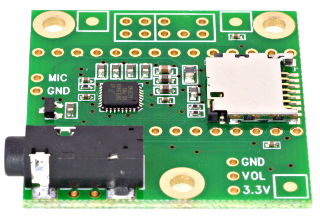
This Audio Board is and extension for your Teensy. It exists for Teensy 4 and Teensy 3. If you want to use it you have to solder it together with your Teensy. It has an anormous amount of useful features, including for example high quality audio adapters in 16 bit and 44.1 kHz sample rate. It supports stereo headphone and stereo line-level output, and also stereo line-level input or mono microphone input.
Teensy Audio Library
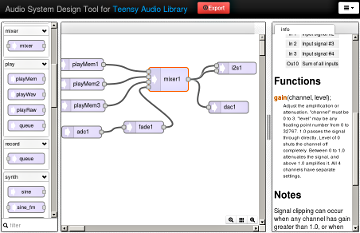
This is kind of a software you can open in your browser to program your signal flow on the Audio Board to create all types of sophisticated audio applications. You can play multiple sound files, create synthesized waveforms, apply effects, mix multiple streams and output high quality audio to the headphones or line out pins. To use the sketch with your board you can export the code and apply it to your Teensyduino Software and upload all of it.
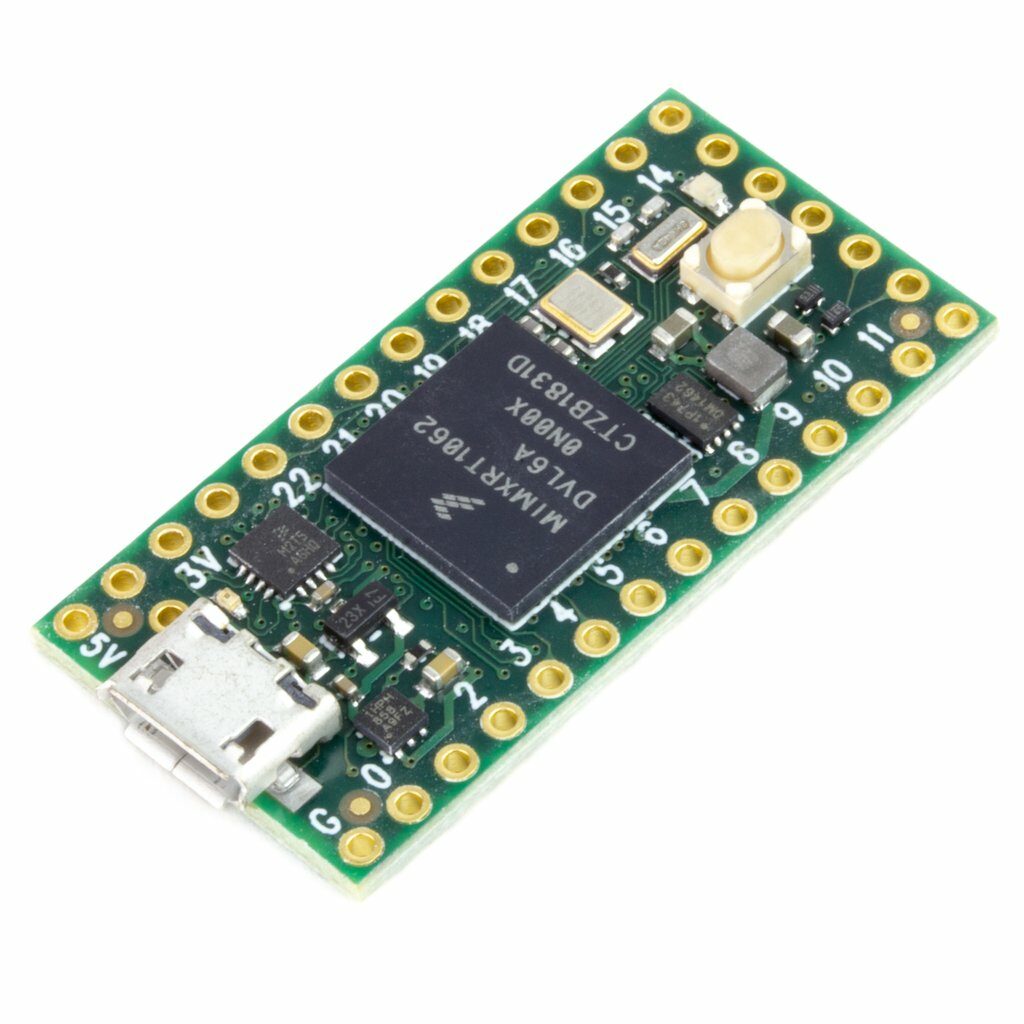
Teensy is very similar to an Arduino Board. It is a complete USB-based microcontroller development system. Its very small and very powerful and beats the Arduino in many ways, so you can use it it a lot of different applications and projects. They have fast processors, a ton of libraries and are compatible with most Arduinos libraries. Its generous flash and RAM, numerous peripherals, and smallest size make it perfect for my most creative ideas.
Teensy Board 4.0
Teensyduino
This is the software you have to install to communicate with your teensy. Basically you modify your existing Arduino software to hack Teensy support right in there. Then you just have to select your board and you are ready to go. It also installs you a lot of extremely useful libraries. On Windows you are required to install extra drivers. If you are on Mac, you are about to replace the Arduino Software by Teensyduino itself.
Different Teensy Boards
There are a few different versions of the Teensy Board out there. The Teensy 3.2 is already a little bit out of date, which was followed by Teensy 3.6, which has a much stronger processor, more pins and a built-in SD card slot. The powerhouse is still the Teensy 4.0, which has like 40 I/O lines compared to the Arduino´s 14. This list goes on with all the other connectivity options on the Teensy. The Teensy also runs at 600 Megahertz and is even cheaper than any Arduino on the market.
Looking forward to use the Teensy board in one of my projects, because its also great for the use with audio, especially with the Teensy Audio Board which I will talk more about in my next post.
Evelyn is a deaf percussionist and musician. Her job is all about listening and her aim is to teach the world how to listen. In a piece of music which is full of black little dots it just tells you technically how to play it, like dynamic, where to play on the drum or which part of the stick to use etc.
What you have to do as a musician is everything that is not in the music. Much more important is the interpretation of the piece, the personality and the character you give to it while playing. Its simply not enough to just play what is in the music. Listen is much more important.
More dynamic with less effort. Just as you need time with the instrument, you need also time with the people to interpret it. You have to think for a piece not as a technician, rather than a musician.
Music is about listening, but how is Evelyn listening? She hears through her body. When she started her lessons with her teacher, they were tuning a timpani differently, but closely together. She can feel the tiniest differences with a small part of her finger.
When she auditioned at the music academy, they first wouldn’t accept her because of her disability of hearing. But she showed them in a second audition how to really listen and changed the whole system for accepting disabled student at a music academy through the UK.
Music and sound could be our daily medicine. Everyone experiences the sound different.
You need to imagine what sound you want to produce. You can for example just create the sensation of sound when we see something. For example, when we just see a tree in the wind, we can hear the sound in our head to it.
Acousticians had to really think about the type of halls. You can absolutely do anything in dynamic in a huge hall. It may sound good over there, but terrible in the back and so on. To find the exact hall how you imagine the sound is incredible.
If we listen to each other it is important to really test our listening skills through our body as a resonating chamber and stop the judgement. Give time to the music, and not just say that it’s a bad piece of music.
We all think about experiencing music just through our ears, just like we are used to clap with our two hands. But it is also possible to create other sounds by clapping on other parts of our body or use just 2 fingers and so on.
In one of Evelyn`s first lessons, her teacher let her experimenting with the snare drum using her body instead of the sticks. By playing technical exercises, there has to be a reason to saying something through music. This is how you can reach the audience. How we listen to the music and how you feel. Allow your body to open up at the next concert. Be aware that you are not going to experiencing the same as the performer.