ML Sample Generator Project | Phase 2 pt3

Convolutional Networks

Convolutional networks include one or more convolutional layers. These layers are typically used for feature extraction. Stacking multiple on top of each other often can extract very detailed features. Depending on the input shape of the data, convolutional layers can be one- or multidimensional, but are usually 2D as they are mainly used for working with  images.  The  feature extraction can be achieved by applying filters to the input data. The image below shows a very simple black and white (or pink & white) image with a size 3 filter that can detect vertical left-sided edges. The resulting image can then be shrinked down without losing as much data as reducing the original’s dimensions would.

2D convolution with filter size 3 detecting vertical left edges

In this project, all models containing convolutional layers are based off of WavGAN. For this cutting the samples down to a length of 16384 was necessary, as WavGAN only works with windows of this size. In detail, the two models consist of five convolutional layers, each followed by a leaky rectified linear unit activation function and one final dense layer afterwards. Both models were again trained for 700 epochs.

Convolutional Autoencoder

The convolutional autoencoder produces samples only in the general shape of a snare drum. There is an impact and a tail but like the small autoencoders, it is clicky. In contrast to the normal autoencoders, the whole sound is not noisy though but rather a ringing sound. The latent vector does change the sound but playing the sound to a third party would not result in them guessing that this should be a snare drum.

Ringy conv ae sample
GAN

The generative adversarial network worked much better than the autoencoder. While still being far from a snare drum sound, it produced a continuous latent space with samples resembling the shape of a snare drum. The sound itself however very closely resembles a bitcrushed version of the original samples. It would be interesting to develop this further as the current results suggest that there is just something wrong with the layers, but the network takes very long to train which might be due to the need of a custom implementation of the train function.

Bitcrushed sounding GAN sample

Variational Autoencoder

Variational autoencoders are a sub-type of autoencoders. Their big difference to a vanilla autoencoder is the encoder’s last layer, the sampling layer. With this, variational autoencoders always provide a continuous latent space, which is much better for generative models than just to sample from what has been provided. This is achieved by having the encoder output two different vectors instead of one: one for standard deviation and one for the mean. This provides a distribution rather than a single point, leading to the decoder learning that an area is responsible for a feature and not a single sample.

Training the variational autoencoder was especially troublesome as it required a custom class with it’s own train step function. The difficulty with this type of model is that the right mix between reconstruction loss and kl loss has to be found, otherwise the model produces unhelpful results. The currently trained models all have a ramp up time of 30,000 batches until full effect of the kl loss. This value gets multiplied by a different actor depending on the model. The trained versions are with a factor of 0.01 (A), 0.001(B), as well as 0.0001(C). Model A produces a snare drum like sound, but is very metallic. Additionally instead of having a continuous latent space, the sample does not change at all. Model B produces a much better sample but still does not include much changes. The main changes are the volume of the sample as well as it getting a little bit more clicky towards the edges of the y axis. Model C has much more different sounds, but the continuity is more or less not present. In some areas the sample seems to get slightly filtered over one third of the vector’s axis but then rapidly changes the sound multiple times over the next 10%. But still, out of the three variational autoencoders model C produced the best results.

VAE with 0.01 contribution (A) sample
VAE with 0.001 contribution (B) sample
VAE with 0.0001 contribution (C) sample

Next Steps

As I briefly mentioned before, this project will ultimately run on a web server which means the next steps will be deciding how to run this app. Since all of the project has been written in python so far Django would be a good solution. But since TensorFlow offers a JavaScript Library as well this is not the only possible way to go. You will find out more about this in the next semester.

ML Sample Generator Project | Phase 2 pt2

Autoencoder Results

As mentioned in the post before I have trained nine autoencoders to (re)produce snare drum samples. For easier comparison I have visualized the results below. Each image shows the location of all ~7500 input samples.

Rectified Linear Unit
Small relu ae
Medium relu ae
Big relu ae

All three graphics portray how the samples are mostly close together but some are very far out. A continuous representation is with all three models not possible. Reducing the latent vector’s maximum on both axes definitely helps, but even then the resulting samples are not too pleasing to hear. The small network has clicks in the beginning and generates very silent but noisy tails after the initial impact. The medium network includes some quite okay samples but moving around in the latent space often   produces   similar  but  less   pronounced issues as the small network. And the big network produces the best sounding samples but has no continuous changes.

Clicky small relu sample
Noisy medium relu sample
Quite good big relu sample
Hyperbolic Tangent
Small tanh ae
Medium tanh ae
Big tanh ae

These three networks each produce different patterns with a cluster at (0|0). The similarities between the medium and the big network lead me to believe that there is a smooth transition between random noise, to forming small clusters, to turning 45° clockwise and refining the clusters when increasing the number of trainable parameters. Just like the relu version, the reproduced audio samples of the small network contain clicks. The samples are however much better. The medium sized network is the best one out of all the trained models. It produces  mostly  good  samples  and has a continuous latent space. One issue is however that there are still some clicky areas in the latent space. The big network is the second best overall as it mostly lacks a continuous latent space as well. The produced audio samples are however very pleasing to hear and resemble the originals quite well.

Clicky small tanh sample
Close-to-original medium tanh sample
Close-to-original big tanh sample
Sigmoid
Small sig ae
Medium sig ae
Big sig ae

This group shows a clear tendency to cluster up the more trainable parameters exist. While in the above two groups the medium and the big network produced better results, in this case the small network is by far the best. The big network delivers primarily noisy audio samples and the medium network very noisy ones as well but they are better identifiable as snare drum sounds. The small network has by far the closest sounds to the originals but produces clicks at the beginning as well.

Clicky small sigmoid sample
Noisy medium sigmoid sample
Super noisy big sigmoid sample

In the third part of this series we will take a closer look at the other models.

ML Sample Generator Project | Phase 2 pt1

A few months ago I already explained a little bit about machine learning. This was because I started working on a project involving machine learning. Here’s a quick refresh on what I want to do and why:

Electronic music production often requires gathering audio samples from different libraries, which, depending on the library and on the platform, can be quite costly as well as time consuming. The core idea of this project was to create a simple application with as few as possible parameters, that will generate a drum sample for the end user via unsupervised machine learning. The interface’s editable parameters enable the user to control the sound of the generated sample and a drag-and-drop space could map a dragged sample’s properties to the parameters. To simplify interaction with the program as much as possible, the dataset should only be learned once and not by the end user. Thus, the application would work with the models rather than the whole algorithm. This would be a benefit as the end result should be a web application where this project is run. Taking a closer look at the machine learning process, the idea was to train the network in the experimentation phase with snare drum samples from the library noiiz. With as many different networks as possible, this would then create a decently sized batch of models from which the best one could be selected for phase 3.

So far I have worked with four different models in different variations to gather some knowledge on what works and what does not. To evaluate them I created a custom GUI.

The GUI

Producing a GUI for testing purposes was pretty simple and straight-forward. Implementing a Loop Play option required the use of threads, which was a little bit of a challenge but working on the Interface was possible without any major problems thanks to the library PySimpleGUI. The application worked mostly bug free and enabled extensive testing of models and also already saving some great samples. However, as it can be seen below, this GUI is only usable for testing purposes and does not meet the specifications developed in the first phase of this project. For the final product a much simpler app should exist and instead of being standalone it should run on a web server.

Autoencoders

An autoencoder is an unsupervised learning method where input data is encoded into a latent vector (therefore the name autoencoder). To get from the input to the latent vector multiple dense layers reduce the dimensionality of the data, creating a bottleneck layer and forcing the encoder to get rid of less important information. This results in data loss but also in a much smaller representation of input data. The latent vector can then be decoded back to produce a similar data sample to the original. While training an autoencoder, the weights and biases of individual neurons are modified to reduce data loss as much as possible.

In this project autoencoders seemed to be a valuable tool as audio samples, even though as short as only 2 seconds, can add up to a huge size. Training with an autoencoder would reduce this information down to only a latent vector with a few dimensions and the trained model itself, which seems perfect for a web application. The past semester resulted in nine different autoencoders, each containing dense layers only. All autoencoders differ from each other by either the amounts of trainable parameters, or the activation functions, or both. The chosen activation functions are rectified linear unit, hyperbolic tangent and sigmoid. These are used in all of the layers of the encoder as well as all layers of the decoder except for the last one to get back to an audio sample (where individual data points are positive and negative). 

Additionally, the autoencoders’ size (as in the amount of trainable parameters) is one of the following three: 

  • Two dense layers with units 9 and 2 (encoder) or 9 and sample length (decoder) with trainable parameters
  • Three dense layers with units 96, 24 and 2 (encoder) or 24, 96 and sample length (decoder) with trainable parameters
  • Four dense layers with units 384, 96, 24 and 2 (encoder) or 24, 96, 384 and sample length (decoder) with trainable parameters

Combining these two attributes results in nine unique models, better understandable as a 3×3 matrix as follows:

Small (2 layers)Medium (3 layers)Big (4 layers)
Rectified linear unitAe small reluAe med reluAe big relu
Hyperbolic tangentAe small tanhAe med tanhAe big tanh
SigmoidAe small sigAe med sigAe big sig

All nine of the autoencoders above have been trained on the same dataset for 700 epochs. We will take a closer look on the results in the next post.

Processing Audio Data for Use in Machine Learning with Python

I am currently working on a project where I am using machine learning to generate audio samples. One of the steps involved is pre-processing.

What is pre-processing?

Pre-processing is a process where input data somehow gets modified to be more handleable. An easy everyday life example would be packing items in boxes to allow for easier storing. In my case, I use pre-processing to make sure all audio samples are equal before further working with them. By equal, in this case I mean same sample rate, same file type, same length and same time of peak. This is important because having a huge mess of samples makes it much harder for the algorithm to learn the dataset and not just return random noise but actually similar samples.

The Code: Step by step

First, we need some samples to work with. Once downloaded and stored somewhere we need to specify a path. I import os to store the path like so:


import os


PATH = r"C:/Samples"

DIR = os.listdir( PATH )


 Since we are already declaring constants, we can add the following:

ATTACK_SEC = 0.1

LENGTH_SEC = 0.4

SAMPLERATE = 44100


 These are the “settings” for our pre-processing script. The values depend strongly on our data so when programming this on your own, try to figure out yourself what makes sense and what does not.

Instead of ATTACK_SEC we could use ATTACK_SAMPLES as well, but I prefer to calculate the length in samples from the data above:

import numpy as np


attack_samples = int(np.round(ATTACK_SEC * SAMPLERATE, 0))

length_samples = int(np.round(LENGTH_SEC * SAMPLERATE, 0))


 One last thing: Since we usually do not want to do the pre-processing only once, form now on everything will run in a for-loop:

for file in DIR:


 Because we used the os import to store the path, every file in the directory can now simply accessed by the file variable.

Now the actual pre-processing begins. First, we make sure that we get a 2D array whether it is a stereo file or a mono file. Then we can resample the audio file with librosa.

import librosa

import soundfile as sf


try:

data, samplerate = sf.read(PATH + "/" + file, always_2d = True)

except:

continue


data = data[:, 0]

sample = librosa.resample(data, orig_sr=samplerate, target_sr=SAMPLERATE)


 The next step is to detect a peak and to align it to a fixed time. The time-to-peak is set by our constant ATTACK_SEC and the actual peak time can be found with numpy’s argmax. Now we only need to compare the two values and do different things depending on which is bigger:

peak_timestamp = np.argmax(np.abs(sample))


if (peak_timestamp > attack_samples):

new_start = peak_timestamp  attack_samples

processed_sample = sample[new_start:]


elif (peak_timestamp < attack_samples):

gap_to_start = attack_samples  peak_timestamp

processed_sample = np.pad(sample, pad_width=[gap_to_start, 0])


else:

processed_sample = sample


 And now we do something very similar but this time with the LENGTH_SEC constant:

if (processed_sample.shape[0] > length_samples):

processed_sample = processed_sample[:length_samples]


elif (processed_sample.shape[0] < length_samples):

cut_length = length_samples  processed_sample.shape[0]

processed_sample = np.pad(processed_sample, pad_width=[0, cut_length])


else:

processed_sample = processed_sample


 Note that we use the : operator to cut away parts of the samples and np.pad() to add silence to either the beginning or the end (which is defined by the location of the 0 in pad_width=[]).

With this the pre-processing is done. This script can be hooked into another program right away, which means you are done. But there is something more we can do. The following addition lets us preview the samples and the processed samples both via a plot and by just playing them:

import sounddevice as sd

import time

import matplotlib.pyplot as plt


#PLOT & PLAY


plt.plot(sample)

plt.show()

time.sleep(0.2)

sd.play(sample)

sd.wait()


plt.plot(processed_sample)

plt.show()

time.sleep(0.2)

sd.play(processed_sample)

sd.wait()


 Alternatively, we can also just save the files somewhere using soundfile:

sf.write(os.path.join(os.path.join(PATH, "preprocessed"), file), processed_sample, SAMPLERATE, subtype='FLOAT')


 And now we are really done. If you have any comments or suggestions leave them down below!

Artificial intelligence as a design tool

For the research on the field of artificial intelligence I collected lots of information from different websites and videos. In the beginning I had problems to gather everything in a nice manner. Positioning images in a Microsoft word document seems like an undoable task. Pen and paper didn’t allow me to copy and paste anything. With Indesign I started layouting stuff which didn’t need a layout. After trying out some tools and being frustrated with the restrictions, I was searching for a tool which could help me to save links and videos, structure information, add text, thoughts and images. It should be easy to use in the process and the output should look appealing without too much design effort. After trying out some online note-tools, I found Milanote [1]. You can have a look at my collection to see more examples for AI driven designs and articles [11]. Milanote is a free online tool for organizing creative projects. It shall help gathering information and structuring it however its desired. I fell in love instantly.

The tool Milanote helped me to structure notes and gather all different kinds of information. View the whole collection at [11]

There is a lot to know about the typology, methods and kinds of AI. In the last blogpost I already explained the difference between machine learning, artificial intelligence and neural networks. The AI systems we know today are based on machine learning. How a simple machine learning algorithm works is not too difficult to understand. There are tons of YouTube videos which explain the basics, I recommend the video of 3Blue1Brown [2] because of it’s visual explanation. But anything will do.

I took a closer look at how I could use artificial intelligence in my own field of interest. As an interaction designer, there are many intersections where AI can help to create. I came across the website of Google AI experiments [3] where different AI projects are shared. “AI Experiments is a showcase for simple experiments that make it easier for anyone to start exploring machine learning, through pictures, drawings, language, music, and more.” It says on the website. It’s collection of work from Google teams and other creative teams in different fields which used AI to find a solution to problem. You find AI examples for learning, drawing, writing, music and other experiments. Just the shear sum of creative work built with AI struck me.

I was especially impressed by the “teachable machine” by the Google Creative Lab [6]. They invented a free online tool, where you can build your own machine learning model in such an easy way… to be honest- it feels somehow rude how easy this tool makes machine learning seem. The video was very inspiring, showing all kinds of solutions and ideas built with pattern recognition. I think this is a huge step in the development of AI and machine learning. I tried the tool if it can spot if I’m wearing glasses or not. First you need to gather pictures of what the method shall recognize. Taking a few selfies of myself wasn’t too difficult. Secondly, by just clicking a button (yes just clicking a button!!) you can train your model and boom that’s all.

The teachable machine makes machine learning crazy easy to non-programmers

This opens up a whole new world to non-programmers and will allow thousands of creative people stepping into the field of machine learning/AI. I have the feeling that using this online tool for a own project might still be more difficult that it seems in the first place, since you need to set up the communication between your model and your code, but still- I’m impressed. Furthermore, this new technique of collecting data of an object opens up a whole new perspective. One of the annoying parts of training a machine learning code was, that you had to feed the model with tagged data. We all know those reCAPTCHA pictures from Google, where you need to click on the pictures which show traffic lights, cars, busses, road signs and stuff like that. What we are doing there is not only a proof for a login, but we are actually feeding and AI with very precious information [4]. (I sometimes click on the wrong images on purpose to confuse Google)

Furthermore, I made a list of how AI could be used in our field of work. This collection is driven a lot by which technologies we used in our first semester.

  1. Use pattern recognition and build physical systems with Arduino
    – Use an Arduino to build a hardware solution where physical things are triggered.
    – Get the input of an event via image (computer vision) or via sound.
    – React to that event with your Arduino device.
    – Example: showed in the video of the teachable machine [5]. Could be used to switch on a light of a disabled, open the little door when the system sees the dog approaching, sort trash by filming the trash etc.
  2. Use pattern recognition to control an object in virtual space
    – Use Unity to control an object in a virtual space.
    – Can track hand gestures or body movement to navigate or manipulate within a virtual 2D or 3D space.

    – Can use for interactive applications in exhibitions
    2.1 The more neural activity your brain has, the more likely you will remember something. If you get the body to move, you can trigger the muscle memory and the user might find it easier to remember your content. For example: teach music theory not only with information or sound but using the gap between your fingers to visualize harmony theory.
    2.2 A higher immersion can lead to more empathy. For example if you made the experience of being an animal in a burning jungle with virtual reality for instance, you might feel more empathy for this concern. A lived experience is more likely to influence emotionally rather than just telling a person that animals are dying in fire.
  3. Draw images with sound
    – Create “random” images which are drawn by incidents in the real world.
    – For the implementation you could use processing or p5.
    – Example: you could record with your Webcam, film the street and trigger an event when a blue car is driving by. This could change how a picture is drawn by code. You could also use certain sounds instead.
  4. Visualizing data
    – Collect data and visualize it in images or in a virtual space.
    – Huge amounts of data can be classified and structured by machine learning to create strong Infographics.
    – Data can be very powerful and reveal insights which you wouldn’t think of. There are good examples where well-structured meta data showed coherences, which didn’t seem related to the data itself. An episode of the design podcast 99% invisible talked about how a list of e-mails within a company showed information of who is a manager and who was probably dealing with illegal and secret projects – without reading one e-mail [7]. Moreover, David Kriesel gives with his presentations an impression of how powerful meta data is [8]. With the power of machine learning and AI we could reveal information which don’t seem obvious in the first place.
    – Example:
    https://experiments.withgoogle.com/visualizing-high-dimensional-space
  5. UI design, recommendations and personalization
    – Use machine learning (ML) in your UI to make navigation easier and quicker.
    – Personalize systems for your user and create experiences where the user can move freely within your application

    – Best practice found in article [9]:
    5.1. Count decisions as navigation steps
    Count how many decisions need to be made for navigating though system. Reduce them with ML. The ML-generated suggestions shouldn’t make the user evaluate the options, otherwise the ML doesn’t make any sense here.
    5.2. A predictable UI is necessary when the stakes are high
    Do not use ML for critic navigation/finding. Human works best in such cases. Consider using it for browsing and exploration.
    5.3. Be predictably unpredictable
    Basically, hide the new ML feature. Think it depends on use case.
    5.4. Make failure your baseline
    ML will make mistakes. Built the system that if mistakes happen, it doesnt take longer to erase them rather than just doing the job on your own in the first place.
  6. Use AI for creative exchange
    – Use AI as a communication in creating new concepts.
    – AI is good in making links and connections to similar fields. Also, it’s good at bringing randomness into the game.
    – Example of writers which chat with AI to boost their ideas. Since ai is built with a neural network its kind of works like our brain, so it’s capable of bringing fascinating ideas for the field it’s programmed for. And since it’s a machine and not a human it can bring new perspectives into thinking (see youtube “Prescursors to a Digital Muse” below).
    – Example: The AI for the game GO, played a move which seemed like a bad one to a human but maximized the winning probability since it was interested in winning the whole game and not conquering as many fields as possible. Professional GO players examined the new thinking of the game which is played since the 4th century, with a new perspective [10].
  7. Get rid of repetitive tasks
    I was so fascinated when I saw how the new iPhone does all the photo editing which I used to do in hours of work, automatically. Of course, it does mistakes and is not as accurate, but come on, who enjoys cropping of a curly haired person in Photoshop. Using a cropped image and putting it somewhere else is the fun part, not the cutting out. At least for me. When such tasks are done by a machine, we can concentrate on all the other ideas we have with that curly-haired-person-image.
Example video for 6. Use AI for creative exchange.

On the search on where AI is and where designers are, you could often read about the fear that AI will take away the jobs of designers. Since AI is capable of doing a lot of work which was dedicated to designers for a long time, it’s definitely true in some ways. But we need to evolve and adapt to technology. A lot of frustrating and repetitive tasks can be done by the machine, take advantage of this and start creating from that point. We can create much larger scaled projects when we can deal with such technologies.

  1. Free tool for collecting notes and structuring ideas:
    https://milanote.com/
  2. Machine Learning tutorial:
    https://www.youtube.com/watch?v=aircAruvnKk&t=3s&ab_channel=3Blue1Brown
  3. Google AI experiments:
    https://experiments.withgoogle.com/collection/ai
  4. Article on how recaptcha images help Googles algorithms:
    https://medium.com/@thenextcorner/you-are-helping-google-ai-image-recognition-b24d89372b7e
  5. The teachable machine promotion video:
    https://www.youtube.com/watch?v=T2qQGqZxkD0&feature=emb_logo&ab_channel=Google
  6. The teachable machine website:
    https://teachablemachine.withgoogle.com/
  7. Interesting podcast – the value of data:
    https://99percentinvisible.org/episode/youve-got-enron-mail/
  8. Interesting presentation on the power of data mining:
    https://www.youtube.com/watch?v=-YpwsdRKt8Q&t=2800s&ab_channel=media.ccc.de
  9. AI in UI design
    https://design.google/library/predictably-smart/
  10. Documentary of the Alpha Go AI
    https://www.youtube.com/watch?v=WXuK6gekU1Y&ab_channel=DeepMind
  11. Collection of articles, example videos and background information
    https://app.milanote.com/1KX8J41TAgBr12?p=d7PvzxFcpuX

Audio & Machine Learning (pt 3)

Part 3: Audio Generation using Machine Learning

Image processing and generating using machine learning has been significantly enhanced by using deep neural networks. And even pictures of human faces can now be artificially created as shown on thispersondoesnotexist.com. Images however are not that difficult to analyse. A 1024px-by-1024px image, as shown on thispersondoesnotexist, has “only” 1,048,576 pixels; split into three channels that is 3,145,728 pixels. Now, comparing this to a two-second-long audio file. Keep in mind that two seconds really can not contain much audio – certainly not a whole song but even drum samples can be cut down with only two seconds of playtime. An audio file has usually a sample rate of 44.1 kHz. This means that one second audio contains 44,100 slices, two seconds therefor 88,200. CD quality audio wav files have a bit depth of 16bit (which today is the bare minimum in digital audio workstations). So, a two second audio file has 216 * 88,200 samples which results in 22,579,200 samples. That is a lot. But even though music or in general audio generation is a very human process and audio data can get very big very fast, machine learning can already provide convincing results.

Midi

Before talking about analysing audio files, we have to talk about the number one workaround: midi. Midi files only store note data such as pitch, velocity, and duration, but not actual audio. The difference in file size is not even comparable which makes midi a very useful file type to be used in machine learning.

FlowMachines is one of the more popular projects that work with midi. It is a plugin for DAWs that can help musicians generate scores. Users can choose from different styles to sound like for example the Beatles. These styles correspond to different trained models. FlowMachine works so well that there is already commercial music produced by it. Here is an example of what it can do:

Audio

Midi generation is a very useful helper, but it will not replace musicians. Generating audio on the other hand could potentially do that. Right now, generating short samples is the only viable way to go and it is just in its early stages but still, that could replace sample subscription services one day. One very recently developed architecture that seems to deliver very promising results is the GAN.

Generative Adversarial Networks

A generative adversarial network (GAN) simultaneously trains two models rather than one: A generator which trains with random values and captures the data distribution, and a discriminator which estimates the probability that a sample came from the training data rather than the generator. Through backpropagation both networks continuously enhance each other which leads to the generator getting better at generating fake data and the discriminator getting better at finding out whether the data came from the training data or the generator.

An already very sophisticated generative adversarial network for audio generation is WaveGAN. It can train on audio examples with up to 4 seconds in length at 16kHz. The demo includes a simple drum machine with very clearly synthesized sounds but shows how GANs might be the right direction to go. But what GANs really have to offer is the parallel processing shown in GANSynth. Instead of predicting a single sample at a time which autoregressive models are pretty good at, GANSynth can process multiple sequences in parallel making it about 50,000 times faster than WaveNet.


Read more:

https://magenta.tensorflow.org/gansynth
https://github.com/chrisdonahue/wavegan
https://www.musictech.net/news/sony-flowmachines-plug-in-uses-ai/

Audio & Machine Learning (pt 1)

Part 1: What is Machine Learning?

Machine Learning is essentially just a type of algorithm that improves over time. But instead of humans adjusting the algorithm the computer does it itself. In this process, computers discover how to do something without being programmed to do so. The benefits of such an approach to problem solving is that algorithms too complex for humans to develop can be learned by the machine. This leads to programmers being able to focus on what goes in to and what out of the algorithm rather than the algorithm itself.

Approaches

There are three broad categories of machine learning approaches:

  • Supervised Learning
  • Unsupervised Learning
  • Reinforcement Learning

Supervised learning is used for figuring out how to get from an input to an output. Inputs are classified meaning the dataset (or rather trainset, the part of the dataset used for training) is already split up into categories. The goal of using supervised learning is to generate a model that can map inputs to outputs. An example would be automatic audio file tagging – like either drum or guitar.

Unsupervised learning is used when the input data has not been labelled. The algorithm has to find out on its own how to describe a dataset. Common use cases are feature learning and discovering patterns in data (which might not have been visible without machine learning).

Reinforcement learning is probably what you have seen on YouTube. These are the algorithms that interact with something (like a human would do with a controller for example) and is either punished or rewarded for its behavior. Algorithms learning to play Super Mario World or Tesla’s Autopilot are trained with reinforcement learning.

Of course, there are other approaches as well, but these are a minority, and it is easier to just stick with the three categories above.

Models

The process of machine learning is to create an algorithm which can describe a set of data. This algorithm is called a model. A model exists from the beginning on and is trained. Trained models can then be used for example to categorize files. There are various approaches to machine learning:

  • Classifying
  • Regression
  • Clustering
  • Dimensionality reduction
  • Neural networks / deep learning

Classifying models are used to (you guessed it) classify data. They predict the type of data which can be several options (for example colors). One of the simplest classifying models is a decision tree which follows a flowchart-like concept of asking a question and getting either yes or no as an answer (or in more of a programmer’s terms: if and else statements). If you think of it as a tree (the way it is meant to be understood) you start at the root with one question, then get on to a branch where the next question is until you reach a leaf, which represents the class or tag you want to assign.

a very simple decision tree

Regression models come from statistical analysis. There are a multitude of regression models, the easiest of which is the linear regression. Linear regression tires to describe a dataset with just one liner function. The data is mapped on to a 2-dimensional space and then a linear function which “kind of” fits all the data is drawn. An example for regression analysis would be Microsoft Excel’s trendline tool.

non-linear regression | from not enough learning (left) to overfitting (right)

Clustering is used to group similar objects together. If you have unclassified data and want to make use of supervised learning, regression models can automatically classify the objects for you.

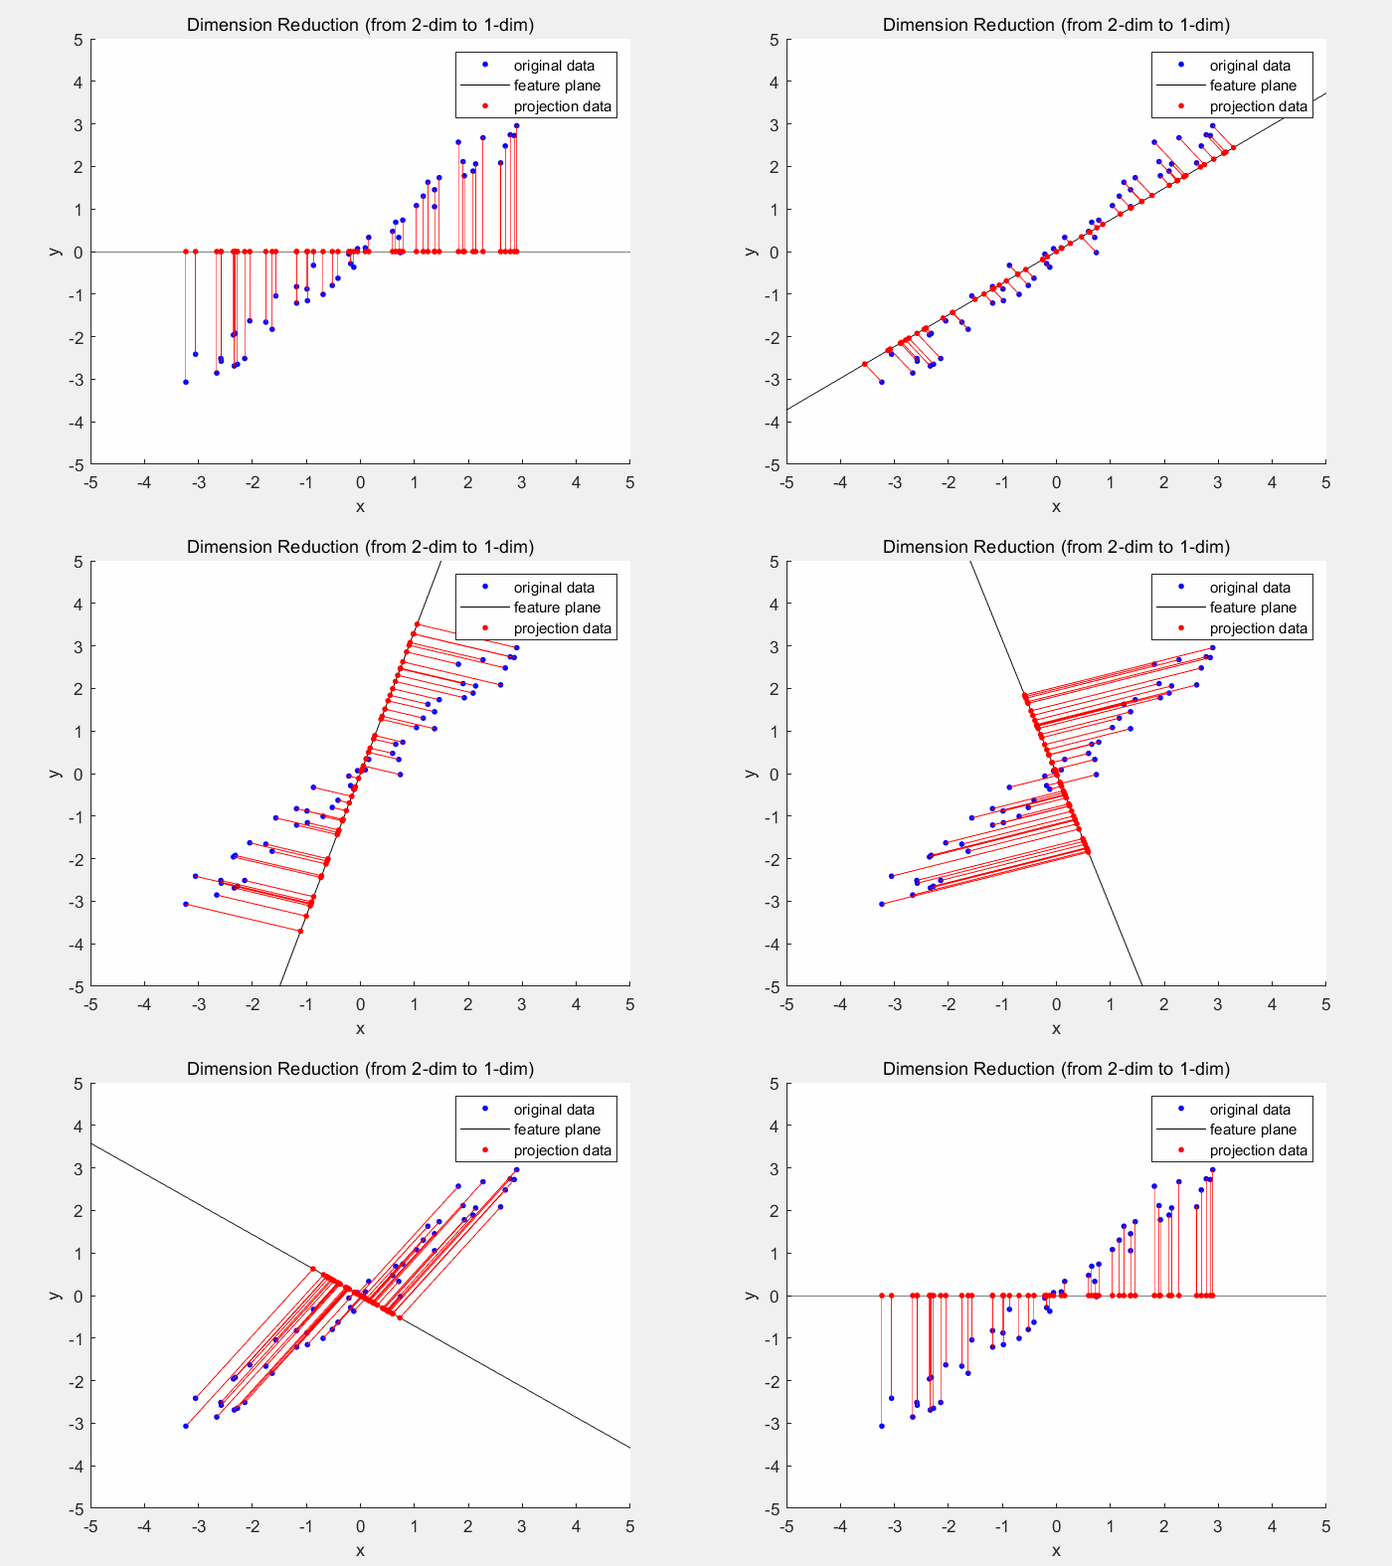
Dimensionality reduction models (again an aptronym) reduce dimensionality of the dataset. The dimensionality is the number of variables used to describe a dataset. As usually different variables do not contribute equally to the dataset, the dataset can still be reliably described by less variables. One example for dimensionality reduction is the principal component analysis. In 2D space the PCA generates a best fitting line, which is usually where the least squared distance from the points to the line is.

2D principal component analysis | the ideal state would be when the red lines are the smallest

Deep Learning will be covered in part 2 of this series as this is the main focus of this series.


Read more:

https://en.wikipedia.org/wiki/Glossary_of_artificial_intelligence
https://www.educba.com/machine-learning-models/
https://www.educba.com/machine-learning-algorithms/