Harmor

The Basics

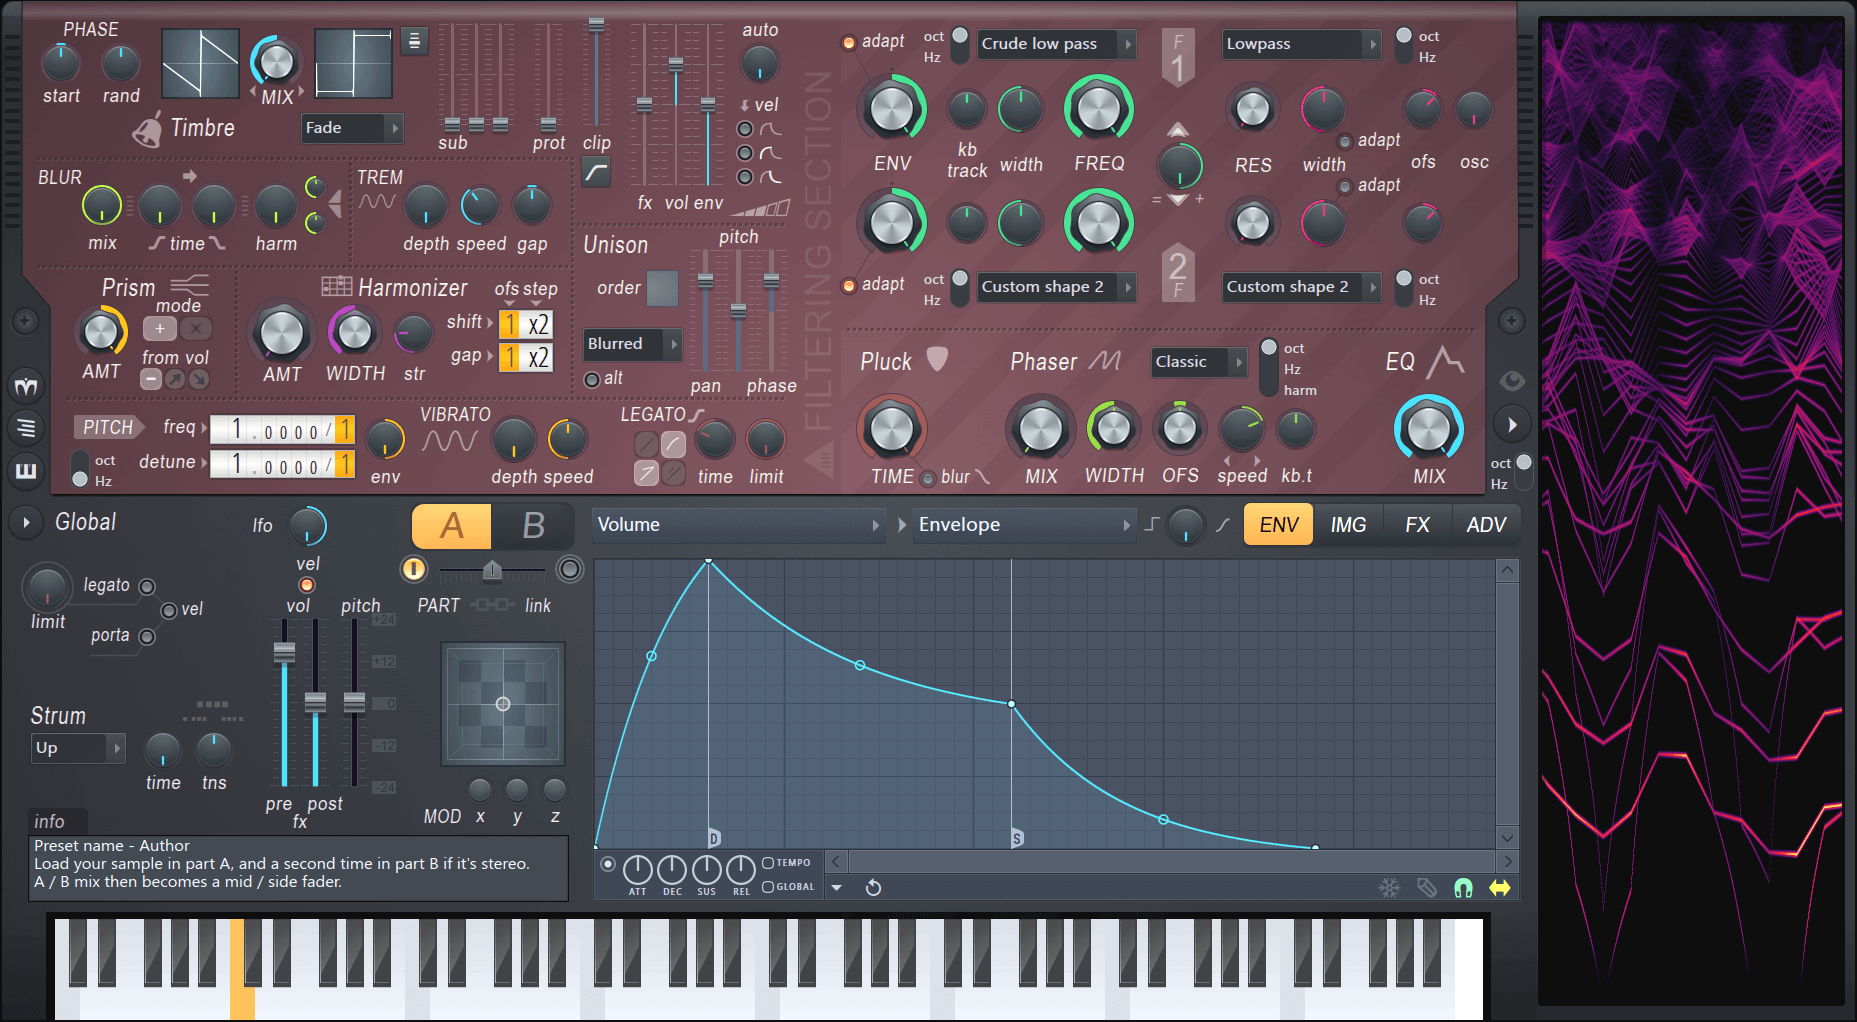
The picture above shows Harmor’s interface. We can group the Interface into three sections: The red part, the gray part and the window to the right. Firstly, the easiest section to understand is the window to the right. Harmor is an additive synthesizer, which means the sounds it generates are made up of sine waves added on top of each other. The window on the right displays the frequencies of the individual sine waves, played over the last few seconds. Secondly, the red window is where most of the sound is generated. There are different sections and color-coded knobs to be able to identify what works together. Left of the center you can see an A/B switch. The red section exists twice: once for state A and once for state B. These states can be mixed together via the fader below. Lastly the gray area is for global controls. The only exception is the IMG tab, which we will cover a little later. As you can see there are many knob, tabs and dropdowns. But in addition to that most most of the processing can be altered with envelopes. These allow the user to draw a graph with infinitely many points to either use it as an ADSR curve, an LFO, or map it to keyboard, velocity, X, Y & Z quick modulation and more. At this point it already might become clear that Harmor is a hugely versatile synth. It’s marketed as an additive / subtractive synthesizer and features an immense amount of features which we will take a closer look at now.

Additive or Subtractive?

As mentioned above Harmor is marketed as an additive / subtractive synthesizer. But what does that mean? While Harmor is built using additive synthesis as its foundation, the available features closely resemble a typical subtractive synth. But because Harmor is additive, there are no audio streams being processed. Instead a table of frequency and amplitude data is manipulated resulting in an efficient, accurate and partly very unfamiliar and creative way to generate audio streams. Harmor features four of these additive / subtractive oscillators. Two can be seen on the image above in the top left corner. These can be mixed in different modes and then again mixed with the other two via the A/B switch. In addition to the four oscillators, Harmor is also able to synthesize sound from the IMG section. The user can drag-and-drop audio or image files in and Harmor can act like a sampler, re-synthesizing audio or even generating audio from images drawn in Photoshop.

The Generator Section

As you can see in addition to the different subsections being walled in by dotted lines, this section is color coded as well. The Timbre section allows you to select any waveform by again drawing and then morphing between two of them with different mixing modes. Harmor allows you to import a single cycle waveform to generate the envelope. But you can import any sample and generate a waveform from it. Here is an example where I dragged a full song into it and processed it with the internal compressor module only:

The blur module allows you to generate reverb-like effects and also preverb. Tremolo generates the effect of a stereo vibrato, think about jazz organs. Harmonizer clones existing harmonics by the offset/octaves defined. And prism shifts partials away from their original relationship with the fundamental frequency. A little prism usually generates a detune-like effect, more usually metallic sounds. And here is the interesting part: As with many other parameters as well, you can edit the harmonic prism mapping via the envelopes section. This allows you to create an offset to the amount knob on a per frequency basis. Here is an example of a usage of prism:

As you can see in the analyzer on the right: There is movement over time. In the Harmonic prism envelope I painted a graph so that the knob does not modify lower frequencies but only starts at +3 octaves.
The other options from this section, unison, pitch, vibrato and legato should be clear from other synthesizers.

The Filter Section

As seen above, Harmor features two filters per state. Each filter can have a curve selected from the presets menu. The presets include low pass, band pass, high pass and comb filtering. Additionally you can draw your own curve as explained in the Basics section above. The filters can additionally be control the mix for the envelope, keyboard tracking, width, actual frequency and resonance. But the cool thing is how these filters are combined: The knob in the middle lets you fade between only filter 2, parallel processing, only filter 1, filter 1 + serial processing and serial processing only. In the bottom half there is a one-knob pluck knob as well as a phaser module with, again, custom shaped filters.

The Bottom Section

As you can see above the bottom section features some general global functions. On the left side most should be clear. The XYZ coordinate grid offers a fast way to automate many parameters by mapping them to either X Y or Z and then just editing events in the DAW. On the top right however there are four tabs that open new views. Above we have seen the ENV section where you can modulate about anything. The green tab is the image tab. We already know that Harmor can generate sound from images and sound (not that this is a different way of using existing sound, before I loaded it into an oscillator, now we are talking about the IMG tab). On the right you can see a whole lot of knobs, some of them can be modified by clicking in the image. C and F are course and fine playback speed adjustments, time is the time offset. The other controls are used to change how the image is interpreted and partially could be outsourced to image editors. I’m going to skip this part, as this post would get a whole lot more complicated if not. It would probably be best to just try it out yourself.

The third tab contains some standard effects. These are quite good but especially the compressor stands out as it rivals the easy-but-usefullness of OTT.

And finally, the last section: Advanced (did you really think this was advanced until now? :P) Literally the whole plugin can be restructured here. I usually only go in here to enable perfect precision mode, threaded mode (enables multi core processing) and high precision image resynthesis. Most of these features are usually not needed and seem more like debugging features so I will not go into detail about them, but like before I encourage you to try it out. Harmor can be very overwhelming and as many people mention in reviews: “Harmor’s biggest strength is also it’s greatest weakness, and probably why there are so few reviews for such an amazing synth. You can use Harmor for years, and still feel like a noob only scratching the surface. That makes writing a review difficult. How can you give an in-depth review, when you feel so green behind the ears? You only need to watch a few YT videos (e.g. Seamless) or chat with another user to discover yet another side to this truly versatile beast.”

Harmor on KVR ⬈
Harmor on Image-Line ⬈
Harmor Documentation ⬈ (a whole lot more details and a clickable image if you have more detailed questions)

Mechanical & Performance Royalties: What the hell is that?

As an independent artist you probably have your music on Spotify & co. And these services pay you through your aggregator, distributor or label. Additionally you might DJ or do some public performances where you get paid. But did you know that you are owed more than that? Platforms like Spotify and venues where you play are required by law to pay a fee to so-called collection societies. And these collection societies get the money whether you’ve joined or not.

Artist vs. Writer

Before talking about the different types of revenue that can be collected we first need to know that there are two types of musicians: songwriters and performing artists. The artist or performer is the entity performing the song. Take Martin Garrix for example: When releasing a track you always hear about “Martin Garrix”. But that’s not his real name, that’s his artist name or performer name. But as a songwriter he has to state his real name which would be Martijn Gerard Garritsen. On tracks like “Animals” only Martin himself worked on it so the difference is really not important, but bands or other artists have many different people working on one song. While the artists on “Titanium” are David Guetta and Sia, the songwriters are many more people who usually you do not know. And these people get money as well.

Performance Royalties

Performing artists hold the copyrights to the recording of a song. This is called a master recording. The royalties are paid to the artists every time a song is performed in public. This means a public performance is whenever your song is played in a bar, over the radio or on streaming services.

Mechanical Royalties

Songwriters (incl. Texters) hold the copyright to the melody and lyrics of a song. The royalties are paid whenever someone acquires a copy of a song. This can be online (e.g. through iTunes) or on physical media (e.g. CDs).

How to get paid

The two rights described above will both be collected via collection societies. You can either work with them directly or use a label or publisher. But in both cases you need to sign up with the societies, which usually costs money!

Direct approach

In Austria the performance royalties are collected by AKM, the mechanical ones by AUME. These two work together so you only have to sign up once and you can use only one platform to tell them about your work. Singing up costs a fee but fortunately in Austria that’s a one time thing. If you live somewhere else there might be a one time fee, an ongoing fee or both (like in Germany). Then you will add all your tracks to their database. Mechanical royalties will be automatically collected, but whenever you play something live you will either be asked by someone from the venue to give them a tracklist, or you will send the tracklist directly to your PRO (=Performance Rights Organization).

3rd-party approach

If you want you can sign up with 3rd parties to get some bonus features. This mostly applies to song copyrights where you can have your own publisher. Master recordings are usually handled be the record label (which you might be yourself).

Music publishers take a percentage cut off of your income from royalties but make submitting your music a little easier and more importantly pitch your songs! Depending on your publisher and your contract this can mean just adding it to a database and having to manually apply for synch (synch means your music being played in a TV ad for example). Or it can mean that you really don’t have much work to do and money is arriving on it’s own.

Stuff to check out

If you are new to all of this you might want to check out this Q&A by AKM: https://www.akm.at/mitglieder/fragen-antworten (German)

Here you can sign up for AKM & AUME (highly recommended!): https://www.akm-aume.at/akm-webapp/ (German again)

Other than performance and mechanical royalty laws, there is also neighbouring rights. Basically you will get money if you are an artist, a label and a music video creator. Here’s the Austrian site: http://lsg.at/ (danger! bad design!) and this one is for artists specifically https://www.lsg-interpreten.com/ (both in German). If you want to learn more about neighbouring rights I’d recommend checking out the German society GVL though: https://www.gvl.de/ (German & English)

If you have questions or anything to add I’d love to hear from you in the comments. Happy royalty collecting!

How to get your music onto FM4

Or in other words: How to correctly pitch your songs to professionals

Due to a recent achievement, which is having my newest song being played on radio FM4 multiple times and giving an interview on it, i thought I’d share my knowledge.

Tools that help pitching

Before talking about pitching to FM4 or in general to radio stations, I’d like to show you two of the most known alternative options, which require far less work.

SubmitHub

This site lets you submit to bloggers, labels, YouTubers, playlisters, influencers and radio stations (small ones though). When creating your account you get a few credits which then can be spent on different people and networks – usually the bigger ones cost a little more. This site might look overwhelming at first but has a lot of great features! Unfortunately, you can’t really send your music to many outlets without purchasing some premium credits. The average approval rate on standard credits is 4%, as opposed to 18% on premium. So, the free credits don’t do as well but still, they do something. And if you only want to target a specific YouTube channel for example this would be perfectly sufficient.

LabelRadar

In contrary to SubmitHub, LabelRadar is far more minimalistic and easy-to-use. Now, don’t get fooled by the name – of course you can send your music to labels, but to promoters as well! Like the previous one, this website gives you a few credits when you start out, but you can send you music into a general pool where the labels or promoters don’t get notified but can browse through. And if you spend all of your credits, they will send you 5 new ones once a month.

Pitching to big radio stations

Okay, so get your pen and paper ready – you’ll want to follow this as closely as possible. I have heard of cases where radio stations did not listen to a track simply because it was in a zip file. This is understandable considering they have to listen to huge amounts of tracks every day. So, as artists it is our job to make it as easy as possible for them to listen to our songs. And we can do that with email and a link to a Dropbox folder. More on that later. Below is a list of what you need but I will get into detail anyway.

  • the song (obviously)
  • artwork
  • either a classic Press Kit
  • or an EPK
  • professional press photos

The song

Obviously your song has to fit in the radio station’s program. Ideally you have heard something similar in the past few weeks, which is something you can then refer to in your email. In your Dropbox folder add the file as an mp3 and as a wav (one for listening and one for actually airing it). Be sure to add as many id3 tags as possible. This can be done with software like AudioShell. As wav files don’t really support much tagging I always provide a flac file as well so that the tags appear as well as it being a lossless file. If your mp3 is smaller than 10MB (with id3 tags) then you can add it as an attachment to your email.

Artwork

The most important Artwork is your cover – including this is a must. Any other stuff you have might work as well. Don’t add your “coming soon” banners, but if you have a Spotify Canvas or something then they might look at it and maybe even share it.

Classic press kit

This is a one page A4 document containing all the information for your release. At the beginning of the press kit you’ll want to show all the basic info like your release title, cover, artist name, release date, label name, IRSC and UPC/EAN. Then add a short biography and a list of previous releases. Finally add some contact info. In my case including my phone number resulted in a spontaneous call where we did an interview.

Here is an example showing the press kit for my latest release “With You”:

Press Kit for “With You” – right click -> view image to make it bigger

And one more thing: don’t shift the design around too much. The radio stations will want to open a press kit and just look at a certain point rather than searching for the info!

EPK

EPK stands for electronic press kit. If you have a classic press kit you won’t need an EPK but I usually to do both. Essentially the EPK is the same as a classic press kit, but it being online comes with a few advantages: You can embed your music and let it autoplay when opening the webpage. Your songs can directly be downloaded with a button. And you can make fancy galleries with your press photos!

Here is an example, again for “With You”:

Screenshot of my EPK for “With You”right click -> view image to make it bigger

Whether you want to offer the complete song as a download or not is up to you. If you are concerned about other people finding this page and downloading your music I have a suggestion for you: Either you use a file sharing service and just don’t offer it on your site. Or you do the more elegant way and use some PHP coding / WordPress plugin installing. I’m using Members to create a custom group for press, promoters, etc. Then I’ll set up a temporary login link for that user group. Finally, to hide the page from normal users, I’m using Visibility Logic for Elementor (and Elementor Page Builder obviously).

Press photos

There’s not much to talk about this one but be sure to have them somewhere ready to be viewed and downloaded!

The email

Now that you have all the parts prepared let’s talk about the email. The most important thing to remember is the KISS Principle (Keep It Short and Simple)! Describe your song in about one to two sentences and then add the link(s). Then thank them for listening and that’s it! As mentioned above, if your mp3 (including id3 tags like the artwork) is smaller than 10MB you can add it as an attachment.

Now about the links: If you have an EPK you should add the link to it here. The other link will be to your folder on Dropbox or other providers and this should contain the audio files, the cover, the press kit and if applicable a txt with the lyrics. I also like to include a shortcut to my EPK but this is probably not very useful as the link is already in the email.

And that’s it. If you have done everything correctly send you music about 1.5 to 2.5 weeks before the release date. And then you’ll have to play the waiting game – with a bit of luck you’ll have your music on FM4 (or any other radio station). Let me know in the comments if this was helpful to you and whether you plan to send something to a radio station or if you already had something played on air!

Smart links for music marketing

You have just released your new Single, are super proud of it and now want to share it with the whole world. So how do you do that? Posting 20 different links for Spotify & co isn’t really an option. Especially when Instagram only allows you to post one link in your Bio. Creating your own website which providers all the links wouldn’t be that much work. If you know some HTML and CSS you could have a basic layout very fast. And using libraries like W3.CSS or a CMS like WordPress gets you there even faster.

That would actually be a good way to go if you didn’t have to do the whole process of looking up your release on every major platform, copying the link and pasting it into your website. Now repeat this for every release. But of course there are stores like Pandora, which are not available in your country, which means you’d need to set up a VPN to get a link from there.

There is a better way to do this: smart links!

What are smart links?

Smart links are a tool that takes all the work described above away! They provide you with one link and show all the shops you’d want to list. And the best part: They collect the links automatically, so you just enter your info once!

Here’s the catch: The most popular services, have fees like linkfire‘s monthly $10. And with those 10$ you can’t add your own stores. Your distributor might offer a similar service. These are most of the time included in your plan. Below are two examples using my own songs.

The big problem with both, paid and free services, is the branding. At least the URL will always reveal that this is some third party product.

And now that you know what’s out there we can talk about my approach!

Smart links without branding: the Black Paper Songlink Plugin for WordPress

First let’s talk about the name: Black Paper was one of my labels at the time of creation and I actually initially developed this plugin solely for it’s website. Black Paper has since been replaced by fs7 Audio. Songlink was a free smart links service, which since got a rebranding. It works the same but is now called odesli (On Demand Smart Links).

Okay. So how does it work?

First of all: Here is the GitHub page where you can download the code as a zip. Right now this is very rough – but it works! So I currently do not have any plans to further develop this. The way it works is that it accesses the odesli API once and saves all links into a json file. You can then access this json from anywhere on your site with a shortcode and it displays all links. Here are two images showing the magic:

When Editing
How it’s Rendered

Let’s look at how to create such a json

When you have uploaded all the files and activated the plugin, create a new private page. It’s important that this is private because it just serves to create the json files and nothing more. You probably do not want your vistitors to see this. Add the BP Songlink Widget to your site and you can start filling your details in. The “Widget Title” field will be the name which is later called by the shortcode. And in the “spotifyuri” you can paste your songs link from any platform – not just Spotify!

This is how your Widget should look like when filled out!

The fileds “beatport”, “juno” and “traxsource” have to be filled manually as these links do not get collected by odesli. And in the “class” field you can add any CSS classes you have defined in your child theme’s stylesheet. This is where you can get creative and customize everything to perfectly fit into your website!

And now you are done! Head over to wherever you want your links to be displayed and just add a [songlink title=your-title] shortcode!

For more info on this visit the links below!